36" STORAGE CABINET THIS INSTRUCTION BOOKLET CONTAINS IMPORTANT SAFETY INFORMATION. PLEASE READ AND KEEP FOR FUTURE REFERENCE. WARNING - Unit can tip over causing severe injury or death. - Anchor unit to stud in wall (if instructed to). - Do Not allow children to climb on unit. - Put heavy items on lower shelves or drawers.
Helpful Hints PEOPLE NEEDED FOR ASSEMBLY: 1-2 ESTIMATED ASSEMBLY TIME: 1 HOUR - Open your item in the area you plan to keep it to avoid excessive heavy lifting. - Identify, sort and count the parts before attempting assembly. - Compression dowels are lightly tapped in with a hammer. - Slides are labeled with a R (right) and L (left) for proper placement. - Make sure to always face the point on the top of the Cam Lock towards the outer edge.
k Quic bly em Ass Tip Before You Start P P P P P Read through each step carefully and follow the proper order Separate and count all your parts and hardware Give yourself enough room for the assembly process Have the following tools: Flat Head Screwdriver, #2 Phillips Head Screwdriver and Hammer Caution: If using a power drill or power screwdriver for screwing, please be aware to slow down and stop when screw is tight. Failure to do so may result in stripping the screw.
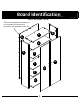
Board Identification Not actual size F D A B Bottom 37363015042 Adjustable Shelf (x3) 37363015060 E Left Panel 37360015012 Right Panel 37360015022 Shelf (x2) 37363015051 This piece is paperboard construction. it is not made from wood, but is required for the assembly of your unit.
Board Identification Not actual size This piece is paperboard construction. it is not made from wood, but is required for the assembly of your unit.
Part List 2 1 5 4 6 3 (x8) #A22620 cam lock (x8) #A22610 cam bolt (x4) #A13410 (x4) #A17400 1-3/4" flat head machine screw (x10) #A12420 (x5) #A12930 1-1/8" screw #8 x 5/8" screw 7 8 (x12) (x42) #A21110 #A80250 shelf support nail 9 (x4) #A89210 rubber bumper Not Actual Size 11 12b 10 (x2) #A52395 pull 12c 12a (x5) #A44140 (x1) #A84050 adjustable foot safety bracket kit 6 13 (x6) #A65615 hinge
STEP 1 13 2 (x6) #A65615 (x8) #A22610 Separate hinges by loosen the screw and removing the hinge plate from the hinge arm.
STEP 2 Quick 12c Assembly Tip 1 (x8) #A22620 12c 12a Proper orientation of CAM LOCK (x1) #A84050 1 Do not tighten this screw.
STEP 3 11 5 (x5) #A12930 (x5) #A44140 (x10) #A12420 6 11 Unscrew the two piece foot as shown. After top part of foot is attached to bottom shelf, screw on bottom part of foot. Be sure all four feet are level with each other.
STEP 4 (x4) #A13410 3 UNLOCK DESAPRETAR LOCK APRETAR E E A finished edge borde acabado bord fini B finished edge borde acabado bord fini E A E B 3 D 10 * raw edges are shaded
STEP 5 7 WARNING (x42) #A21110 Please make sure that the Backs are attached securely. All nails must be driven into the parts straight and tightened firmly. Failure to do so could cause instability, product collapse, and/or serious injury. AVERTISSEMENT S’il-vous-plaît assurez-vous que les PANNEAUX ARRIÈRES sont attachés solidement. Tous les clous doivent être enfoncés perpendiculairement et solidement dans les parties.
STEP 6 12b 12d (x1) #A84050 12d 12b hole agujero trou stud montante planche wallboard muro mur Option 1; Securely screw (12d) into solid area of the wall as shown. Option 2: Drill a 3/16" diameter hole (5mm) in the wallboard. Tap the wall anchor(12b) into the hole until it is flush. Fasten the wall bracket (12a) to the wall anchor (12b) with the screw (12d). Now tighten the screw (12c) that was left loose in step 2.
STEP 7 13 8 (x6) #A65615 (x12) #A80250 13 G x2 13 8 13 8 8 F 8 F F 13
STEP 8 10 4 (x4) #A17400 (x2) #A52395 10 G G B 4 A 4 14
STEP 9 To adjust the doors, remove the cover on the back of the hinge arm to expose the two adjusting screws. To adjust the doors up and down, loosen the hinge plate screws. Move the door the direction needed and retighten the screws on the hinge plates. To adjust the doors sideways, turn the large adjustment screw on the hinge arm clockwise or counter clockwise, depending on the sideway direction needed. The small adjustment screw needs to be loosend or tightened in conjunction with the larger screw.
Maximum Loads This unit has been designed to support the maximum loads shown. Exceeding these load limits could cause sagging, instability, product collapse, and/or serious injury. 9 9 0 lbs. 0 kg. 9 (x4) #A89210 40 lbs. 18.1 kg. 9 35 lbs. 15.8 kg. 50 lbs. 22.7 kg. Warning: Risk of injury to persons - do not place a television on this furniture. This furniture is not approved for use with a television. Certificate of Conformity 1. This certificate applies to the Dorel Home Furnishings, Inc.
Español Cubierta Delantera Este libro de instrucciones contiene información IMPORTANTE de seguridad. Por favor lea y manténgalo para referencia en el futuro. PRECAUCION Este mueble puede volcarse y causar graves heridas y/o muerte. Anclar el mueble a un poste de madera en la pared (si esto se requiere). No Permita que los niños monten el mueble. Mantenga los artículos más pesados en los cajones de abajo.
Español Página 8 No apriete este tornillo. Página 9 Desatornille el pie de dos piezas como se muestra. Despuéw de que la parte superior del pie se una al estante inferior, atornille en la parte inferior del pie. Esté weguro que los cuatro son nivelados el uno con el otro. Página 11 IMPORTANT: El Panel trasero es una parte estructural de la unidad y debe ser instalado correctamente. Alinie el borde del panel trasero con el borde inferior del estante inferior.
Français Couverture Avant CE LIVRET D'INSTRUCTION CONTIENT DES INFORMATIONS IMPORTANTES SUR LA SÉCURITÉ. VEUILLEZ LIRE ET GARDER POUR UNE RÉFÉRENCE FUTURE ATTENTION Le meuble peut basculer et causer des blessures graves ou la mort. Ancrer le meuble à une planche murale dans le mur (si indiqué). Ne laissez pas les enfants grimper sur le meuble. Placez les articles lourds sur les étagères ou dans les tiroirs inférieurs.
Français -Utiliser tous les clous fournis pour le panneau arrière et les répartir également -Le panneau arrière doit être utilisé pour vous assurer que votre appareil est robuste -N'utilisez pas de produits chimiques agressifs ou de nettoyants abrasifs sur cet appareil -Ne jamais pousser, tirer, ou faire glisser votre meuble Avant de Commencer (page 3) -Lisez attentivement chaque étape et suivez le bon ordre -Séparez et comptez toutes vos pièces et matériaux -Donnez-vous suffisamment de place pour l'assembl
Français Page 15 Pour ajuster les portes, retirez le couvercle au dos du bras de la charnière pour exposer les deux vis de réglage. Pour ajuster les portes vers le haut ou le bas, desserrez les vis de la plaque de charnière. Déplacez la porte dans la direction que vous désirez et resserrez les vis sur les plaques de charnière.