
User's Manual


5
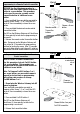
Choose Button 3 on your
Car2U® transmitter
Car2U® is
a registered
trademark of
Lear Corp.
Choose a
Scene button
LED’s
REPLACE Use the following procedure to
teach a hand held remote control transmitter
button to a scene button. This procedure
is also used to reassign a remote control
transmitter button to a different scene
button.
1. Press and Hold the scene button you wish to
program, either Scene 1, 2 or 3, until the LED
turns off, then immediately release the scene
button.
2. Press and hold the desired remote control
transmitter button.
The LED on the Wireless Gateway will flash three
(3) times quickly to indicate the programming is
successful.
3. Release the remote control transmitter button.
Note: During set-up the Wireless Gateway will
stay active for 10 seconds after programming
to allow for testing the scene. After 10 seconds
you must either plug the unit into an AC outlet or
push one of the three scene buttons to reactivate
DELETE Car2U® In-vehicle tranmsitters:
Use this procedure to teach Car2U® button
3 to a scene button. This procedure can
also be used to reassign Car2U® buttons to
a different scene button.
Note: To Program Car2U® buttons 1 or 2
to a scene button, see your vehicle owner’s
manual for instructions on programming
with rolling code receivers to change
Car2U® buttons 1 or 2.
1. Do not plug the Wireless Gateway into AC
power to program.
Press and Hold scene button you wish to
program, either Scene 1, 2 or 3, until the LED
turns off, then immediately release the scene
button.
2. Press and hold Car2U® button 3.
The LED on the Wireless Gateway will
flash three (3) times quickly to indicate the
programming is successful.
3. Release the transmitter button.
Programming to a Remote Control transmitter
Programming to In-Vehicle Mounted Remote
Control transmitters
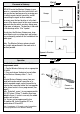
Choose a Scene
button
LED’s
Set-Up
Remote control
Transmitter
buttons
Quick
Sta rt
Quick
Sta rt