
User's Manual


6
The Homelink logo and trademark are
the property of Johnson Controls, Inc.
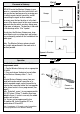
Choose a Homelink
transmitter button
Choose a
Scene button
LED’s
DELETE Homelink® in-vehicle transmitters:
Use this procedure to teach a Homelink®
button to a scene button. This procedure can
also be used to reassign a Homelink® button
to a different scene button.
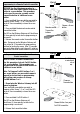
1. Place the Wireless Gateway within 3 inches
of the Homelink® transceiver. The Wireless
Gateway must NOT be plugged into an AC
outlet for this operation.
2. Press and hold the desired Homelink®
button. The Homelink® LED will either flash
slowly or light on solid.
3. On the Wireless Gateway, press and hold
the Scene 1 button. The LED on the Wireless
Gateway will turn on immediately, then turn off ,
then turn on again. This is normal. Keep holding
both buttons simultaneously.
4. Keep holding both buttons until the
Homelink® transceiver LED flashes rapidly or
turns off completely. (This process may take up
to 60 seconds.)
5. Release the Wireless Gateway Scene button
and the Homelink® transceiver button.
6. On the Wireless Gateway, press and hold the
Scene button you wish to program; either Scene
1, 2 or 3 until the LED turns off, then immediately
release the Scene button.
7. Press and hold the desired programmed
Homelink® button from Step 2.
The LED on the wireless Gateway will
flash three(3) times quickly to indicate the
programming is successful.
Programming to In-Vehicle Mounted Remote
Controls (continued)
Set-Up
Quick
Sta rt