
Installation Guide


19
Please Do Not Return This Product To The Store. Call Us Directly! Our Trained Technicians Will Answer Your Questions and/or Ship Any Parts You May Need.
You can reach us Toll Free at 1-888-827-3667 for Consumer Assistance or online at www.wayne-dalton.com
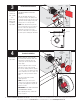
C
a
b
le
D
rum
N
o
s
pa
c
e b
e
tw
e
en
Ra
tc
he
t
P
a
w
l a
n
d C
a
b
le
D
ru
m
in
d
ica
te
s
en
ga
g
em
en
t
C
a
b
le
D
ru
m
R
a
tc
he
t P
a
w
l
E
N
G
A
G
E
D
S
ID
E
V
IE
W
N
o
s
p
a
ce
be
tw
e
e
n
R
a
tc
h
et P
a
w
l
a
n
d
C
ab
le
D
ru
m
E
N
G
A
G
E
D
U
N
D
E
R
N
E
A
T
H
VIE
W
S
p
a
ce
b
e
tw
e
e
n
R
atc
he
t P
aw
l
a
n
d
C
a
b
le
D
ru
m
n
on-indic
a
te
s
C
a
b
l
e
D
ru
m
R
a
tc
h
e
t
P
a
w
l
D
IS
E
N
G
A
G
E
D
SID
E
V
IE
W
N
o
sp
a
c
e
b
e
tw
e
e
n
R
a
tc
h
e
t P
aw
l
an
d
D
IS
E
N
G
A
G
E
D
U
N
D
ERN
E
A
T
H
VIE
W
U
P
P
E
R
P
O
S
IT
I
O
N
Use t
hese Illustration, in conjunc
tion with the Instr
uction
s on the other side
thi
s label.
WARNING
WARN
ING
R
ac
h
et B
r
acke
t is un
d
e
r
Ra
c
he
t B
r
ack
e
t
i
s un
d
e
r
E
X
T
R
E
M
E
S
P
R
IN
G
E
X
T
R
E
ME
S
P
R
IN
G
TE
N
S
IO
N
TE
NS
IO
N
.
T
o
avoi
d pos
si
b
le s
ev
e
re
or
To
avo
i
d p
o
ss
i
b
l
e se
ve
r
e
o
r
fa
tal
inju
ry
,
fa
ta
l
inju
r
y,
D
O
N
O
T
DO
N
O
T
rem
ove
re
mo
ve
fa
sten
e
rs fr
om
ratc
het bra
c
ket
fa
sten
ers fr
om ratch
e
t bra
cke
t
u
ntil sp
ri
n
g(s
) are fu
l
ly
un
til
sp
r
i
n
g(s
) a
re
ful
l
y
w
n
w
o
u
nd.
wn
wo
u
nd.
T
o
sa
fel
y u
nw
in
d
spring
(s)
To
sa
f
ely
unwi
nd
spri
n
g(s)
read
rea
d
an
d fo
l
low th
e directio
ns i
n the
an
d
fol
l
ow t
h
e d
i
r
ectio
n
s i
n
t
h
e
inst
alla
ti
o
n in
s
tru
ction
s/o
w
n
e
rs
i
n
sta
ll
atio
n
in
str
u
ction
s/o
wner
s
m
a
nu
a
l.
man
ua
l
.
D
O
N
O
T RE
M
O
V
E
T
H
IS
TAG
.
D
O
NO
T R
E
MO
V
E
T
HIS
TAG
.
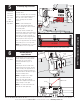
NOTE: If you have a Torquemaster
®
counterbalance, skip this step and continue
with Step 13 on page 21.
NOTE: It is recommended that leather
gloves be worn while winding the
TorqueMaster
®
Plus springs.
FAILURE TO WEAR GLOVES MAY CAUSE
INJURY TO HANDS.
See chart on page 20 for proper spring
tension setting.
Double check to ensure the counterbalance
cable is aligned in the first groove of the
cable drum, as shown in Step 11.
IMPORTANT! PAWL KNOB MUST BE IN
UPPER POSITION TO ADD/ REMOVE SPRING
TURNS. AFTER ADDING / REMOVING SPRING
TURNS, PAWL KNOB MUST BE PLACED
BACK IN LOWER POSITION.
Beginning with the right side, place a mark
on winding shaft (or socket) and end bracket.
Turn pawl knob on the end bracket to the
upper position. Using a ratchet with a 5/8”
socket,wind the spring by rotating the
winding shaft counter clockwise, while
watching the mark on the winding shaft.
NOTE: A 3” extension is also recommended
for added clearance from the horizontal
angle.
After 2-3 turns, remove the ratchet and
adjust the cable on the left side. Ensure the
cable is in the first groove of the cable
drums as shown in Step 11 and clear of any
obstructions.
NOTE: Single spring applications require no
spring winding on left hand side, but need
cable tension adjusted.
IMPORTANT! ENSURE COUNTERBALANCE
CABLE TENSION IS EQUAL FOR BOTH SIDES
PRIOR TO FULLY WINDING SPRING(S) TO
APPROPRIATE NUMBER OF TURNS. IF
CABLE TENSION IS UNEQUAL, REFER TO
STEP 11.
See the Spring Turn chart.
For SINGLE SPRING applications, return to
the right hand side and continue winding the
spring to the required number of turns for
your door or the number record during the
Pre-Installation Inspection on page II. Place
pawl knob in lower position.
For DOUBLE SPRING applications, place a
mark on the left hand winding shaft and end
bracket. Place the ratchet with 5/8” socket
onto the left hand winding shaft end.
Winding Spring(s)
Tools Needed:
5/8” Socket
Ratchet Wrench
3” Extension
Step Ladder
WARNING
Mark
Pawl Knob In Upper Position
Ratchet
3” Extension
Pawl Knob
End Bracket
13
TorqueMaster
®
Plus
PAWL KNOB
IN UPPER POSITION
Pawl
Pawl
IDRIVE
®
FOR TORQUEMASTER
®
INSTALLATION