Certification Test Report 908.42 MHz Low Power Communication Device Transceiver 372 MHz Discrete Receiver FCC ID: KJ8-0001715 IC: 3540A-0001715 FCC Rule Part: 15.249 IC Radio Standards Specification: RSS-210 ACS Report Number: 07-0186 - 15C Manufacturer: Wayne-Dalton Corporation Model: 3790-Z Installation Guide Section2 5015 B.U.
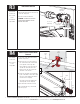
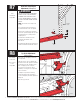
R3 Tools Needed: Power Drill 7/16” Socket Driver 1/2” Wrench Step Ladder End Bracket Removal End Bracket (Right Hand) To remove end brackets, start with the right hand end bracket and remove the lower lag screw and carriage bolt. Repeat for left hand end bracket. CAUTION: THE WINDING SHAFT MAY ROTATE WHEN REMOVING THE END BRACKET AND GEAR. 5/16” X 1-5/8” Hex Head Lag 5/16” - 18 X 3/4” Carriage Bolt Use this these lab Illustr el.
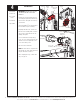
Retro-Fit TorqueMaster® Tools Needed: 7/16" Wrench Power Drill 7/16" Socket Driver Step Ladder Drum Wrap Counterbalance spring tension must be relieved before removing any hardware. Cable Drum WARNING A POWERFUL SPRING RELEASING ITS ENERGY SUDDENLY CAN CAUSE SEVERE, EVEN FATAL INJURY. NOTE: Warning tag removed for illustration clarity.
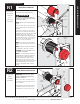
R3 Tools Needed: Locking Pliers End Bracket Removal To remove the end brackets, follow the steps below starting with the right hand end bracket first: Phillips Head Screwdriver a. Remove the upper lag screw from the Flat Tip Screwdriver b. Attach a pair of locking pliers to the Power Drill 7/16” Socket Driver Step Ladder Locking Pliers End Bracket end bracket. upper portion of the end bracket and hold the end bracket steady while removing the lower lag screw.
Tools Needed: If installing an idrive® opener on an installed 9100 door, the top bracket and roller location will have to be adjusted for the opener to work properly. Power Drill 7/16" Socket Driver Step Ladder Loosen the (2) 1/4”-20 nuts from the top bracket slide. Remove the (4) 1/4”-14 x 5/8" self-tapping screws from the top bracket. Raise the top bracket to align the bottom slots with the second set of holes in the end cap.
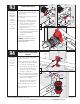
R7 Tools Needed: Level 1/2” Wrench Step Ladder 8000/8100/8200 Track Horizontal Track Height Adjustment (If Required) WARNING FAILURE TO RE-ATTACH HORIZONTAL TRACKS TO THE SUPPORT BEFORE OPENING DOOR CAN CAUSE DOOR TO FALL FROM OVERHEAD POSITION, POSSIBLY CAUSING SEVERE OR FATAL INJURY. NOTE: Door must be in the fully closed Perforated Angles position. If the vertical track was raised then the horizontal track will need to be adjusted.
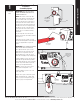
Tools Needed: IMPORTANT! RIGHT AND LEFT HAND IS None ALWAYS DETERMINED FROM INSIDE THE GARAGE LOOKING OUT. RETRO-FIT INSTALLATIONS 1 Idrive® for Torquemaster® Installation Assembling Opener NOTE: Older versions of the torque tube have a label applied on the right side that the opener will not slide over. Check the location of the label on the torque tube.
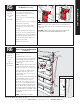
TorqueMaster® Plus Installation 2 Tools Needed: None Drum Wraps Right Hand Drum Wrap NOTE: If you have a Torquemaster® counterbalance, skip this step and continue with Step 2 on page 11. If you have a Torquemaster® Plus counterbalance system, complete Steps 2-4 on pages 8, 9 and 10. Left Hand Drum Wrap IMPORTANT! RIGHT AND LEFT HAND IS ALWAYS DETERMINED FROM INSIDE THE GARAGE LOOKING OUT. Drum wraps are identified as right and left hand.
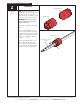
23 Cable Drums Tools Needed: IMPORTANT! RIGHT AND LEFT HAND IS Tape Measure ALWAYS DETERMINED FROM INSIDE THE GARAGE LOOKING OUT. Step Ladder TorqueMaster® Spring Tube Assembly Winding Shaft Shake the TorqueMaster® spring tube assembly gently to extend the winding shafts out about 5" on each side. For single spring applications, there will be no left hand spring in the TorqueMaster® spring tube assembly. Lift the TorqueMaster® spring tube assembly and rest it on the top of the flagangles.
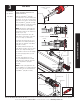
43 Tools Needed: Power Drill 7/16” Socket Driver 1/2” Wrench End Brackets Splines Winding Shaft Right End Bracket Disconnect Cable Guide Hole IMPORTANT! WARNING TAGS MUST BE SECURELY ATTACHED TO BOTH END BRACKETS. End brackets are right and left hand. You can identify the right hand end bracket by the disconnect cable guide hole in the top of the bracket. Step Ladder Warning Tag Use this these lab Illustr el. Use this these labe Illus trat l.