DF 710 / DF 1040 Digitális képkeret Használati utasítás
Bevezetés Köszönjük, hogy cégünk termékét választotta! Kérjük, használatba vétel előtt olvassa el figyelmesen ezt a használati utasítást, hogy a készüléket könnyen és egyszerűen tudja használni. A jobb szolgáltatás elérése érdekében a használati utasítás tartalma megváltozhat. A készülék funkciói és tulajdonságai előzetes figyelmeztetés nélkül megváltozhatnak. Amennyiben eltérést információkért.
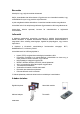
Üzembehelyezés Csomagolja ki a terméket, távolítsa el a védőfóliákat. Állítsa be a támaszt! Csatlakoztassa a hálózati adaptert! Helyezze be a memóriakártyát. Kapcsolja be a képkeretet az ON/OFF kapcsoló ON állásba állításával. Csatlakoztatás a számítógéphez A képkeret USB csatlakozáson keresztül számítógéphez csatlakoztató. A számítógépes kapcsolat létrejötte után az adatok egyszerű másolással átvihetőek a belső memóriába, vagy a memóriakártyára. Megjegyzés: használható.
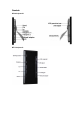
Gombok DF1040 típusnál: DF-710 típusnál:
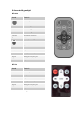
A távvezérlő gombjai DF-1040 Gomb Funkció Be / kikapcsolás Photo Fotók megjelenítése Music Zenék megjelenítése Video Videok megjelenítése Combo Diavetítés indítása Time Idő/ naptár megjelenítése Némítás Menu Főmenü Enter Kijelölt elem kiválasztása VOL +/- Hangerőszabályzás Nyilak Mozgás a képernyőn II Lejátszás / szünet DF-710 Gomb Funkció POWER Be / kikapcsolás EXIT / Kilépés / leállítás Enter Kijelölt elem kiválasztása VOL Hangerőszabályzás Nyilak Mozgás a képernyőn I
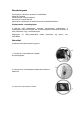
Memóriakártya behelyezése A képkeret az alábbi memóriakártyákkal kompatibilis: Secure DigitalTM Card (SD) MultiMediaTM Card (MMC) Memory StickTM Úgy helyezze be a memóriakártyát, hogy a címke nem ön felé néz. Ne erőltesse a memóriakártyát a helyére. Ha nem tudja könnyen a helyére helyezni a kártyát, akkor valószínűleg nem megfelelő módon próbálta behelyezni azt. Megjegyzés: A képkeret csak JPEG formátumot ismer. Más formátumú képeket a képkeret nem fog megjeleníteni.
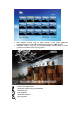
Funkció Beállítás Naptár SD/MMC/MS/ USB Ismertető A rendszer beállítása Naptár, óra, ébresztő megjelenítése Lejátszás SD/MMC/MS/ memóriakártyáról Lejátszás USB-meghajtóról Megjegyzés: A fenti funkcióknak megfelelő ikonok automatikusan megjelennek a kijelzőn, amikor a megfelelő memóriakártya be van helyezve. A kártya kitétele után az ikonok eltűnnek. Képnézés Győződjön meg róla, hogy legalább egy kép van a memóriakártyán, vagy az USBmeghajtón.
Más esetben nyomja meg az Enter gombot a kép teljes képernyős megjelenítéséhez. A diavetítés indításához nyomja meg a II gombot.
Videólejátszás A képkeret az alábbi video formátumokat támogatja: Motion JPEG (.avi): a legtöbb digitális fényképezőgép által használt formátum MPEG-I MPEG-2 MPEG 4 Győződjön meg róla, hogy legalább egy video van a memóriakártyán, illetve az USBmeghajtón. Ez után: Válassza ki a megfelelő memóriát a menüből A menüben válassza a MOVIE menüpontot és nyomja meg az Enter gombot A kijelző bal oldalán a listában megjelenik az összes video.
Video lejátszása közben az ENTER gomb megnyomásakor az alábbi menü jelenik meg a kijelzőn: Előző video lejátszása Keresés hátra Lejátszás vagy szünet Keresés előre Következő video Leállítás Nagyítás
MP3 hallgatása Győződjön meg róla, hogy legalább egy MP3 fájl van a memóriakártyán, illetve az USB-meghajtón. Ez után: Válassza ki a megfelelő memóriát a menüből A menüben válassza a MUSIC menüpontot és nyomja meg az Enter gombot A kijelző bal oldalán a listában megjelenik az összes zene. A jobboldalon a frekvencia oszlop a folyamatjelző és információ látható a zenéről. A Fel/Le gombokkal válassza ki a zenét, a lejátszáshoz nyomja meg az Enter gombot.
Fájl kezelés Diavetítés háttérzenével Győződjön meg róla, hogy legalább egy kép és egy MP3 zene van a memóriakártyán, illetve az USB-meghajtón. Ez után: Válassza ki a megfelelő memóriát a menüből A menüben válassza a FILE menüpontot és nyomja meg az Enter gombot A kijelző bal oldalán megjelenik a fájlok listája. A jobb oldalon információ látható a fájlokról. A fel/le gombokkal válassza ki a fájlt, majd nyomja meg az ENTER gombot. Nyomja meg a COMBO gombot a távvezérlőn a zene elindításához*.
A fel/le gombokkal válassza ki a célmappát, majd nyomja meg a jobbra gombot az elfogadáshoz. A másolás elindításához nyomja meg az Enter gombot. Törlés Járjon el a másolás funkciónál leírtak szerint. A Másolás és törlés menüből válassza a DELETE menüpontot. A törlés végrehajtásához nyomja meg az Enter gombot.
Beállítások A főmenüben válassza a Beállítás menüpontot.
Hibaelhárítás Jelenség Ok Elhárítási lehetőség Nem kapcsol be. A hálózati adapter nem megfelelően csatlakozik. Ellenőrizze az adapter csatlakozását. Nem lehet behelyezni memóriakártyát A memóriakártya rossz helyre, vagy rossz irányban próbálja helyezni. Ellenőrizze a kártya behelyezését. A rendszer nem működik megfelelően Indítsa újra a képkeretet. A memóriakártya nem megfelelően lett behelyezve. Helyezze be megfelelően a memóriakártyát. A hangerő valószínűleg a legkisebb fokozatra van állítva.
Specifikáció Típus Méret Felbontás Feszültség Áramerősség Működési hőmérséklet Válaszidő Képernyő formátum Fájlformátum Képméret Hálózat Memóriakártya USB port Doboz tartalma WayteQ DF1040 / DF710 10.4” / 7” 800x600 12 V 6 Watt -20 és +65 C 25ms 4:3 JPEG, MPEG1, MPEG2, MP3, MPEG4 max. 12 megapixel AC110—240V (50HZ—60HZ) SD/MMC/MS/USB USB-meghajtóhoz, USB aljzat Digitális képkeret Hálózati adapter Használati utasítás Távvezérlő USB kábel Figyelmeztetések A képkeret csak beltéri használatra lett tervezve.
DF 710 / DF 1040 DIGITAL PICTURE FRAME USER’S MANUAL
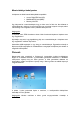
Introduction Congratulations on your purchase of WayteQ Digital Picture Frame. Before operating the unit, please read this manual thoroughly, and retain it for future reference. This Digital Picture Frame lets you view digital pictures directly from your camera's memory cards. You will be able to create a slideshow using multiple transition effects or display one picture at a time. No computer, digital camera or Internet connection is required.
Installing your unit Open the package and remove the protective foam sleeve from the unit. Install the Digital Picture Frame stand as the back of the unit. Plug in the AC adapter into power outlet. Plug the other end into the unit. Insert the media into the correct slot. Turn power to ON position via the ON/OFF switch.
Controls DF-1040 DF-710
Using your Remote Control DF-1040 Button Description Power Turn on/off Photo Access your photo files Music Access your music files Video Access your videos files Combo Start the slideshow Time Display the time/ Calendar Mute Mutes volume Menu Displays the main menu Enter Select highlighted item VOL +/- Adjusts volume Arrows Navigate on screen /II Play/ pause DF-710 Button Description POWER Turn on/off EXIT / Exit from menu / Stop Enter Select highlighted item VOL Adjust
Inserting Memory Cards The Digital Picture Frame is compatible with the following memory cards: Secure DigitalTM Card (SD) MultiMediaTM Card (MMC) Memory StickTM Insert the memory card with the front label facing AWAY from you. Do not force the memory card into the memory slot. If you are not able to easily insert the memory card completely, you may have inserted it the wrong way. Note: The Digital Picture Frame will ONLY recognize digital pictures stored in JPEG format.
Use the left and right arrows to move inside the menu and then press “Enter” to continue Note: In all menus, pressing the “Menu” button will bring you back to the main menu Function Setup Calendar SD/MMC/MS/ USB Description Set system menu Display calendar, clock, alarm Play files on SD/MMC/MS/ memory card Play files on USB flash drive NOTE: Icons of above functions shall appear automatically on MENU screen when certain memory card is inserted.
Otherwise press Enter to enter the full screen photo (pause mode) and press Play to enter into slideshow mode. Once a slideshow is playing or a picture is being shown, press the OSD button. The following menu will appear: Play previous picture in the picture list Play or pause the current slideshow. Play next picture in the picture list Use the rotate function to change the picture orientation to either portrait or landscape Stop slideshow and return to photo thumbnail.
Watching video The Digital Picture Frame supports the following video formats: Motion JPEG (.avi): video format used by most digital cameras MPEG-I MPEG-2 MPEG 4 Make sure you have at least one video on your memory card or your USB flash drive. When this is done: Select the desired flash media on main menu. (SD/MS/USB/NAND-Internal Memory) Select the “MOVIE” option from the menu and press “ENTER” A list of all movie files will be listed on the left side of the screen.
Once a movie is playing, press the ENTER button on the remote control. The following menu will appear: Play previous movie in the play list Play backward the movie by 2/3/4 times speed. Play or Pause the movie. Play forward the movie by 2/3/4 times speed.
Listening to MP3 music Make sure you have at least one MP3 file on your memory card or your USB flash drive. When this is done: Select the desired flash media on main menu. (SD/MS/USB/NAND-Internal Memory) Select the “MUSIC” option from the menu and press “ENTER” A list of music files will be listed on the left side of the screen. The right side consists of the frequency chart and information status bar. The song information area is below the status bar.
Press Play/Pause button on remote control to play or pause the music file. Press Stop button on the remote control to return to the list of music files. File Management Playing a slideshow with music Ensure you have at least one picture on your memory card or your USB flash drive. Additionally, you must have one MP3 file saved on the selected memory card/USB/Internal Memory. When this is done: Select the desired flash media on main menu.
Copying and Deleting Files To copy and delete files on your memory card, USB drive or internal memor Copy Select the desired flash media on main menu. (SD/MS/USB/NAND-Internal Memory) Select the “FILE” option from the menu and press “ENTER”. A list of available files will be displayed. Use the up and down arrows to highlight your required file and press the right arrow to highlight the desired file. Repeat for all files that you want to copy. Press the “Enter” button to display the Copy and Delete menu.
Delete Make steps as above at Copy. From Copy and Delete menu select Delete function and press Enter. File will be deleted.
Troubleshooting Symptom Cause Corrective Actions Please be sure that the Digital Picture Frame The Power connector to the unit AC adaptor is properly doesn’t power on. is not securely inserted. connected to the frame. Unable to memory card insert Memory card inserted in the Insert the correct card in incorrect slot or in the incorrect the correct slot and direction. direction. Power is on but the Start-Up screen is not System does not work normally displayed. Restart the Digital Picture Frame.
Specifications Type Size Resolution Alimentation Consumption Working Temperature Response Time Display Mode File Format Photo Size Current Cards USB ports Package Contents DF 710/DF 1040 Digital Picture Frame 7/10.