
User's Manual


CONFIGURING SETTINGS
91
MY CLOUD USER MANUAL
WebDAV Access: To enable WebDAV Access for the ISO Share, click the toggle
button to ON.
Note: If FTP Access or WebDAV access are disabled for the device, the FTP
Access and WebDAV Access fields will be grayed out.
6. Click Next.
7. Click the toggle button to ON to enable NFS Access for the ISO Share.
Note: If NFS Access is disabled for the device, the NFS Access fields will be
grayed out.
8. Enter the host IP address.
9. Click Apply.
10. Click Save. The new ISO share is displayed in the ISO Share List.
Viewing the Details of an ISO Share
Use the following steps to modify an ISO share.
1. In the ISO Share area, click the Details icon next to the ISO share you want to view.
2. Review the ISO share details, then click Close.
Modifying an ISO Share
Use the following steps to modify an ISO share.
1. On the ISO Mount screen, click the Modify icon next to the ISO share that you’d like to
modify.
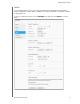
2. The Edit ISO Share dialog box appears. Click Next.
3. Complete the following fields:
Media Serving: To enable Media Serving for the ISO Share, click the toggle
button.
FTP Access: To enable FTP Access for the ISO Share, click the toggle button.
WebDAV Access: To enable WebDAV Access for the ISO Share, click the toggle
button.
Note: If FTP Access or WebDAV access are disabled for the device, the FTP
Access and WebDAV Access fields will be grayed out.
Public: To enable public access to the share.
4. Click Next.
5. Click the toggle button to enable NFS Access for the ISO Share.
Note: If NFS Access is disabled for the device, the NFS Access fields will be
grayed out.
6. Enter the Host IP address.
7. Click Apply.
8. Click Save. The modified ISO share is displayed in the ISO Share List.
Deleting an ISO Share
Use the following steps to delete an ISO share.