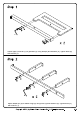
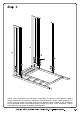
Attach upper cross bar (6) to guardrail (5) using bolts(B) and washers (E).Tighten bolts (B) with wrench (J). Attach ladder rail (8) to ladder rungs (9) using bolts (D) and washers (E).Tighten bolts (D) with wrench (J).
Attach ladder rail (8) to upper cross bars (6) using bolt (C) and washer (E).Tighten bolt (C) with wrench (J). Attach ladder rail (8) to lower cross bar (7) using bolt (D) and washer (E).Tighten bolt (D) with wrench (J).
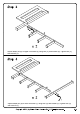
Attach guardrail (5) to post (3) using bolts (A) and washers (E).Attach crossbars (6,7) to post (3) using bolts (C) and washers (E). Attach ladder rungs (9) and crossbars (6,7) to post (1) using bolts (C) and washers (E).Tighten all bolts with wrench (J). Attach guardrail (5) to post (4) using bolts (A) and washers (E).Attach crossbars (6,7) to post (4) using bolts (C) and washers (E). Attach ladder rungs (9) and crossbars (6,7) to post (2) using bolts (C) and washers (E).Tighten all bolts with wrench (J).
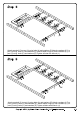
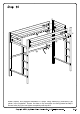
Attach front upper guardrail (11) to the upper cross bar (12) using bolts (B) and washer (E) as shown in the illustration. Be sure to tighten firmly using wrench (J). Attach back upper guardrail (11) to the upper cross bar (14) using bolts (B) and washer (E) and, where applicable, angle brackets (H).* Tighten bolts (B) with wrench (J).
Attach lower cross bars (10) and upper cross bars (12,14) to the end supports in Step 5 using washers (E) and bolts (C) as shown in the illustration. Attach upper guardrail (11) to the supports posts (1,3) using bolts (A) and washers (E) as shown in the illustration. Ensure the slots on the cross bats are facing inward as shown in the illustration. Secure bolts (A)(C) but not tighten completely until step #13.
Attach another end supports assembled in Step 6 using washers (E) and bolts (C) as shown in the illustration. Ensure the slots on the cross bats are facing inward as step 9. Secure bolts (A)(C) but not tighten completely until step #13.
Insert mattress support bars (13) into the provided slots of crossbars (12,14). Secure mattress support bars (13) by snapping plastic tab locks (F) into the provided slots of crossbars (12,14). Note that it may be necessary to apply more pressure to some plastic tab locks than others.
Snap plastic links (G) onto the middle of mattress support bars (13).
*OPTIONAL: Angle brackets (H) can be used to attach the bed to a wall for additional support. You must use hardware suitable for the particular wall type, which is not included as there are many different wall types. You must also mount the bed to the structure of the wall (i. e. wood studs, metal studs or cement/brick) directly. DO NOT attach the bed to the surface of the wall without anchoring into the structural framework of the wall.
Screw bolts (C) into the bunk bed assembly.This will fill the holes that are used only with he optional accessory attachments, which are sold separately.