
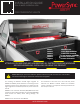
Installation Guide

24-00134 Rev A 6/21
3
WEATHERGUARD.COM
Installation of PowerSync Light Bezel
TOOLS NEEDED
- 3/8" wrench
- 1/4" wrench
Once connected, slowly open and close the lid and check for
any interference.
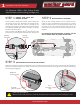
REMOVE THREE LID BOLTS
The PowerSync Light Bezel will be attached using the
hardware that is securing the lid to the body. Line up the
PowerSync Light Bezel to the center of the truck box as
shown. There will be 2 nuts interfering with 2 of the slots
provided in the Light Bezel. Remove the interfering nuts,
place the Light Bezel over the remaining bolts, replace the
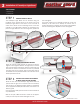
With the lid open, LEDs should be lit. Close the lid approxi-
mately ¾ of the way and confirm LED lights turn off.
CONNECT NEW TRUCK BOX HARNESS
TO TRUCK FUSE BOX AND GROUND
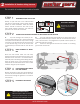
Place the magnet bracket against the bottom lid channel,
aligned to the magnetic switch on the light bezel, on the left
side as shown below making sure that the bracket tabs stay
flush with the bottom of the channel. If there are predrilled
mounting holes in the channel, align the mounting holes in
the bracket with the pre-drilled holes in the channel. Use the
screws provided to secure.
STEP 1
STEP 2
nuts and tighten.
If you have a light kit for a 164/165 Lo-side box, center the
assembly in the truck box to identify the correct nuts to
remove. Remove the interfering nuts and place the Light Bezel
over the remaining bolts. Replace the nuts and tighten.
CONNECT THE MAGNET BRACKET
STEP 3
Route the wire from the PowerSync Light Bezel down the
partition with the gas strut on the left side of the truckbox,
and connect to the PowerSync Power Cable. For installation
of the appropriate PowerSync Power Cable, see section A or
B of this guide.