
Installation Guide


We’re happy to help. Call 1-855-224-9761
.
12
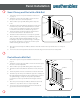
Picket
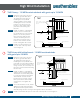
1. Follow the layout and post installation instructions on page 3.
2. Install the 1st post (post A) with concrete around the post. Be
sure to level and plumb.
3. Have another post (post B) sitting in the adjacent hole.
4. Slide the bottom rail (with the aluminum insert) and then the
top rail into the first post (post A). The top rail will have routed
holes on the top and bottom of the rail. The larger routed
holes should face towards the ground.
5. Next, slide the bottom rail and then the top rail into the second
post (post B)
6. Pour concrete around post B to about 3 inches below ground
level and level and plumb.
7. After all rails are installed, insert the pickets with the notched
side down through the routed holes in the top rail and into the
bottom rail.
8. Finally, place a picket cap on top of each picket using a thin
bead of glue on the inside of the picket to secure the cap.
Pickets are
inserted through
top rail and lock
into the bottom
rail
Routed bottom rail
Hole for the rail
in the post
Aluminum
Secure the picket
cap to the picket
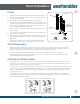
Spade Picket Cap Dogear Picket Cap
Post A
Panel Installation
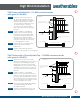
SHORTENING PANELS
• When shortening a picket fence, semi-privacy, pool or privacy fence with a picket accent, be sure the
placement of the cuts allows the panel to maintain the proper picket spacing. Depending on the fence
style, you may not necessarily cut the same distance off each side of the rail.
• The T&G and Panel Privacy pickets may be cut to reduce the width of the panel if needed.
• If eliminating pickets from a "scalloped" panel, be sure to create the scalloped or sloped look of the
original panel when inserting the pickets.
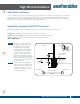
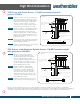
SECURING SHORTENED PANELS
• To replace the notches in a top rail, insert a stainless steel screw through the top of the rail so that the
head of the screw rests close to the inside wall of the post. This should be done after installing the fence
panel, but before securing the post cap. See Figure 1.
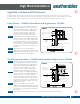
• To replace the notches in a bottom rail, insert a screw into the front face of the rail about 1" from the end
of the rail. See Figure 2. While inserting the rail into the post, use applied pressure from your thumbs to
deflect or "bow in" the face of the rail enough so that the head of the screw passes through the routed
opening of the post.
• To replace notches in the mid-rail, insert the screw through the top of the mid-rail, if it is accessible
through the top of the post. If the mid-rail is not accessible through the top of the post, use the method
described for the bottom rail above.
Figure 1
Top Rail
Figure 2
Insert screw here
Top View
Insert screw here
Side View