3-Rail Fence Gate Installation Guide
Gate Assembly 1 Measuring Tape 1. Locate, lay out and dry-assemble all parts of the gate including posts and rails. Do not use glue. 2. For a single gate, cut the rails to a length 2 1/2” shorter than the gate opening size (gate opening size is the distance between the gate posts). For example, if your gate opening size is 96”, cut each of the rails to 93.5”. 3. For a double gate, the gate will need to be 4” shorter than the gate opening size. You will need to cut 2” off of each gate for a total of 4”.
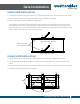
Gate Assembly Measuring Tape 3 Measuring Tape 1. Repeat the previous steps for the other post. This may take some assistance to do before the adhesive sets. 2. Measure the top and bottom of gate to ensure both lengths are the same. 4 SELF-TAPPING SCREWS (6/BRACE) BRACING (best configuration) 1. Lay the cross-brace on the gate and mark the length to cut. 2. Pre-drill holes into the cross-brace only. DO NOT pre-drill into the vinyl rail. Tip : The hinge side of gate is where cross-brace is at bottom.
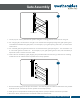
Gate Installation SINGLE GATE INSTALLATION 1. Determine the direction the gate is to swing, usually swings away from yard. Check your local codes! 2. Install aluminum insert on the hinge side prior to the installation of the gate. 3. Locate and follow hardware installation instructions. The gate will be mounted to be flush with the side of the fence that the gate will be swinging. See the illustration below. Be sure the gate will be high enough to clear obstructions such as snow.