
Installation Guide


We’re happy to help. Call 1-888-743-3673.
Gate Assembly
2
Measuring Tape
1
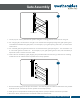
1. Locate, lay out and dry-assemble all parts of the gate including posts and rails. Do not use glue.
2. For a single gate, cut the rails to a length 2 1/2” shorter than the gate opening size (gate opening size
is the distance between the gate posts). For example, if your gate opening size is 96”, cut each of the
rails to 93.5”.
3. For a double gate, the gate will need to be 4” shorter than the gate opening size. You will need to cut
2” off of each gate for a total of 4”. For example, if your gate opening size is 192” (192” divided by 2
equals 96”) then cut each rail to 94” wide.
4. Insert rails into sockets by lightly tapping end post & sockets into rails using a soft face non-marking
mallet. Be sure to make sure the cap holes are in the up position.
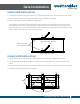
1. Remove the rst gate post to ip it and insert a 1/8” bead of glue around the inside of the two pockets
down about 1/4” from the top of each pocket. Do next step quickly!
2. After glue is in the pockets of the rst post, ip posts to quickly insert the rails into the pockets.
3. Be sure to rmly insert the rails. The adhesive will set in 45 seconds.
2