
Installation Guide

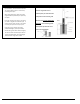
Table Of Contents

GENERAL POST INSTALLATION
1
2
3
4
5
6
7
Install the line stakes (secure stakes firmly) and run a string line
1.5" to 2" off of the ground, (see figure 3 located on page 2.)
Line should not be distorted. Avoid tall grass, weeds and other
obstructions. The line should be very tight!
Recommended: drill holes (1/4" bit) through the underside of rails to allow water to escape. If your bottom rails have ribs as
shown in figure 2, you will need a bit long enough (1/4"x4") to drill through the upper rib. Recommended: If you are filling the
inside of your post with concrete you must drill holes to prevent sagging.
IMPORTANT
When installing your fence or gate, we recommend a minimum of 2" clearance between the bottom of the panel and the ground.
This will allow enough clearance for the gate to swing freely.
Measure, assemble and install your gates first (even pre-cut gate kits). The installed gate will set the height of the fence being
installed. Failure to do so may result in a poor installation. Dry fit the cut rails into gate socket posts. Make any needed
adjustments prior to gluing your gates. For various reasons, gate sizes may vary in width. Post and caps sold separately.
We recommend installing 1 post and 1 section at a time but
there are many methods to install. As long as the end result is
positive, feel free to alter this method to suit your installation
needs. Concrete and plumb the first post and insert assembled
panel rails into the first post. Next, have the second post sitting
in the adjacent hole, insert assembled panel rails into the
second post, then concrete and plumb. Repeat for all panels
and posts.
To insure a quality job, it is strongly recommended that all posts
be set in concrete. To do this, hold post in place to prevent
slippage. Fill remainder of hole around post with concrete to 3"
below ground level. Be sure to work concrete into hole around
post as needed. We recommend you mix concrete and pour
wet. Use a minimum of 2 of the 80 lbs. bags of quickcrete for
each 5" post and 2 of the 60 lbs. bags for each 4" post.
Use a tape measure to measure and mark where the posts are
to be installed. Most of the posts are to be installed 72" or 96"
from center of post to center of post. The Semi-Privacy panels
will have a 97" from center of post to center of post layout.
Always follow the information on your C.A.D. diagram.
Remove string line leaving the stakes and dig the post holes. For
5" posts you will need a 12" dia. hole and for 4" posts you will
need 10" dia. hole. Accuracy in the depths will help to simplify
post installation. Run a string line on side of posts to insure
fence line is straight. (See figure 1). The recommended depth
of holes is 30" - 36". Check local codes and frost lines as greater
depth may be required for your specific area. NOTE: If
installing with Fast 2k, the manufacturer recommends the
diameter of the post holes as 6" in diameter for a 4" post and
8" in diameter for a 5" post.
Survey land for special features such as obstructions,
underground cables, or concrete from the old fence. Be sure to
follow all local building codes and obtain a building permit if
necessary. Contact your local utilities prior to digging.