
Instructions / Assembly


We’re happy to help. Call 1-855-243-9761.
Panel Installation
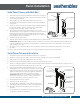
Solid Panel Privacy with Mid-Rail
7/8” X 13.875” Panel
privacy pickets slide
into the slotted rails
1.5" x 5.5" Slotted
rail
Post A
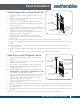
Solid Panel Privacy with Lattice
Post A
1.75" x 3.5" Rail with 1/4"
rip for the lattice strip
1.75" x 3.5" Hole
for rail in the post
7/8" x 1.5" Lattice end
caps for each end o
f
the lattice strip
1.5" x 5.5" Rail with 1/4"
rip in the top for the
lattice strip
77/8” X 13.875” Panel
privacy pickets slide
1.5" x 5.5" Slotted rail
1.5" x 5.5" Hole
for rail in the pos
t
Aluminum
Cap
Aluminum
1.5" x 5.5" Slotted rail
Cap
1.5" x 5.5" Hole
for rail in the post
into slotted rails
1. Follow the layout and post installation instructions on page 3.
2. Install the 1st post (post A) with concrete around the post. Be
sure to level and plumb.
3. Have another post (post B) sitting in the adjacent hole.
4. Slide the bottom rail (with the aluminum insert) and mid rail
into post A.
5. Slide one of the panel privacy pickets (13.875" wide) between
the bottom and the mid rail - leaving some of the panel
privacy picket extending outside of the rails.
6. The end of the panel privacy pickets have a “C” shape
allowing them to lock together. To install, hold a second panel
privacy picket above the first panel privacy picket and then
slide down to lock them together. Slide them in as a unit and
repeat until the panel is complete.
7. Slide the top rail into post A.
8. Repeat steps 5 & 6 to insert the pickets between the top and mid-rails.
IMPORTANT TIP: Be sure to install the pickets exactly the same way you installed the pickets between the
bottom and mid-rail so that the panel maintains a consistent appearance. You will want to do this all the
way down the fence line.
9. Once the panel is fully assembled, insert the bottom rail, then the mid and top rail into the second post
(post B).
10. Pour concrete around post B to about 3 inches below ground level and level and plumb.
1. Follow the layout and post installation instructions on page 3.
2. Install the 1st post (post A) with concrete around the post. Be sure to level and plumb.
3. Have another post (post B) sitting in the adjacent hole.
4. Slide the bottom rail (with the aluminum insert) and mid-rail into post A.
5. Slide one of the panel privacy pickets (13.875" wide) between the bottom and the mid-rail - leaving some of
the panel privacy picket extending outside of the rails.
6. The end of the panel privacy pickets have a “C” shape
allowing them to lock together. To install, hold a second
panel privacy picket above the first panel privacy picket
and then slide down to lock them together. Slide them
in as a unit and repeat until the panel is complete.
IMPORTANT TIP: Be sure to install the pickets exactly the
same way for each fence panel so that you maintain a
consistent appearance down the entire fence line.
7. Slide the bottom rail into post B.
8. Slide the top rail into post A.
9. Slide the lattice strip between the mid-rail and the top
rail. Add the lattice end caps on each end of the lattice.
10. Slide the mid-rail and top rail into the second post
(post B).
11. Pour concrete around post B to about 3 inches below
ground level and level and plumb.
8