
Instructions / Assembly


We’re happy to help. Call 1-855-243-9761.
9
Solid Privacy with a Closed Spindle Top
1. Follow the layout and post installation instructions on
page 3.
2. Install the 1st post (post A) with concrete around the
post. Be sure to level and plumb.
3. Have another post (post B) sitting in the adjacent hole.
4. Slide the bottom rail (with the aluminum insert) and
the mid-rail into post A.
5. Slide the T&G pickets between the bottom and mid-
rails until this portion of the panel is complete. Be sure
to slide a u-channel on the first and last picket.
6. Insert the spindles into the routed holes in the mid-rail.
7. Slide the top rail into post A with the opposite end (at
post B) angled upward towards the sky. Holding the
top rail at an upward angle, slowly line the spindles up
with the routed holes in the top rail while lowering the
rail into place.
8. Once the panel is fully assembled, slide the bottom
rail, then the mid and top rail into the second post
(post B).
9. Pour concrete around post B to about 3 inches below ground level and level and plumb.
10. If there is a small gap at each end, position the u-channels to cover any gaps.
Panel Installation
Solid Privacy with Mid-Rail
1. Follow the layout and post installation instructions
on page 3.
2. Install the 1st post (post A) with concrete around
the post. Be sure to level and plumb.
3. Have another post (post B) sitting in the adjacent
hole.
4. Slide the bottom rail (with the aluminum insert)
and the mid-rail into post A.
5. Slide the T&G pickets between the bottom and
mid-rails until the bottom half of the panel is
complete. Be sure to slide a u-channel on the
first and last picket.
6. Slide the top rail into post A, then repeat the
process above to install the pickets between the
mid and top rail.
7. Once the panel is fully assembled, slide the bottom rail, then the mid and top rail into the second post
(post B).
8. Pour concrete around post B to about 3 inches below ground level and level and plumb.
9. If there is a small gap at each end, position the u-channels to cover any gaps.
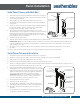
Post A
Post A
Cap
1.5" x 5.5" Slotted rail
7/8" x 6" T&G pickets
slide into slotted rails
1.5" x 5.5" Slotted rail
Aluminum
1.5" U-Channel slides
on the T&G picket
1.5" x 5.5" Holee
for rail in the post
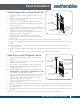
Post A
7/8" x 6" T&G pickets
slide into slotted rails
7/8" x 15" Pickets slide into
routed holes of the top end
1.75" x 3.5" Top rail with
the underside routed to
accept 7/8" x 1.5"
Cap
1.75" x 3.5" Hole
for rail in the post
1.5" U-Channel slides
on the T&G picket
1.5" x 5.5” Hole
for rail in the post
Aluminum
1.5" x 5.5" Slotted rail