
Installation Guide


We’re happy to help. Call 1-855-224-9761
.
3
Layout & Post Installation
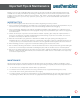
ADDITIONAL STEPS REQUIRED FOR FENCES
OVER 6' TALL OR HIGH WIND AREAS
If your fence is over 6' tall or located in a high wind area, you
must reinforce the post with either concrete or an aluminum
insert to at least 22" above grade. If you choose concrete, fill
the inside of the post AFTER THE PANELS ARE INSTALLED.
Prior to installing the panels into the posts, tape the lower rail
to prevent concrete backflow. If using aluminum inserts, be
sure to install them prior to installing the panels. For additional
high wind installation instructions, please see page 13.
Concrete or aluminum insert
(22" above ground minimum)
2" recommended height
off the ground
3” of soil
Concrete
Concrete Hole
String Line
30” - 36”
Tape
Ribs
Notch
Layout & Post Installation
Step 1
The location of your gate will determine the layout
of the posts for the fence line. The width of your gate
will determine the spacing between your gate posts.
It is important to assemble your gate first since the
gate width combined with the space needed for your
gate hardware to function correctly will determine
the distance between the gate posts. The
instructions on pages 5-6 will show you how to
assemble your gate and determine the spacing
needed for your gate hardware.
Step 2
To make sure your fence run is straight, install line
stakes and run a string line. The string line should be
positioned on the side of the posts and be very tight.
Use a tape measure and mark the location for each
post. Most posts are to be installed 72" or 96" from
center of post to center of post.
Tip: The width of all of our fence panels can be
reduced.
Remove the string line, leaving the stakes and dig the
post holes. If installing with concrete, 5" posts will
need a 12" diameter hole. 4" posts will need 10"
diameter hole. The recommended depth of holes is
30" - 36".
Tip: If installing with Fast2K concrete alternative, 5”
posts will need a 8” diameter hole and 4” posts will
need a 6" in diameter hole. We recommend the depth
of the holes will still be 30"-36".
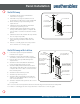
N
ext, re-attach the string line to the stakes and place
a
post in each hole. As you set the posts, use the string
line to ensure the fence line is straight (see figure 1).
Finally, mix the concrete and fill the hole around the
post with concrete to 3" below ground level ensuring
that the post is level and plumb. Best practice is to
use two 80 lb. bags of Quickcrete for each 5" post or
two 60 lb. bags for each 4" post.
TIPS: Drilling a hole (1/4" bit) in the middle of the underside of
each rail will allow water to escape.
e 1
Paint a mark
at post centers
Line Stake
String line
5" posts require a 12" diameter
hole that is 30" to 36" deep. Use
two 80lb. bags of concrete
4" posts require a 10" diameter
hole that is 30" to 36" deep. Use
two 60lb. bags of concrete
String line
The inside of each post is marked to
identify the specific post definition:
Line Posts - no marking
End Posts - red dots
Corner Posts - green dots
Custom Posts - marked custom
Blank Posts - marked blank
Figure 1
Figure 2
Step 2
Step 3
Step 4
Step 5
Step 6