
Installation Guide


We’re happy to help. Call 1-855-224-9761
.
13
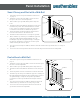
High Wind Installation
High Wind Installation
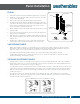
All of our vinyl privacy fence panels (up to 6' in height) have been engineered and tested to accommodate
high wind loads. In order to withstand high wind loads, the additional installation steps below must be
followed. Please note, testing completed on a 6' x 8' size panel confirms that all tongue and groove picket
privacy fences 6' and shorter will accommodate high wind loads.
High Wind Installation WITHOUT Fasteners:
Below are the wind loads tested without any fasteners connecting the pickets to the rails:
Panel Privacy: 100mph sustained winds up to 116mph wind gusts
Panel Privacy with Lattice: 70mph sustained winds up to 84mph wind gusts
T&G Privacy Fence: 90mph sustained winds up to 110mph wind gusts
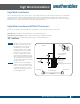
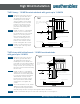
Step 1
Reinforce each post to at least
22" above ground with either
an aluminum insert (prior to
installing the fence) OR fill
each post with concrete (after
installing the fence) as shown
in figure 1. If using concrete,
be sure to tape off the rails to
prevent it from flowing into the
rails. If reinforcing the post with
an aluminum insert, the insert
can be shipped from the factory
already cut to size.
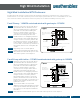
Step 2
Install a #10 x 1" self-tapping
stainless steel screw inside the
post on each side of the top rail
(see figure 2). #10 x 1" screws
may be purchased from us or a
local hardware store.
Figure 1
Figure 2
1.5" to 2" recommended
height off the ground
Concrete hole
Concrete or aluminum
(at least 54" tall)
12" x 36" post hole filled with concrete
3" soil
Tape
Ribs
Notch
Top view of rail in posts
Place screw here
Place screw here