
Installation Guide


We’re happy to help. Call 1-855-224-9761.
4
Gate Installation
GATE INSTALLATION
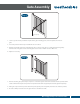
1. Determine the direction the gate is to swing, it usually swings away from deck. Check your local codes!
2. Locate and follow the hardware installation instructions. The gate will be mounted flush with the side
of the railing that the gate will be swinging off of. See the illustration below. Be sure the gate is high
enough to clear obstructions such as snow. The gate posts may be cut on site as needed. You may
choose to cut the gate posts off at the bottom of the lower gate pocket. However, be sure you DO NOT
cut into the gate pocket.
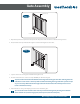
0.75" gap
0.75" gap
YARD
GATE - SWINGS INTO THE DECK
GATE - SWINGS AWAY FROM DECK
0.75" gap 0.75" gap
Hinge placement
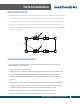
All railing gates are 60” wide, but may be cut down to a custom size on site. To cut the gate to a
custom size, follow the steps below:
1. Measure the distance between posts.
2. Subtract the space needed to accommodate the gate hardware. Typically this is 2 1/4 inches, but
refer to the gate hardware installation instructions for your specific hardware to confirm. The
distance between the posts minus the space needed for the hardware is the total length of the
gate rails.
3. Before cutting the rails, ensure there will be adequate space between the socket post and the first
picket hole. Note, the gate rails insert 3-7/8” into the socket posts. In order to keep the pickets
centered correctly, the length cut from the rail may need to be different on each side.
4. Mark the bottom and top rail to the same length, ensuring the spindle holes line up.
5. Cut the vinyl rail. The aluminum insert will need to be cut 1/2" shorter than the rail.
ADJUSTING THE GATE WIDTH: