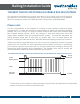
RAILING Installation Guide
Railing Installation Guide THE BEST CHOICE FOR STRONG & DURABLE RAILING SYSTEMS Our exclusive manufacturing process ensures our vinyl railing will provide superior strength plus it is virtually maintenance free. This guide will help make your installation easy. For questions, please call 1-888-743-3673 and welcome to Weatherables. Please note It is the responsibility of the installer to conform to local building codes and safety requirements.
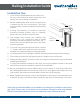
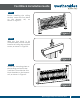
Railing Installation Guide Installation Tips: 1. A non-ferrous metal blade can be used to cut the vinyl and aluminum at the same time. Cut slowly and use all safety precautions 2. Before installing the rails, ensure the aluminum is seated into the vinyl rail properly. The large opening of the H-channel should be towards the pickets. Top Rail 3. If using vinyl sleeves, it is easier to mark the mounting bracket position prior to installing them over wood posts or post mounts. 4.
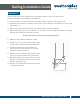
Railing Installation Guide Section 1 These instructions are designed to be supplemental; review all instructions with the brackets before starting installation. 1. Plumb posts and install optional post skirt before installing railing sections. 2. Determine the distance between the deck and the bottom rail based on local code (generally 2”). 3. Mark your post where the black mounting bracket will be installed. 4.
Railing Installation Guide Section 2 1. Assemble the railing sections and slide the black mounting brackets over the vinyl rail ends. 2. Position the entire section between the posts aligning the bottom bracket with the line previously drawn. 3. Center the mounting bracket on the post and install the bottom of the mounting bracket on the drawn line. 4. Fasten the black mounting bracket to the post using the provided 1-1/2”screws, two on each side. Screws should be kept straight and not angled.
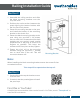
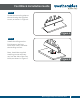
Foot Block Installation Guide STEP 1 Before installing the railing section, center the foot block on the bottom rail, as shown in Figure 1. Figure 1 STEP 2 With the foot block in its collapsed state, mount it to the bottom rail using the supplied screw, as shown in Figure 2. Figure 2 STEP 3 Center the mounting plate on the decking surface so that it will be in line with the foot block installed on the bottom rail, as shown in Figure 3. Figure 3 We’re happy to help. Call 1-888-743-3673.
Foot Block Installation Guide STEP 4 Screw the mounting plate to the deck using the supplied screw, as shown in Figure 4. Figure 4 STEP 5 Install the railing section. Pull down on the foot block until it sits lush with the decking surface. Next, install the supplied retaining screw and snap cap into the side of the foot block, as shown in Figure 5. Figure 5 We’re happy to help. Call 1-888-743-3673.