
Installation Guide

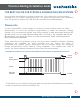
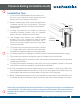
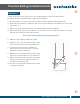
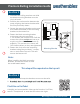
Table Of Contents

We’re happy to help. Call 1-855-224-9761.
4
1. Assemble the railing sections and slide
the
black mounting brackets over the
vinyl rail ends.
2. Position the entire section between the
posts, aligning the bottom bracket with
the line previously drawn.
3. Center the mounting bracket on the post
and install the bottom of the mounting
bracket on the drawn line.
4. Fasten the black mounting bracket
to the post using the provided
1-1/2”screws, two on each side. Drill the
screws into place straight on (not at an
angle) to ensure the bracket covers fit
properly. This ensures the screws will
shift into the divets as they are tightened.
5. Fasten the vinyl rail to the mounting
brackets using the provided 1” screws,
two on each side of the rail. This will
secure the bottom rail.
Note:
When installing the black mounting
brackets, ensure the screws fit into
the screw head cutouts.
This step will be repeated on the top rail.
1. Gently slide and snap the bracket covers over the rails.
2.
Find this on YouTube!
A helpful and more detailed video can be found on YouTube,
search "ThreepieceA" or scan the QR code to the right.
Mounting Bracket
Section 2
Section 3
Premium Railing Installation Guide