Aluminum Railing Kit Installation Guide
Aluminum Railing Assembly The best choice for strong & durable railing. Thank you for choosing Weatherables railing for your deck or patio! Our aluminum railing provides strength, durability and is maintenance free. It meets all nationwide (IRC/IBC) building codes. Ideal for the do-it-yourself or a professional installer, it is simple to install and does not require any special tools. Made to last a lifetime, our premium aluminum railing is manufactured with the best American made materials on the market.
Aluminum Railing Assembly Tools 1. Cordless Drill/Impact Driver 2. 13/64” Drill Bit 3. #3 Phillips Screwdriver Bit 4. Speed Square 5. 2’ Level 6. Tape Measure 7. Miter saw or portable band saw 8. Rubber Mallet 9. Post level (optional) Section 1: Installing the Posts 1. Lay out and mark where the posts will be installed on the deck surface. Assure that the 5”x5” base plate is at least 2” from the edge of the deck to allow for the 2-piece trim. 2.
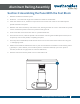
Aluminum Railing Assembly Section 2: Assembling the Panel With the Foot Block 1. Measure the distance between posts. 2. Subtract ½” from the total length of the distance to allow for the brackets. 3. If the rails need to be cut, subtract an equal amount from each end of the rail. This will keep the pickets centered in the panel. 4. Measure and mark both the top and bottom rails, assuring that the cut is not in the middle of a picket mount and that the picket mounts line up before cutting the rail. 5.
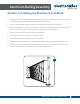
Aluminum Railing Assembly Section 3: Installing the Brackets & Foot Block 1. Mark the post at the desired height of the bottom rail (usually 2”) Make sure to account for the 3/8" post flange and the 1/4"bracket when marking the measurement. 2. Align the bottom Bracket with the mark and install the bottom brackets on each post. 3. Set the assembled panel with foot block into the bottom brackets. Mark where the foot block will attach to the deck or patio, as well as where the top brackets will be installed.