Aluminum Stair Railing Kit Installation Guide
Aluminum Stair Railing Assembly The best choice for strong & durable railing. Thank you for choosing Weatherables railing for your deck or patio! Our aluminum railing provides strength, durability and is maintenance free. It meets all nationwide (IRC/IBC) building codes. Ideal for the do it yourselfer or a professional installer, it is simple to install and does not require any special tools.
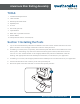
Aluminum Stair Railing Assembly TOOLS 1. Cordless Drill/Impact Driver 2. 13/64” Drill Bit 3. #3 Phillips Screwdriver Bit 4. Speed Square 5. 2’ Level 6. Post level (optional) 7. Tape Measure 8. Miter saw or portable band saw 9. Rubber Mallet 10. Clamps with at least 4” clearance (x2) Section 1: Installing the Posts 1. Lay out and mark where the posts will be installed on the deck surface. Assure that the 5”x5” base plate is at least 2” from the edge of the deck to allow for the 2-piece trim. 2.
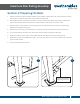
Aluminum Stair Railing Assembly Section 2: Preparing the Rails 1. After the posts have been installed, determine the height of the bottom rail to stair tread (it must be at least 3/4” to clear the post skirt). A wood spacer works best. 2. Assemble the panel and set the rail section on top of the spacers against the post (tip: install with just the two pickets closest to the post to make it easier to take apart and cut the rails). 3.
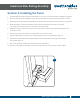
Aluminum Stair Railing Assembly Section 3: Installing the Panel 1. Re-assemble the panel and place the brackets on each end. Then set the panel in between the posts. 2. Double check the spacing between the picket and the posts to assure the panel is seated correctly. 3. Once the panel is properly seated between the posts, mark the position of each bracket on the posts. 4. Mark the position of the top brackets to assure they are fastened to the top rail correctly.