
Installation Guide

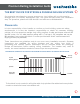
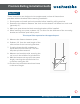
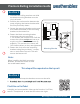
Table Of Contents

We’re happy to help. Call 1-855-224-9761.
3
These instructions are designed to be supplemental; review all instructions
provided with the brackets before starting installation.
1. Plumb posts and install optional post skirt before installing railing sections.
2. Determine the distance between the deck and the bottom rail based on local code
(generally 2”).
3. Mark your post where the black mounting bracket will be installed.
4. When marking your posts, subtract 1/4” to allow for the thickness of the mounting
bracket and mark the post with a pencil.
Section 1
This step will be repeated on the opposite post.
5. Measure the distance between posts.
6. Subtract 1/2" from the total length of the
rails to allow for the mounting brackets.
7. If cutting down the rails, subtract an
equal amount from each end. This will
keep the spindles centered.
8. Measure and mark the rails, ensuring the
cut is not in the middle of a spindle hole.
9. Mark the bottom and top rail to the same
length, ensuring the spindle holes line
up before cutting the rail.
10. Cut the vinyl rail and the aluminum insert
to the same length.
Premium Railing Installation Guide