
Product Manual


7
WeatherHawk®
815 W 1800 N Logan, UT 84321-1784, Email: info@weatherhawk.com Copyright© 2004, 2013
Toll free in USA: 866-670-5982, International: 435-227-9802, FAX: 435-227-9749 Printed 2013
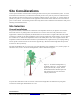
Figure 1: Box of standard and
wireless equipment. The lift straps
allow easy removal of the
WeatherHawk from the box.
Lift Straps
Quick Start Guide
Signature Series Model 232/916/922/240
Read Me First
Computer Requirements
Available Serial Port or USB Port (Serial-to-USB Converter
Cable required)
WeatherHawk Setup Procedure
1. Remove the top foam packing from the WeatherHawk box and
verify you have all ordered equipment; then unpack equipment.
a. Use the lift straps to remove the WeatherHawk
station, since removing the station by lifting on the
sensors may damage the sensors (see Figure 1).
b. Avoid resting the WeatherHawk on the wind speed
and wind direction sensors.
c. Report missing or damaged equipment to
WeatherHawk Customer Service before installing
your system.
2. Install your application software on your computer.
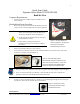
3. Connect the serial cable male connector to the WeatherHawk RS-232 port and the serial cable female
connector to a computer serial port (Figure 2).
a. If you are using a serial connection, ensure the serial port is not already assigned to an open program.
b. If you’re connecting the cable to a USB port, a serial-to-USB converter cable is required and
optionally available from WeatherHawk (P/N 16878, USB-AD).
4. Turn the key to the on position (Figure 3), and observe a red flashing light through the small rectangular
Scan/Receive window on the underside of the WeatherHawk.
Figure 2: Serial cable (left) and the
WeatherHawk serial port in which the serial
cable male connector connects. A dust cover
must be removed from the WeatherHawk
RS-232 port before connecting the cable.
Figure 3: Keyed power switch
is located on the bottom of the
WeatherHawk station.