
Instructions / Assembly


weatherstrong.com 888-745-0004
1
Required Tools
• Level
• Plastic Shims (for leveling if necessary)
• Drill
• Tapcon® 3/16" x 2-3/4" Stainless Steel Screws
• 1/4" Stainless Steel Washers
• Tapcon® 3/16" Drill Bit (pilot holes in concrete - typically is provided with screws)
• 3/16" Wood Drill Bit (pilot holes in cabinet backs or installation rails)
• 1/8" Wood Drill Bit (pilot holes in cabinet sides to join them together)
• Phillips Head Screwdriver
• Clamps (with rubber pads)
•Saw(circularortable)–totrimmatchingendpanelsandtoekickllers
• Carpenter’s Square
• Tape Measure
• Extension Cord
• Step Ladder (at least 6' if installing wall cabinets)
Before You Begin:
Check your new cabinetry against your design plan to ensure that you have all required cabinets, moldings,
llers,andaccessoriestocompletetheinstallation.
Safety First:
To avoid injury, explosion, or shock, make sure that all water supplies, gas supplies, and pertinent circuit
breakersareshutoff.Doublecheckelectricalusingcircuittestertoconrmpowerisoff.Ifyouareuncertain
that utilities have been properly shut off, consult your utility company or service professional.
Caution:
Itisessentialthatyouusetherecommendedscrewsforyourcabinetryinstallation.Undernocircumstances
should you use nails or drywall screws as they do not have the strength or holding power to ensure that
cabinetsstayonthewall.Failuretousespeciedscrewswillrenderwarrantynullandvoid.
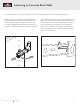
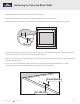
Installationdetailedinthismanualisforconcreteblockconstructiononly.Attachmenttoanyotherwalltypes
will require locating the wood or steel studs behind the wall. Consult with your local home center, hardware
store, or installation specialist for recommended fasteners.
Installation Guide