
Installation Guide

weatherstrong.com 888-745-0004
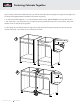
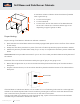
IfyourdesignincludesaBarRiserKit(BRK),theinformationbelowwillhelpyoutoinstallit.
We recommend installing the cabinet legs after you have attached the bar riser to the base cabinet.
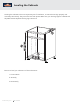
1. Lay out the cabinets that make up your kitchen and locate where the bar riser kits are going to be placed.
2.Note:SomeBRK’smayoverlaptwocabinets,sofollowyouroorplancarefully.
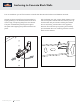
3.AttachtheBRKtothebasecabinet(s)byliningupthebottomofthebarriserwiththebottomofthe
cabinet.
4.Attachthebarriserusing1-1/4”stainlesssteelscrews(WSSS1.25-ScrewKit)bysrewingfromtheinsideof
the cabinet through the rear hanging rails.
5. Once the BRK is attached, you can install the adjustable legs and level the cabinet/riser.
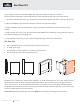
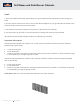
Bar Riser Kits
• 3/4”All-Weatherboard™compositematerialcabinetconstruction
• 4” deep by 36” high
• RequiresBTPforeldinstallationtomatchthecabinetdoors
• Can be used with open back base cabinets only
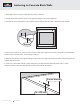
Bar Risers are 4” deep by 36” high and are available in 3” width increments from 12” to 48”. When securely
attached to the back of a 34 ½” high Open Back base cabinet, the top of the riser will be approximately
40½”fromtheoor.Theseeldinstalledkitsfeatureafull-height¾”thickenclosedAll-Weatherboard™
composite material back panel and can only be paired with the open back base cabinets. These kits will turn
almost any base cabinet into a two-level bar.
Please Note: Exposed cabinet sides and backs MUST be covered by a matching end/island panel
BACK VIEW
36"
36" H
12"-49" W
4" D
Bar Riser Kit