
User`s guide


Web Mountain Technologies Page 5
Mounting the RUC
There is nothing special needed to mount the RUC unit. It will sit nicely on any
flat surface. Do not allow the unit to dangle in the air on one of the connecting
cords, as this can lead to fatigue not only on the cord, but to the onboard
connectors.
Plug the included power supply into an available power outlet, then plug the
circular jack on the end of the power cord into the PWR jack on the RUC. After
a second or two, you will see the LED closest to S1 on the unit start to flash in a
constant pattern of a second on, then a second off, a second on, then a second
off, etc.
Note on the Power Supply:
It is important that the user use the provided power supply with the unit. This
power supply provides the correct voltage and current for the unit, plus has the
right matching plug. In addition, this is the power supply that was used when
the RUC passed the appropriate FCC EMI testing.
Specs on the included power supply:
Input 100 VAC to 240 VAC
Output 5VDC, 1A
Output connector 2.1x5.5mm connector
IMPORTANT: If you do not use the recommended power supply, you must
ensure that the output voltage of the power supply does not exceed 5.5VDC. If
this voltage is exceeded, it could cause damage to the unit. Damage caused by
applying a voltage higher than 5.5VDC is not covered under the Warranty.
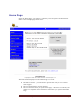
Setting up the LAN
Standard Ethernet LANs can be built to provide 10, 100 or 1000 megabit per
second (Mb/s) data rates. The RUC supports 10 Base-T (10 Mb/s) and 100
Base-T (100 Mb/s) networks over cable of Category 5 (CAT 5) or better. You
need to decide the data rate you want your LAN to support. Your decision will
influence the type of Ethernet network adapters and Ethernet switches you will
need to purchase or install. 100 Base-T installations will be slightly more
expensive than 10 Base-T. Nowadays you can purchase reasonably priced
10/100 Base-T adapters and switches that support both speeds.
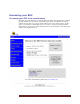
Connecting the RUC to an Ethernet Switch
Obtain a patch cable long enough to reach from your RUC to the Ethernet
switch. Connect one end of the cable to the jack labeled “LAN” on your RUC.
Connect the other end of the cable to any numbered jack on your Ethernet
switch. You should see the Link Connect LED on your switch go solid indicating
a good connection.