
Service manual


Webasto Diesel Cooker X 100 5 Updating and repair
507
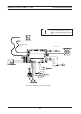
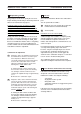
Adhesive strip
Front and back
profile
Side profile
Adhesive
The adhesive used is Loctite
®
5368.
Store the adhesive in room temperature.
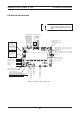
Figure 3:
Figure 2:
Figure 1:
Adhesive strip
Changing the glass
In the event you need to change a broken glass
range or if you need to reach the structures
underneath the glass range, i.e. you must break the
range.
Detaching the glass
Cut the weld adhesive between the range and the
profile with a sharp knife while at the same time
prying it with a screw driver, for example.
Gluing the glass
Clean the old adhesive and grease off the profiles
well and dry the surfaces. Spread the adhesive in an
even strip (Ø 4 mm) in the niche of the front, back
and side profile. Go around the entire device
according to Figures 1 and 3. Press the range
carefully in place such that the adhesive does not
squeeze from between the range and profile.
When gluing the range, take note of the way the
spring of the banjo, located under the range,
depresses. The spring must depress along with the
range such that the edges of the range have evenly
settled against the profiles. Place something heavy
on the range that distributes evenly over the entire
range for the entire time it takes for the range to dry.
Concentrated weight on a certain area of the range
will cause it to warp. You have six minute’s time to
apply the adhesive before it starts drying. It will be
completely dry after 24 hours.
Location of the adhesive in the profiles and
adhesive cleat:
The strip of adhesive is approximately 4 mm thick
and goes around the entire device in the place
illustrated in the Figure 1.
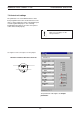
5.5 Heat exchanger and glass panel