
Operating instructions


4. Installation
4.9 Initial Operation
1. Check your installation for:
- loose nuts and bolts.
- exhaust system routing and clamp tightness.
- loose hose clamps.
- routing and securing of wiring and heater hoses.
- kinked or pinched hoses.
- routing and securing of fuel lines.
- battery connection and polarity.
2. Top off or refill cooling system with coolant as per engine manufacturers recommendations.
3. Open shut-off valves.
4. Set heater valve to max. heat position and turn off Air Conditioning in cab and sleeper.
5. Start the vehicle engine and run it at a fast idle for 10 minutes to purge air from the Thermo 90 S
and the heat exchanger. While the engine is running check:
- hose connections for leaks.
- coolant level in the expansion tank and add coolant as needed.
- Remove upper heater hose clamp and push screwdriver in between pipe and hose to let air
escape. Repeat this at least 4 times with engine running or use bleeder in the same manner
if so equipped.
6. Shut off the engine.
7. Re-connect hoses and tighten hose clamps used for bleeding system.
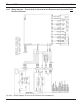
8. Connect power/switch extension harness to waterproof plug on side of heater enclosure
(Deutsch).
9. Switch on Webasto heater and check:
- green indicator light on.
- circulating pump in operation.
- initiation of start up sequence.
- successful start up and operation.
433
Thermo 90 S 4 Installation
NOTE
Coolant temperature must be below 167°F (75°C) to start up.