User Manual for webcamXP 5.5 revision 1.4 © 2010 Moonware Studios. All Rights Reserved.
webcamXP 5.5 documentation Table of Contents Table of Contents ................................................................................................. 2 Legal Notice ........................................................................................................ 4 1 Installing webcamXP ....................................................................................... 5 1.1 1.2 webcamXP Pre-Requisites .................................................
webcamXP 5.5 documentation A PPENDIX B: Port forwarding .............................................................................. 77 A PPENDIX C: Setting up a Dynamic Domain Name Service ...................................... 78 A PPENDIX D: Controlling webcamXP from an External Application ............................ 79 A PPENDIX E: Controlling webcamXP by Windows Messaging ....................................
webcamXP 5.5 documentation Legal Notice Information in this document, including URL and other Internet Web site references, is subject to change without notice. Without limiting the rights under copyright, no part of this document may be reproduced, stored in or introduced into a retrieval system, or transmitted in any form or by any means (electronic, mechanical, photocopying, recording, or otherwise), or for any purpose, without the express written permission of Mooware Studios.
webcamXP 5.5 documentation 1 Installing webcamXP The following sections contain instructions on installing and configuring webcamXP for initial operations. 1.1 webcamXP Pre-Requisites Before installing webcamXP, install Microsoft DirectX9 and Windows Media Player. webcamXP supports Windows Media Player versions 9, 10, and 11. Note on Windows Media Player Installation for Microsoft Windows 2008: If you run Microsoft Windows 2008, you must install Windows Media Player using the following steps: 1.
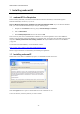
webcamXP 5.5 documentation The following options are available: • IP Camera Directshow Filter: Check this if you wish webcamXP to use a Directshow filter to clean up the motion and data coming from a network (or IP camera). Directshow filters can be customized by advanced users. • SSL Libraries for FTPS / HTTPS: Check this box if you would like to install security options for secure FTP and secure HTTP transfers. Click the Next > button to continue.
webcamXP 5.5 documentation If you would like to launch webcamXP immediately, check the Launch webcamXP 5 Now? checkbox. Click the Finish button to finish installation.
webcamXP 5.5 documentation 2 The Three Modes of webcamXP 2.1 webcamXP 5 [Normal mode] The default webcamXP mode can be accessed using the webcamXP icon (created on the Desktop during webcamXP install). It is not optimized for any one particular method of camera data representation but should cover the needs for most users.
webcamXP 5.5 documentation 3 webcamXP Monitoring 3.1 Live View / Source Selection / Controls webcamXP allows you extensive control over their surveillance needs. The default tab, Live View / Source Selection / Controls, allows you to add and remove cameras (sources), view the data streaming live from their connected sources, and edit connected sources (by panning and zooming).
webcamXP 5.5 documentation • Controls Box (5): The controls box provides two options: Capture and Record. The Capture option allows you to take a still image (a still frame) from the currently-selected camera. The still frame is stored as a .JPG file on your hard drive. Record allows you to record a snippet of the selected camera’s output, and store it as a movie on your hard drive.
webcamXP 5.5 documentation Under the preview thumbnail, each source has its own indicators. If the rectangle of the left is displayed it mean that the source is currently selected, on the illustration below we can see that it’s the first source that is selected: On the above image we can see that the rectangle is drawn in white, this means that the source is selected but previewing is not enabled, it will not refresh in the user interface in this mode.
webcamXP 5.5 documentation In the following subsections, the various steps to connecting a USB/PCI camera, Network camera, and WMV/ASF stream are detailed. 3.1.1.1 Connecting a New USB/PCI Device In order to connect a USB or PCI camera, begin by connecting the camera to your computer. Use the manufacturer’s installation disk to download and install the necessary drivers for your camera.
webcamXP 5.5 documentation The following screen will appear: Select your camera’s manufacturer from the Camera Brand drop-down box. If you know the camera’s specific model number, you may select it from the Camera Model drop-down. If you are unsure of the camera’s model number, simply select “Network Camera” from the Camera Model drop-down. Note: Some cameras are designed for use with Microsoft Media Streaming, and therefore do not appear in the Camera Brand or Camera Model drop-down boxes.
webcamXP 5.5 documentation Enter the URL or IP address of you camera in the Hostname or IP Address box. There is no need to include the http:// prefix of the URL or IP Address. Enter the camera’s port number in the Port textbox, and specify the camera’s number in the Cam Number box. If you are unsure of the camera’s number, enter “1” in the Cam Number textbox. If your camera’s URL contains https:// as a prefix, this indicates the camera is hosted on secure HTTP connection.
webcamXP 5.5 documentation 3.1.1.3 Connecting Cameras from Other Sources Cameras can be connected to webcamXP that are not IP Cameras, and are not USB cameras connected directly to the computer. MPEG files can be imported into webcamXP and treated as if they were full-fledged cameras. webcamXP can also import camears that are set up as MPEG or WMF (Windows Media Format) buffering. All of these additional source types require files to be present on the machine running webcamXP.
webcamXP 5.5 documentation The followings sections will describe the process of specifying an audio driver and configuring audio options for a connected camera. 3.1.3.1 Selecting an Audio Driver / Manager In order to take in input, you must select an audio driver or manager to handle the audio signal. To specify an audio manager, right-click in the Source Selection box. In the menu that appears, you should see webcamXP displaying a “(No Audio Source)” error.
webcamXP 5.5 documentation If the Enabled checkbox in the Pan, Tilt, Zoom area is not checked, place a check in it by clicking on it. This entry will make the pan, tilt, and zoom options available to the currently-selected camera. The magnifying glass icons to the upper right and upper left of the box control zoom functionality. The magnifying glass with a minus (-) sign zooms out. The magnifying glass with the plus sign (+) zooms in. The four directional arrow keys tilt and pan the camera.
webcamXP 5.5 documentation 3.1.7 Adding a Visual Overlay to a Camera To add a visual overlay to an image, click the button shown below: The following window will appear: In this window, you can declare a series of objects which will be placed over the image from the camera. The overlay information will be stored when video files or still images are captured. To add objects to your overlay design, use the six buttons located directly under the sample image displayed in the Overlay Editor window.
webcamXP 5.5 documentation Double-click on the new piece of text to edit its contents. The following Text Object Editor window will appear: Enter the contents you wish to appear in the text object in the black box of the Text Object Editor window. You can specify the font of the text by entering a font name in the far-left textbox directly below the black box area. Hit the Enter key to make the changes and have them appear in the black box area.
webcamXP 5.5 documentation • $memory: The amount of memory the computer running webcamXP has at its disposal. • $connected: The number of users connected to webcamXP at the time the camera with the overlay was accessed. You can also bold, italicize, or underline the text by clicking on the appropriate button (the three format buttons are located below the black box area). Alignment of the text (e.g.
webcamXP 5.5 documentation 3.1.7.2 Adding a Shape To add a shape, click on the Shape button. The Shape button is the third from the left button, located directly below the camera sample object. Once the Shape button has been pressed, click in the camera sample image box where you wish the upper left-hand corner of the shape to appear (e.g. where you wish the shape to begin).
webcamXP 5.5 documentation A standard Windows Open dialog will appear. Navigate to and select an image file from your hard drive and click the Open button. The new image will appear in the Overlay Editor window. 3.1.7.4 Adding a Network Image File To add an image to your graphical overlay from an image file hosted on your network, click the Network Image button. The Network Image button is the button located five from the left directly under the sample camera view.
webcamXP 5.5 documentation Select the number of the camera you wish to use as your camera source from the From other source… dropdown box. The ImageX and ImageY textboxes are automatically filled in using the coordinates you specified using your mouse cursor. Enter a width and height (both in pixels) for your video source by entering values in the Image width and Image height textboxes. Enter an automatic refresh number in the Auto-refresh textbox.
webcamXP 5.5 documentation 3.2 The Security Center The security center displays a heads-up display of all cameras connected to webcamXP. It provides an excellent way to easily keep track of the data coming from all connected cameras, this can be done by clicking on this button: The Integrated Security Center allows you to display a flexible number of cameras on the screen at once.
webcamXP 5.5 documentation 3.3 Online Gallery The online gallery is a space you can set up using webcamXP to display regular still shots from a particular camera or particular cameras. The online gallery is then available to all who have access to your machine (e.g. anyone in your immediate intranet or, if your computer is connected through a static IP address to the Internet, all Internet users).
webcamXP 5.5 documentation If you wish to stop the gallery from being hosted, simply click the Disable button. The online gallery will take a few seconds to begin uploading your data. In this time, you should begin to customize your gallery by specifying which camera or cameras still shots should be taken from and how often still shots should be taken. 3.3.
webcamXP 5.5 documentation 1, and then take an image from camera 2, and so forth. When the final camera in your source sequence is captured, the system will start again with the first camera and repeat the process. You may also select the Capture Now button. This button forces the system to take a screenshot from the selected camera (or the next camera in the sequence if Cycle is selected), and upload the captured image to the gallery host.
webcamXP 5.5 documentation 3.4 The Scheduler The scheduler allows you to set a level of autonomy to webcamXP. Many common tasks can be performed without the direct input of a human operator, and must be performed multiple times a day. For example, you may want a camera to capture and store an image to your hard drive every hour for your records. This would be a tedious job if it required the constant input of a human operator. 3.4.
webcamXP 5.5 documentation 3.4.2 Specifying Scheduled Tasks In the Scheduler tab, select an action to be performed from the Action drop-down box: Sample actions include capturing a picture, begin recording a movie from a camera, stop recording a movie from a camera, start broadcasting your camera’s data (over HTTP), end HTTP broadcasting, start motion detection and end motion detection. Next, select a camera (or cameras) to use as a source (sources).
webcamXP 5.5 documentation If you wish the action to be performed once daily at a specific, preset time, select the Run daily @ fixed time option box. Then, select at what time (in hours and minutes) you wish the action performed from the H and M drop-down boxes. If you wish the action performed multiple times per day at even, preset intervals, select the Run periodically every option box. Then, enter a numerical value in the textbox and select a time unit from the drop-down box.
webcamXP 5.5 documentation 4 Broadcasting over the Web webcamXP gives you the power to share the data coming from your connected cameras to Internet or Intranet users. This property is called Broadcasting. When Broadcasting is enabled, users who know your machine’s IP address or website URL can navigate to a custom-designed page and view a streaming representation of your connected cameras. The following sections describe how to enable and customize webcamXP’s broadcasting services: 4.
webcamXP 5.5 documentation You may wish to limit bandwidth, preventing users from streaming large amounts of data and thus slowing your network. To limit bandwidth, check the Limit bandwidth (kb/s) checkbox. In the textbox directly below this checkbox, enter the number of kilobytes (kb) per second (s) you wish to use as a maximum bandwidth allowance. When all of your settings have been successfully specified, click the Enable button to begin broadcasting your camera displays. 4.1.
webcamXP 5.5 documentation From this main website, you can control your camera (using the four arrow buttons and the two magnifying glass buttons on the upper right-hand corner of the page). The following sections describe the options available to you when viewing your cameras through your broadcasted HTTP portal: 4.1.3.1 Monitor By default, the Monitor page is displayed (see previous screenshot). This page provides a direct view of one particular camera.
webcamXP 5.5 documentation 4.1.3.2 Multiview Multiview displays images from all connected cameras side-by-side. To view the Multiview page, click on the Multiview link, located on the topbar of the page. The Multiview page is shown below: To change the size of the individual images, select a pixel width and pixel height from the drop-down box located in the upper left-hand corner of the window. 4.1.3.
webcamXP 5.5 documentation To view the gallery view, click on the Gallery link, located at the top bar of the page. 4.1.4 Disabling HTTP Broadcasting To disable HTTP broadcasting, simply navigate to the Broadcasting (HTTP) tab of the Web / Broadcast section. Click the Disable button, located at the top of the tab. 4.1.5 Viewing Connected Users As users navigate to your computer and view your camera’s displays, entries are listed in the Connected users list of the Broadcast (HTTP) tab.
webcamXP 5.5 documentation HTML code generated by webcamXP contains dynamic links that must reference the correct address or host location. One final way webcamXP allows you to share camera images is to integrate with your pre-existing or customlycoded website. To integrate to your website, begin by having webcamXP generate the necessary HTML source code. Select Tools > Generate HTML.
webcamXP 5.5 documentation Flash: Adobe Flash is a compiled technology that allows smooth graphical representation in browsers. Unfortunately, Flash is rather processor and memory-intensive. Flash also requires the installation of a third-party plug-in (the Adobe Flash Player). Flash is suggested for users who have modern browsers and relatively modern computing equipment. Finally, specify the camera you wish your HTML code to represent.
webcamXP 5.5 documentation 4.3 Uploading via FTP If you wish to host pictures from your various connected cameras to an Internet repository for downloading, you may wish to consider using FTP. FTP allows you to upload files for download hosting, and does not create a website for user interaction. Users who wish to download captured images from your camera simply need to navigate to your FTP website.
webcamXP 5.5 documentation If you have a firewall set up on your local network (the network connected to the computer running webcamXP), you may wish to enable FTP passive mode. With passive mode, your computer (the client) initiates all connections. If passive mode is not used and a firewall is in place, the firewall may block connections made by the FTP server (required to begin FTP transfers). To enable passive mode, check the Passive Mode checkbox.
webcamXP 5.5 documentation 4.4 Uploading via HTTP webcamXP provides HTTP users similar functionality to FTP users. If you wish to host your camera images on a standard web server (HTTP), you may use webcamXP’s automatic HTTP upload functionality. webcamXP HTTP Uploads work using an HTTP POST. HTTP POST is the action performed when you click on the Submit button on a standard website form. You can therefore program your HTTP website (in Perl, PHP, Ruby, etc.
webcamXP 5.5 documentation Checking the Password Protected checkbox enables the Username and Password textboxes. Enter your login credentials in the Username and Password textboxes. 4.4.3 Scheduling Regular HTTP Uploads In order to schedule regular HTTP upload Posts, you must customize the values in the Upload interval fields. Enter a numerical value in the Upload interval textbox and select a time unit from the Upload interval dropdown box.
webcamXP 5.5 documentation 4.5 Live Chat Live Chat gives you the flexibility to set up an online talking space for visitors to your shared camera website. The service is run by Chatango and requires you to register a user name in order to implement Live Chat in your custom website. 4.5.1 Enabling Live Chat In order to enable Live Chat functionality, you must begin the service. Navigate to the Live Chat tab of the Web / Broadcast section.
webcamXP 5.5 documentation 5 Access Restriction and Password Protection It may become necessary to restrict camera access to a select few users, or to block certain computers from accessing your camera’s data. webcamXP comes with an extensive set of security functionality, allowing you to easily restrict access to your data. The following sections describe the process of restricting access to your data. 5.
webcamXP 5.5 documentation To add your newly-created user, click the Add / Update button. The user will appear in the User accounts: 5.1.2 Editing an Existing User To edit an existing user, select the user’s account entry from the User accounts list. The textboxes at the top of the Credentials (Password Protection) tab will update with all of the user’s currently-set option values. Edit the option values as you see fit.
webcamXP 5.5 documentation 5.2 Users and HTTP Broadcasting If you enable password protection and add users, your HTTP Broadcasting page will automatically be password protected. Users who visit your website will be presented with the following login page: The user will be required to enter his or her password in the Username and Password textboxes before being taken to view the output of connected cameras.
webcamXP 5.5 documentation 5.3 Restricting Access to Specific IP Addresses If you know the IP address or set of IP addresses belonging to malicious users and wish to prevent them from gaining access to your camera and camera settings, you may wish to take advantage of webcamXP’s IP blocking functionality. To enable this functionality, navigate to the IP Filtering tab of the Access Restriction section. Click the Activate button to begin IP Filtering.
webcamXP 5.5 documentation 6 Security The Security section provides a list of tools allowing you to use webcamXP for camera-based security purposes. With the Security section, you can use your cameras for motion detection, audio detection, and reconnaissance. The following sections describe the Security section and provide instructions on configuring and enabling webcamXP’s security functionality: 6.1 Motion Detector One of the most flexible functions webcamXP can provide is motion detection.
webcamXP 5.5 documentation Select an interval time to specify how long the camera is able to collate bouts of movement using the Interval indicator bar. The higher the interval, the longer two bouts of motion can be from each other and still be considered one movement. An example of an interval setting would be a person walking within view of the camera. The person walks in view of the camera, pauses for a specific interval of time, and then moves again.
webcamXP 5.5 documentation At this point, if you decide to detect only the motion that comes from the street on the left side you can click on the Invert button to reverse the area. When you are done with setting the area for the current video source you can click again on the Mask button to switch back to the standard view, the area filter will still be active.
webcamXP 5.5 documentation 6.1.3 Settings To edit general settings for the motion detector, select the Settings tab. The full Settings tab is shown below: The following options are available in the Settings tab: Recording Duration: Enter into this text box the number of seconds you wish the motion detector to record video once an event is tripped (e.g. a motion is detected).
webcamXP 5.5 documentation 6.1.4 External Application Settings To set External Application Settings, click on the External Application Settings tab. The complete External Application Settings tab is shown below. The settings in this tab are only applicable if the Run application feature is enabled in the Enabled features box. The following options are available for specification: External Application (.EXE / .
webcamXP 5.5 documentation 6.1.5 SMS (Text Message) Settings The features in the SMS tab require that the Send SMS feature be enabled. For more information on enabling the Send SMS feature, see the section Enabling Features. The SMS settings tab is shown below: Enter the URL of your SMS delivery service in the HTTP Post Url for SMS Provider textbox. By default, the service http://www.textu.org is used. Enter your cell phone's number (including country code) in the Mobile phone number textbox.
webcamXP 5.5 documentation 6.1.6 Windows Message Settings The settings in the Windows Message Settings tab require that the Send Windows Message feature is enabled. See the section titled Enabling Features for more information on enabling the Send Windows Message feature. The Windows Message Settings tab is shown below: You can specify the following options: Windows Caption: The text displayed on the title bar of the main windows of the target application.
webcamXP 5.5 documentation 6.1.7 Enabling Features Features are listed in the Enable Features box on the right-hand side of the Motion Detector tab: The following features are available: Save locally: This feature saves information about the alert on the machine running webcamXP. Record Movie: This feature records the output of a camera when an alert is tripped. The output of the camera is saved as a movie file on the machine running webcamXP.
webcamXP 5.5 documentation 6.1.8 Activating Motion Detection In order to activate motion detection, click the Activate button located at the top of the Motion Detector tab. When motion detection is successfully enabled, the red X in the Motion Detector tab will turn to a green check mark: The box in the center of the Motion Detector tab will begin updating with the output of the camera selected in the Source Selection box.
webcamXP 5.5 documentation 6.2 The Audio Detector The audio detector is designed to trip an event whenever an audio signal, taken in from the network or USB microphone connected to webcamXP picks up a signal over a certain threshold. To enable the Audio Detector, navigate to the Audio Detector tab of the Security section. First, specify all the applicable options (see sections below). When all applicable options are specified, click the Activate button.
webcamXP 5.5 documentation From this window, you can specify the level of Line Volume (the amplitude of the data coming to webcamXP from the Microphone itself and the Mic Volume (the amplitude of the data being registered in webcamXP from the connected camera). You may also use the slider bars located above each volume option specify a speaker bias. For example, a slider to the left will cause the sound to appear as if they are only coming from the lefthand speaker. 6.2.
webcamXP 5.5 documentation 6.3 Email Alerts Configuration Email alerts are sent to you whenever an enabled detector (e.g. camera motion detectors or audio detectors) discover an anomaly and trip an event. Email configurations are enabled in the Motion Detector tab. To dictate where and to whom email alerts are sent, navigate to the Email Alerts Configuration tab of the Security section.
webcamXP 5.5 documentation 6.4 Digital Video Recording Digital Video Recording (or DVR) allows you to automatically take video footage of camera output (usually schedule to be performed at regular intervals). To specify the options necessary to run Digital Video Recording, click the Digital Video Recorder tab in the Security section. To begin regular Digital Video Recording, click the Activate button.
webcamXP 5.5 documentation 7 Customizing webcamXP with Options 7.1 General Settings To set webcamXP settings, navigate to the Options section. The default tab within the Options section, the General Settings tab is shown below: You may specify the following options: • Folder for captured images and movies: Enter into this text box the directory you wish webcamXP to save all captured still images (in .JPG format) and all captured movie clips (in .MPG format).
webcamXP 5.5 documentation ßß 7.2 Logo / Page title Settings The webcamXP Overlay and Logo Settings tab is shown below: You may specify the following options: • Display Logo (max 160x60, BMP): Check this box if you want webcamXP to display a logo in the upper left-hand corner of your cameras’ images. By default, webcamXP displays the webcamXP logo on camera images. • Import…: Click this button to import a custom logo (see the Display Logo… option above).
webcamXP 5.5 documentation 7.3 Compression and Encoding Settings The Compression / WM9 Profiles tab is shown below: You may set the following options: • Video Compression filter: select from this drop-down box the type of compression (e.g. the file format) you wish to use when taking recordings from your cameras (e.g. when you click the Record button in the Live View / Selection Source / Controls tab). For this option, you can click the Properties button to specify filter-specific options.
webcamXP 5.5 documentation 7.4 Selecting a Language for webcamXP webcamXP can be translated into multiple languages. By default, webcamXP is published in English. To change your language, simply select your language from the Language menu bar: You may select from the following languages: • French • German • Italian • Portuguese • Spanish Note: You can receive a free webcamXP PRO license if you assist translation efforts by translating webcamXP into your native language.
webcamXP 5.5 documentation 8 webcamXP Administration It is important to keep webcamXP fully licensed and up-to-date. Failure to do so can cause webcamXP to function improperly or fail. The following two sections describe how to register webcamXP and how to update webcamXP. 8.1 Remote Administration When HTTP Broadcasting is enabled, webcamXP can be administered over a web interface. To test your administrative web interface, open a web browser (e.g.
webcamXP 5.5 documentation A set of General Settings and camera-specific (source-specific) settings will be listed in the remote administration page. The following sections describe the administrative functions you can perform using the remote administration page (shown above).
webcamXP 5.5 documentation 8.2 Starting and Stopping Services Immediately visible when you log in to the remote administration page are a list of services and utilities. In the above example, none of the services are enabled (and therefore, none of them are running). As an administrator, you have the right to start and stop services. When a service is started, it will use the options and settings configured and saved by webcamXP on the webcamXP host computer.
webcamXP 5.5 documentation 8.3 Users Management Administrators can also add, edit, and delete users from the remote administration page. To begin administrating users, click on the Users management link, located at the top of the Administration page. The following page will appear: Initially, all user accounts will be listed. Along with the Username, the administrator status of the user and any time limits will be displayed.
webcamXP 5.5 documentation 8.4 Adding a New User To add a new user, click on the [add new user] link from the Users management page. The following page will appear: Enter the new user’s username in the Username textbox and enter his or her password in the Password textbox. If you wish to make the user an administrator, check the Administrator Rights checkbox. Click the add / update button to add the new user.
webcamXP 5.5 documentation 8.5 Editing an Existing User To edit an existing user, click the [edit] button, located to the right of the user’s entry in the Users management page. The following page will appear: Make all necessary changes to the user’s information in the textboxes and checkboxes that appear. Click the update button to accept and finalize changes. 8.6 Deleting a User To remove a user, simply click on the [delete] link, located to the right of the user’s entry.
webcamXP 5.5 documentation 8.7 Statistics The Statistics page provides information about viewership and traffic for your HTTP Broadcasting site. To view the Statistics page, simply click on the Statistics link from the Administration page. The following page will appear: Each session (each visit by a user) will be displayed in the Statistics page. In the above example, the user myuser, who is an administrator, is the only person to have visited the HTTP Broadcast website.
webcamXP 5.5 documentation 8.8 Registering webcamXP / Editing License Information To register webcamXP, select Register from the Help menu. The following window will appear: Enter your license key in the textbox and click OK. If your license key is in the format of WXP-xxxx-xxxx, your license pertains to a previous version of webcamXP. Click on the webcamXP 2008 / 2008 license… button. The following window will appear: Enter your email address in the Email textbox.
webcamXP 5.5 documentation 8.9 Using webcamXP Mobile Many of the monitoring functions of webcamXP are also available for a Windows Mobile-enabled device. To begin using the webcamXP mobile functionality, install the “webcamXP.Mobile.cab” file on your mobile device. Depending on the Windows Mobile version, installation procedures may differ. Consult your mobile device’s instructional documentation for more information on installation.
webcamXP 5.5 documentation Select Configuration Authentication. The following screen will appear: Enter your username in the Username textbox. Enter your password in the Password textbox. Click the OK button.
webcamXP 5.5 documentation From the main window of your PDA application (shown below), you can control the positioning of the camera using the four arrow buttons: The up and down arrow buttons control the tilt of the camera. The left and right buttons control the pan position of the camera. The plus and minus (+ and -) buttons control the zoom of the camera. Auto capture is also available to users of the webcamXP 5 for PocketPC.
webcamXP 5.5 documentation Appendix A: Required Firewall and Anti-Virus Settings In order for your broadcasted website to display to users, the port used must be given an allowance in any and all firewall software. Firewall software is designed to block connections on specific ports, thus cutting off primary lines of attacks for hackers.
webcamXP 5.5 documentation Click the Add Program… button. The following window will appear: Select webcamXP 5 from the list and click OK. Click OK in the Windows Firewall window to accept changes and add the exception.
webcamXP 5.5 documentation Appendix B: Port forwarding In order for webcamXP’s output to be reachable or viewable over the Internet, it is required that all HTTP ports are enabled and unblocked in your network’s router or modem. Also, the router must be configured to automatically route visitors to the computer running webcamXP. This process is called Port Forwarding. Port Forwarding methods differ by router manufacturer and model. A good tutorial on Port Forwarding can be found on http://www.
webcamXP 5.5 documentation Appendix C: Setting up a Dynamic Domain Name Service You may wish to set up a domain name (e.g. www.mywebsite.com). There are various Domain Name Registration services. A simple Internet search will yield many possibilities. Domain Names (unless they are for registered non-profit organizations), cost a monthly or yearly price to register and maintain. The easiest service to use is When you first visit www.dyndns.org. It is free and compatible with webcamXP www.
webcamXP 5.5 documentation Appendix D: Controlling webcamXP from an External Application webcamXP can be controlled and utilized from a custom, third-party website. There are two methods to doing so. The first, HTTP, is rather straight-forward. It utilizes the HTTP Get functionality of the files hosted in webcamXP’s remote administration. For a list of the available commands, please read the section titled Remote Administration.
webcamXP 5.5 documentation Appendix E: Controlling webcamXP by Windows Messaging webcamXP can also be controlled by means of Windows messaging. Windows messaging can be accomplished using Visual C++ or C by calling the Windows 32 API function SendMessage(). To control webcamXP, an integer value should be sent to webcamXP.
webcamXP 5.5 documentation WM_MOTIONPICTURE WM_USER+3204 WM_MOTIONALERT WM_USER+3205 WM_MOTIONFTP WM_USER+3206 WM_MOTIONHTTPPOST WM_USER+3207 WM_MOTIONEMAIL WM_USER+3208 WM_SENDSMS WM_USER+3209 WM_ADDGALLERY WM_USER+3210 WM_SENDWINMSG WM_USER+3211 WM_REFRESHOVERLAYFORM WM_USER+3501 WM_CLEANEXIT WM_USER+3701 Note: webcamXP allows for easy integration with Power-Home, a home scripting and macro application.
webcamXP 5.5 documentation Appendix F: Customizing Your Page’s Look and Feel (Using CSS) The default HTTP Broadcast page uses a default Crystal Stylesheet (CSS). If you wish to edit the CSS manually, you can do so by locating the file “default.css.” “default.css” is located in the WebFiles\CSS_Styles folder of your webcamXP installation file (by default, C:\Program Files\wLite). The “default.
webcamXP 5.5 documentation To change the default image for the offline notification, simply rename “offline.jpg” to “offlineprevious.jpg” and rename the image of your choice to “offline.jpg.” To change the default image for the loading notification, rename “loading.jpg” to “loadingprevious.jpg” and rename the image of your choice to “loadingprevious.jpg.” You can specify a custom image (one not included in the library) as long as the image is 320 pixels x 240 pixels in size.
webcamXP 5.5 documentation Appendix G: Setting up webcamXP as a Windows Service As a Windows service, webcamXP can run in the background of most Microsoft Windows processes. While running, webcamXP can perform its normal duties of handling events thrown by detectors, monitoring camera output, and saving screenshots and movies. To set up webcamXP as a Window service, select the webcamXP Service controller icon from your webcamXP start menu.
webcamXP 5.5 documentation Select Automatic from the Startup Type drop-‐down box. Click OK to save changes.
webcamXP 5.5 documentation Appendix H: Starting webcamXP When Windows Loads There are two methods for automatically starting and executing webcamXP. The first, described in Appendix G, is to run webcamXP as a Windows Service. When run as a service, webcamXP will begin even when no user is logged into Windows. Windows services is perfect for dedicated servers that must run webcamXP regardless of the connected users. The second method is to add webcamXP to the Windows startup group.
webcamXP 5.5 documentation Appendix I: Keeping webcamXP Up to Date In order to update webcamXP, select Check for Updates from the Tools drop-down menu. The following window will appear: Click the Check for update button. webcamXP will contact its parent server and check for upgrades. The upgrades will be listed in the list box. Select the first update from the list and click the Install update button. The two status bars at the bottom of the window will progress until installation is complete.
webcamXP 5.5 documentation Appendix J: Making Changes using the Advanced Settings Editor The Advanced Editor allows you to easily specify complex, fundamental options of webcamXP without editing code or messing with complicated configuration files. To open the Advanced Editor, open Microsoft Windows Explorer and navigate to your webcamXP installation directory (standardly C:\Program Files\wLite). Double-click on the wTweaker application.