
Operation Manual

webcamXP"5.5"documentation"
" @"21"@" "
3.1.7.2 Adding a Shape
To add a shape, click on the Shape button. The Shape button is the third from the left button, located directly
below the camera sample object.
Once the Shape button has been pressed, click in the camera sample image box where you wish the upper
left-hand corner of the shape to appear (e.g. where you wish the shape to begin).
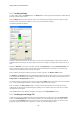
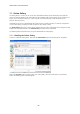
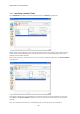
The following window will appear:
Select the shape you wish to add by clicking on one of the three-available buttons at the top of the window.
Available shapes are rectangle (or square) with sharp corners, rectangle (or square) with rounded corners, or
oval.
Specify the Fill color (the color of the shape’s interior), the Border Color, and the Transparent Color (the
color you wish the shape to obtain when its alpha value is decreased and its transparency is increased) by
clicking on the colored boxes to the right of each option.
Enter a width for the shape’s border by entering a number of pixels in the Border width textbox.
The ImageX and ImageY options are automatically specified by the location of your cursor when you clicked
in the camera sample image. Enter a width and height (both in pixels) for the shape by entering values in the
Image width and Image height textboxes.
You can also specify an alpha value by entering a value in the Alpha textbox. The alpha value is a percentage
(0% - 100%) representing transparency. 0% is invisible while 100% is fully opaque.
Enter a number in the Auto-refresh textbox. The Auto-refresh option declares in intervals of how many
milliseconds the shape should repaint itself (thus updating on the camera’s view). If a value of 0 is entered,
the shape will never refresh.
Click the OK button to save changes and place your shape on the Overlay Editor window.
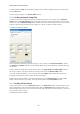
3.1.7.3 Adding a Local Image File
To add an image to your graphical overlay from an image file from your hard drive, click the Local Image
button. The Local Image button is the button located four from the left directly under the sample camera
view. When the Local Image button is selected, click in the camera sample box where you wish your local
image file’s upper left-hand corner to appear (e.g. where you wish the image to begin).