GAS GRILL LP Gas Grill Owner’s Guide ESNA Guía del Propietario de la Barbacoa de Gas Propano Licuado - Pg. 47 Mode d’emploi du Grill à gaz PL - Pg. 85 SUMMIT® GRILL CENTER #56567 YOU MUST READ THIS OWNER’S GUIDE BEFORE OPERATING YOUR GAS GRILL. DANGER If you smell gas: 1. Shut off gas to the appliance. 2. Extinguish any open flames. 3. Open lid. 4. If odor continues, keep away from the appliance and immediately call your gas supplier or your fire department.
WARNINGS DANGER Failure to follow the Dangers, Warnings and Cautions contained in this Owner’s Manual may result in serious bodily injury or death, or in a fire or an explosion causing damage to property. WARNINGS Do not store a spare or disconnected liquid propane cylinder under or near this barbecue. Improper assembly may be dangerous. Please follow the assembly instructions carefully.
TABLE OF CONTENTS WARNINGS . . . . . . . . . . . . . . . . . . . . . . . . . . . . . . . . . . . . . . . . . . 2 SEAR STATION® IGNITION & USAGE . . . . . . . . . . . . . . . . . . . .31 SEAR STATION® BURNER IGNITION . . . . . . . . . . . . . . . . . . . . . . . . . . . . . . . . . 31 TABLE OF CONTENTS . . . . . . . . . . . . . . . . . . . . . . . . . . . . . . . . . 3 TO EXTINGUISH . . . . . . . . . . . . . . . . . . . . . . . . . . . . . . . . . . . . . . . . . . . . . . . . .
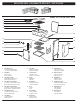
EXPLODED VIEW • DIAGRAMA DE DESPIECE • VUE ECLATEE 1 2 SUMMIT_6Brn_Grill Center_LP_US_021511 30 3 4 31 32 5 6 7 33 34 35 36 8 37 9 38 10 11 12 39 40 41 13 14 15 16 17 18 19 20 42 43 44 21 22 23 45 24 46 25 47 48 49 26 50 51 27 28 29 52 53 54 55 56 4
EXPLODED VIEW • DIAGRAMA DE DESPIECE • VUE ECLATEE 1. Shroud Hardware Accesorios de la cubierta Quincaillerie de l’étui 20. Water Baffle / Heat Shield Reflector de agua / Pantalla térmica Baffle à eau / Protection anti-chaleur 39. Smoker Bar Barra del ahumador Barre du fumoir 2. Shroud Cubierta Etui 21. Disposable Drip Pan Bandeja de goteo desechable Egouttoir jetable 40. Smoker Burner Tube Tubo quemador del ahumador Tube du brûleur du fumoir 3. Thermometer Termómetro Thermomètre 4.
EXPLODED VIEW • DIAGRAMA DE DESPIECE • VUE ECLATEE SUMMIT_Grill Center Left Cabinet_121610 1 2 3 4 5 6 11 12 7 13 8 9 14 10 15 1. Rotisserie Motor Motor del asador Moteur de la rôtissoire 6. Left End Skirt Faldón del extremo izquierdo Jupe d’extrémité gauche 11. 2. Rotisserie Bracket Soporte del asador giratorio Support de la rôtissoire 7. Adjustable Leg Pata ajustable Pied ajustable 12. Wire Shelf Estante de alambre Etagère métallique 3. Table Mesa Tablette 8.
EXPLODED VIEW • DIAGRAMA DE DESPIECE • VUE ECLATEE SUMMIT_Grill Center Left Cabinet_LHR_051911 1 2 3 4 5 10 11 6 12 7 8 13 9 14 1. Rotisserie Motor Motor del asador Moteur de la rôtissoire 6. Adjustable Leg Pata ajustable Pied ajustable 11. Wire Shelf Estante de alambre Etagère métallique 2. Rotisserie Bracket Soporte del asador giratorio Support de la rôtissoire 7. Paper Towel Holder Portatoallas de papel Support pour serviette en papier 12.
EXPLODED VIEW • DIAGRAMA DE DESPIECE • VUE ECLATEE SUMMIT_Grill Center SB Cabinet_122110 1 2 3 4 5 6 14 7 15 16 8 17 9 10 11 18 12 13 19 20 1. Side Burner Lid Tapa del quemador lateral Couvercle du brûleur latéral 8. Wire Shelf Estante de alambre Etagère métallique 15. Shelf Bracket Soporte del estante Support pour étagère 2. Wok Ring Aro para wok Bague pour wok 9. Control Knob Perilla de control Bouton de commande 16. Water Deflector Deflector de agua Déflecteur à eau 3.
EXPLODED VIEW • DIAGRAMA DE DESPIECE • VUE ECLATEE SUMMIT_Grill Center_Social_SB Cabinet_122110 1 2 3 4 5 6 14 7 15 16 8 9 10 11 17 12 13 18 19 1. Side Burner Lid Tapa del quemador lateral Couvercle du brûleur latéral 8. Side Burner Shelf Estante del quemador lateral Etagère du brûleur latéral 15. Shelf Bracket Soporte del estante Support pour étagère 2. Wok Ring Aro para wok Bague pour wok 9. Control Knob Perilla de control Bouton de commande 16.
EXPLODED VIEW • DIAGRAMA DE DESPIECE • VUE ECLATEE SUMMIT_Grill Center Middle Cabinet_121610 1 7 2 8 3 4 9 5 10 6 11 1. Cooler Lid Tapa del enfriador Couvercle du refroidisseur 5. Door Assembly Ensamble de la puerta Assemblage de la porte 9. 2. Cooler Enfriador Refroidisseur 6. Front Panel Panel frontal Panneau avant 10. Trash Can Bote de basura Corbeille 3. Corner Cabinet Top Panel Panel superior del gabinete de esquina Panneau supérieur du meuble de coin 7.
EXPLODED VIEW • DIAGRAMA DE DESPIECE • VUE ECLATEE SUMMIT_Grill Center Middle Cabinet2_121610 1 7 2 8 3 4 9 5 10 6 11 1. Cooler Lid Tapa del enfriador Couvercle du refroidisseur 5. Door Assembly Ensamble de la puerta Assemblage de la porte 9. Left Back Panel Panel izquierdo posterior Panneau arrière gauche 2. Cooler Enfriador Refroidisseur 6. Front Panel Panel frontal Panneau avant 10. Trash Can Bote de basura Corbeille 3.
EXPLODED VIEW • DIAGRAMA DE DESPIECE • VUE ECLATEE SUMMIT_Grill Center Social Center_121610 1 2 3 4 10 11 12 5 6 7 8 13 9 14 15 1. Condiment Holder Portacondimentos Support pour condiments 6. Shelf Frame Bastidor del estante Cadre de l’étagère 11. 2. Table Mesa Tablette 7. Shelf Estante Etagère 12. Right Frame Skirt Faldón del bastidor derecho Jupe du cadre de droite 3. Shelf Bracket Soporte del estante Support pour étagère 8. Left Door Puerta izquierda Porte de gauche 13.
EXPLODED VIEW • DIAGRAMA DE DESPIECE • VUE ECLATEE SUMMIT_Grill Center Social Center_LHR_051811 1 2 3 4 10 11 12 5 6 7 13 8 14 9 15 1. Condiment Holder Portacondimentos Support pour condiments 6. Shelf Frame Bastidor del estante Cadre de l’étagère 11. Left Frame Bastidor derecho Cadre de gauche 2. Table Mesa Tablette 7. Shelf Estante Etagère 12. Left End Skirt Faldón del extremo izquierdo Jupe d’extrémité gauche 3. Shelf Bracket Soporte del estante Support pour étagère 8.
WARRANTY Weber-Stephen Products LLC (Weber) hereby warrants to the ORIGINAL PURCHASER of this Weber® gas grill that it will be free of defects in material and workmanship from the date of purchase as follows: Aluminum castings: Stainless steel shroud: Porcelain-enameled shroud: Stainless steel burner tubes: Stainless steel cooking grates: Stainless steel Flavorizer® bars: Porcelain-enameled cast-iron cooking grates: Porcelain-enameled cooking grates: Porcelain-enameled Flavorizer® bars: Infrared rotisserie
GAS INSTRUCTIONS SAFE HANDLING TIPS FOR LIQUID PROPANE GAS CYLINDERS r -JRVJE 1SPQBOF -1 HBT JT B QFUSPMFVN QSPEVDU BT BSF HBTPMJOF BOE OBUVSBM HBT -1 gas is a gas at regular temperatures and pressures. Under moderate pressure, inside a cylinder, LP gas is a liquid. As the pressure is released, the liquid readily vaporizes and becomes gas.
GAS INSTRUCTIONS IMPORTANT LP CYLINDER INFORMATION DANGER NEVER store a spare LP cylinder under or near Weber® gas appliances. NEVER fill the tank beyond 80% full. Failure to follow these statements exactly may result in a fire causing death or serious injury. 2 1 5 Weber® gas appliances are equipped for a cylinder supply system designed for vapor withdrawal. WARNING: Only use Weber® gas appliances outdoors in a well-ventilated area.
GAS INSTRUCTIONS A) Locate hose retention clip (1) on regulator hose. Secure into slot (2) on underside of tank scale. WARNING: The hose must be secured to the tank scale with the Hose Retention Clip. Failure to do so could cause damage to the hose resulting in a fire or explosion which can cause serious bodily injury or death, and damage to property. 1 2 Some LP tanks have differing top collar assembles. (The top collar is the metal protective ring around the valve.
GAS INSTRUCTIONS WARNING: The gas connections of your Summit® gas grill have been factory tested. We do however recommend that you leak check all gas connections before operating your Summit® gas grill. Remove Control Panel Parts required: Phillips screwdriver and a towel. A) Remove the burner control knobs (1). B) Open both doors and place a towel on top of the doors. This will protect the control panel and tops of the doors from getting scratched on the next step.
GAS INSTRUCTIONS Remove Side Burner Cabinet Back Panel and Side Burner Cabinet Water Deflector Tools required: Phillips screwdriver. A) Facing the back of the unit, remove screws that secure back panel of side burner cabinet with a Phillips screwdriver (1). B) Remove back panel and set aside (2). C) Facing the front of the unit, open side burner cabinet door and remove screw securing side burner cabinet water deflector (3).
GAS INSTRUCTIONS Check A) B) C) D) Main gas line to manifold connection (1). Rotisserie (I.R. Burner) gas line connection (2). Bulkhead and gas supply hose connection (3). Side burner hose to bulkhead connection (4). WARNING: If there is a leak at connection (1, 2, 3, or 4), re-tighten the fitting with a wrench and recheck for leaks with soap and water solution. If a leak persists after retightening the fitting, turn off the gas. DO NOT OPERATE THE GRILL.
GAS INSTRUCTIONS REFILLING THE LIQUID PROPANE CYLINDER We recommend that you refill the LP cylinder before it is completely empty. Removal of the LP cylinder: A) Close cylinder valve (turn clockwise) (1). B) Unscrew regulator coupling by turning counterclockwise, by hand only (2). C) Loosen cylinder lock wing nut and turn cylinder lock up out of the way (3). D) Lift cylinder off.
BEFORE USING THE GRILL FUEL LEVEL There are two ways to check the fuel level in your tank: electronically and manually. 3 To check the level using the electronic tank scale, press the tank scale button, located on the right side of the control panel, for two–three seconds. The LED indicates the fuel level in the tank. 2 To check the level using the manual tank scale, view the color indicator level line, located on the side of the tank scale.
SNAP IGNITION OPERATION Always open the lid before igniting the burners. A) Each control knob has its own igniter electrode built in. To create a spark, you must push the control knob in (1) and turn it to START/HI (2). B) This action will generate gas flow and a spark to the burner lighting tube (3). You will hear a “snap” from the igniter. You will also see a 3" – 5" orange flame coming from the burner lighting tube at the left side of the burner (4).
MAIN BURNER IGNITION & USAGE MAIN BURNER IGNITION Summary lighting instructions are inside the left-hand cabinet door. DANGER Failure to open the lid while igniting the barbecue’s burners, or not waiting five minutes to allow the gas to clear if the barbecue does not light, may result in an explosive flare-up which can cause serious bodily injury or death.
MAIN BURNER IGNITION & USAGE MAIN BURNER MANUAL IGNITION DANGER 1 Failure to open the lid while igniting the barbecue’s burners, or not waiting five minutes to allow the gas to clear if the barbecue does not light, may result in an explosive flare-up which can cause serious bodily injury or death. 4 A) Open the lid (1). B) Make sure all burner control knobs are turned off (2). (Push each knob in and turn it clockwise to ensure it is in the OFF position.
GRILLING TIPS & HELPFUL HINTS r "MXBZT QSFIFBU UIF HSJMM CFGPSF DPPLJOH 4FU BMM CVSOFST PO )* IFBU BOE DMPTF MJE IFBU GPS NJOVUFT PS VOUJM UIFSNPNFUFS SFHJTUFST m ' m $ r 4FBS NFBUT BOE DPPL XJUI UIF MJE EPXO GPS QFSGFDUMZ HSJMMFE GPPE FWFSZ UJNF r (SJMMJOH UJNFT JO SFDJQFT BSF CBTFE PO ' $ XFBUIFS BOE MJUUMF PS OP XJOE "MMPX more cooking time on cold or windy days, or at higher altitudes. Allow less cooking time in extremely hot weather.
COOKING METHODS The most important thing to know about grilling is which cooking method to use for a specific food, direct or indirect. The difference is simple: place the food directly over the fire, or arrange the fire on either side of it. Using the right method is the shortest route to great results—and the best way to ensure doneness safety. X 6 BURNER DIRECT COOKING The direct method, similar to broiling, means the food is cooked directly over the heat source.
SIDE BURNER IGNITION & USAGE SIDE BURNER IGNITION APAGADO ARRÊTÉ Summary lighting instructions are inside the left-hand cabinet door. DANGER Failure to open the lid while igniting the side burner, or not waiting five minutes to allow the gas to clear if the side burner does not light, may result in an explosive flare-up which can cause serious bodily injury or death. OFF START/HI LOW WARNING: Check hose before each use of barbecue for nicks, cracking, abrasions or cuts.
SIDE BURNER IGNITION & USAGE SIDE BURNER MANUAL IGNITION Summary lighting instructions are inside the left-hand cabinet door. DANGER Failure to open the lid while igniting the side burner, or not waiting five minutes to allow the gas to clear if the side burner does not light, may result in an explosive flare-up which can cause serious bodily injury or death. WARNING: Check hose before each use of barbecue for nicks, cracking, abrasions or cuts.
SIDE BURNER IGNITION & USAGE SIDE BURNER USAGE The side burner has two burner rings to control cooking temperature. Burner , the inside burner, cooks with a small flame and works best with smaller sauce pans and skillets. Burner , the outside burner, cooks with a large flame and works best with larger pans, pots, skillets, and woks. For more intense heat, you may utilize both burners at the same time. Wok Cooking The side burner also comes with a wok ring for wok cooking.
SEAR STATION® IGNITION & USAGE SEAR STATION® BURNER IGNITION APAGADO ARRÊTÉ Summary lighting instructions are inside the left-hand cabinet door. DANGER Failure to open the lid while igniting the barbecue’s burners, or not waiting five minutes to allow the gas to clear if the barbecue does not light, may result in an explosive flare-up which can cause serious bodily injury or death. The Sear Station® burner has an on or off control setting.
SEAR STATION® IGNITION & USAGE SEAR STATION® BURNER MANUAL IGNITION DANGER 1 Failure to open the lid while igniting the barbecue’s burners, or not waiting five minutes to allow the gas to clear if the barbecue does not light, may result in an explosive flare-up which can cause serious bodily injury or death. 2 3 The Sear Station® burner, has an on or off control setting. To ignite the Sear Station® burner, you must first ignite the two adjacent main burners.
SMOKER BURNER IGNITION & USAGE SMOKER BURNER IGNITION APAGADO ARRÊTÉ DANGER Failure to open the lid while igniting the grill, or not waiting five minutes to allow the gas to clear if the grill does not light, may result in an explosive flare-up which can cause serious bodily injury or death. OFF START/HI LOW Smoker Burner Snap Ignition Note: The control knob snap igniter creates a spark from the igniter electrode to the burner lighting tube.
SMOKER BURNER IGNITION & USAGE SMOKER BURNER MANUAL IGNITION WARNING: Check hose before each use of grill for nicks, cracking, abrasions or cuts. If the hose is found to be damaged in any way, do not use the grill. Replace using only Weber® authorized replacement hose. Contact the Customer Service Representative in your area using the contact information on our web site. Log onto www.weber.com®. 1 2 3 9 8 6 A) Open the lid (1).
SMOKER BURNER IGNITION & USAGE USING THE SMOKER The smoker uses presoaked wood chips. For best results with faster cooking foods like steaks, burgers, and chops, etc., we recommend using finer wood chips because they ignite and create smoke faster. For longer cooking foods such as roasts, chicken, and turkeys, etc., we recommend using larger wood chunks because they ignite slowly and provide smoke for a longer period of time.
ROTISSERIE BURNER IGNITION & USAGE ROTISSERIE BURNER IGNITION APAGADO ARRÊTÉ Rotisserie Burner Snap Ignition Note: Each control knob snap igniter creates a spark from the igniter electrode to the burner lighting tube. You generate the energy for the spark by pushing in the control knob and turning it to START/HI. This will ignite each individual burner.
ROTISSERIE BURNER IGNITION & USAGE ROTISSERIE BURNER MANUAL IGNITION 5 ATTENTION: READ BEFORE LIGHTING ROTISSERIE BURNER 1 After a period of non-use, before lighting the rotisserie burner, a few seconds must pass for the gas supply line to fill. When holding a match to the rotisserie burner you will see a flash of flames moving from left to right across the rotisserie burner surface. The rotisserie burner is not lit until the entire ceramic surface is aflame.
ROTISSERIE BURNER IGNITION & USAGE IMPORTANT SAFEGUARDS OPERATING THE ROTISSERIE Note: Before using your rotisserie, measure your food at the widest point. If it exceeds 9½" (241.8 mm), it is too large to fit the rotisserie. If it is too large, food can be prepared using a roast holder and the indirect cooking method. WARNING: Set up the rotisserie with food before lighting rotisserie burner. WARNINGS A) To set up rotisserie motor, push the button on the retractable rotisserie panel (1).
ROTISSERIE BURNER IGNITION & USAGE F) Insert the pointed end of the rotisserie shaft into the motor. Lower the rotisserie spit into the grooves on the cookbox (6). G) The rotisserie shaft should rotate so that the heavy side of the meat or poultry rotates down to the bottom. Large cuts may require the removal of the cooking grates and warming rack to allow full rotation of the shaft. Remount the food if necessary for better balance. H) Turn the motor on. X 6 ROTISSERIE COOKING r .
TROUBLESHOOTING PROBLEM CHECK SOLUTION Burners burn with a yellow or orange flame, in conjunction with the smell of gas. (This is normal for the burner lighting tube.) Inspect spider/insect screens for possible obstructions. (Blockage of holes.) Clean spider/insect screens. Refer to “ANNUAL MAINTENANCE.” Symptoms: The excess flow safety device, which is part of the barbecue to cylinder connection, may have been activated.
SEAR STATION® TROUBLESHOOTING PROBLEM CHECK Burners burn with a yellow or orange flame, in conjunction with the smell of gas. (This is normal for the burner lighting tube.) Sear Station® burner does not light. General Symptoms: Burner does not light. OR Burner has a small flickering flame. SOLUTION Inspect spider/insect screens for possible obstructions. (Blockage of holes.) Clean spider/insect screens. Refer to “ANNUAL MAINTENANCE.
MAINTENANCE CLEANING WEBER® SPIDER/INSECT SCREENS WARNING: Turn your Weber® gas barbecue off and wait for it to cool before cleaning. CAUTION: Do not clean your Flavorizer® bars or cooking grates in a self-cleaning oven. Your Weber® gas barbecue, as well as any outdoor gas appliance, is a target for spiders and other insects. They can nest in the venturi section (1) of the burner tubes. This blocks the normal gas flow, and can cause the gas to flow back out of the combustion air opening.
MAINTENANCE REPLACING MAIN BURNERS Note: Your Summit® Gas Grill must be off and cool. A) Turn gas off at source. B) Disconnect gas supply. C) Remove cooking grates. D) Remove Flavorizer® bars. E) Remove smoker box (if included in your model). Removing Control Panel Parts required: Phillips screwdriver and a towel. A) Remove the burner control knobs (1). B) Open both doors and place a towel on top of the doors.
MAINTENANCE Removing The Sear Station® Burner To remove the Sear Station burner®, pull the burner tube toward you. This removes it from the burner tube notch (7). Then rotate the tube clockwise (8), taking care to rotate it so that the screw at the end of the tube (9) fits through the notch in the heat shield opening (10). When the burner tube is free, remove it from the cookbox (11). 1 7 5 11 2 8 A) To reinstall the manifold assembly, reverse steps for “Removing Control Panel” as previously described.
MAINTENANCE SIDE BURNER MAINTENANCE WARNING: All gas controls and supply valves should be in the OFF position. Check Igniter Wires on the Underside of the Side Burner Tools required: Phillips screwdriver. A) To remove side burner cabinet back panel and side burner cabinet water deflector: a) Facing the back of the unit, remove screws that secure back panel of side burner cabinet with a Phillips screwdriver (1). b) Remove back panel and set aside.
MAINTENANCE Check Fit and Alignment of the Side Burner Components A) Make sure side burner head is properly aligned over igniter electrode and burner. The electrode must fit through the electrode opening (7) and lock into the tab on the burner (8). B) Make sure side burner outer ring 2 is positioned correctly over side burner head; rotate the ring until the locating pin locks into the hole on the burner head (9).