SMART EX-335 • SX-335 • SE-SX-335 EPX-335 • SE-EPX-335 • SPX-435 • SE-SPX-435 NG Owner’s Manual REGISTER TODAY Register your gas grill and receive special content to make you the ultimate backyard hero. Scan the QR Code or register online at weber.registria.com Need help? Visit photoregister.com/help or text help to 71403 52969 Keep this Owner’s Manual for future reference, thoroughly read through it, and if you have any questions please contact us today.
Welcome to Weber Important Safety Information DANGER, WARNING, and CAUTION statements are used throughout this Owner's Manual to emphasize critical and important information. Read and follow these statements to help ensure safety and prevent property damage. The statements are defined below. m DANGER: Indicates a hazardous situation which, if not avoided, will result in death or serious injury. m WARNING: Indicates a hazardous situation which, if not avoided, could result in death or serious injury.
TABLE OF CONTENTS We are so glad that you have joined us on the journey to grilling happiness. Please take some time to read through this Owner’s Manual to ensure that you are up and grilling quickly and easily. We want to be with you for the life of your grill, so please take just a couple of minutes to register your grill. When you sign up for a WEBER-ID as part of your registration, we will deliver special grillrelated content just for you to enjoy.
The Weber Promise The WEBER Promise At WEBER, we pride ourselves on two things: making grills that last and providing a lifetime of excellent customer service. Thank you for purchasing a WEBER product. Weber-Stephen Products LLC, 1415 S. Roselle Road, Palatine, Illinois 60067 (“WEBER”) prides itself on delivering a safe, durable, and reliable product. This is WEBER’s Voluntary Warranty provided to you at no extra charge.
HIGH PERFORMANCE GRILLING D F The high performance grilling system sets the standard in the world of gas grilling, and lands Weber in a class of its own. This powerful grilling system is based on over 65 years of grilling experience, culinary expertise, and most importantly, the wants and needs of the people who matter most – our grilling community. Each component was uniquely designed for ease-of-use and to provide an unequaled satisfaction to your backyard grilling experience.
Getting Started Important Information about Natural Gas & Gas Connections What is Natural Gas? Natural gas (NG) is a combustible, gaseous mixture of simple hydrocarbon compounds, usually found in deep underground reservoirs formed by porous rock. It is a fossil fuel composed almost entirely of methane. Natural gas is delivered by your local utility through an underground pipeline system. General Specifications • Three burner grills are designed to operate at 7" of water column pressure (0.2526 psi).
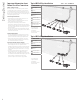
A Connect the Hose to the Gas Supply A quick-disconnect fitting connects your grill to the gas supply. Gas will not flow unless the quickdisconnect is properly engaged. 1) Check that all burner control knobs are in the off position. Check by pushing in and turning knobs clockwise (A). 2) Slide the collar of the quick-disconnect back (B). 3) Push male fitting of the hose into the quickdisconnect and maintain pressure. Slide the collar closed (C). If it does not engage or lock, repeat procedure.
Getting Started What is a Leak Check? Once the hose is properly connected, it is necessary to perform a leak check. A leak check is a reliable way to verify that gas is not escaping after you connect the hose to the gas supply. The fuel system in your grill features factory-made connections that have been thoroughly checked for gas leaks and the burners have been flame-tested. WEBER recommends performing a thorough leak check after assembly, as well as annually.
F Getting Started b) If the leak is at any fittings indicated in illustration (F), re-tighten fitting with a wrench and recheck for leaks with soap and water solution. If leak persists, turn off the gas. DO NOT OPERATE THE GRILL. c) If the leak is at any fittings indicated in illustration (G), turn off the gas. DO NOT OPERATE THE GRILL. If a leak is present, contact the Customer Service Representative in your area using the contact information on our website.
Operation The Very First Time You Grill A E B F C G D m DANGER: Do not line the slide-out grease tray Perform an Initial Burn-Off Heat the grill on the highest setting, with the lid closed, for at least 20 minutes prior to grilling for the first time. Every Time You Grill Meal-to-Meal Maintenance The Meal-To-Meal Maintenance plan includes the following simple, yet important, steps that should always be performed prior to grilling.
Operation Igniting the Grill Using the Electronic Ignition System to Ignite the Grill Each control knob operates an individual burner, and each burner ignites independently. Ignite the burners starting from left to right. All burners should be lit for preheating, however, all burners do not have to be lit while grilling. 1) Open the grill lid (A). 2) Check that all burner control knobs are in the off position. Check by pushing in and turning knobs clockwise (B). 3) Turn the gas supply valve on (C).
Operation Using the sear zone Searing is a direct grilling technique used on meats, such as steak, poultry parts, fish and chops. Searing browns the surface of the food at a high temperature. By searing both sides of the meat, you caramelize the food surface, creating a more desirable flavor. Ignition of the sear burner is the same as ignition of a main burner, each burner ignites independently. 1) Open the lid and ignite all of the burners, including the sear burner.
Operation Igniting the Side Burner Using the Electronic Ignition to Ignite the Side Burner If one or more of the main burners on your grill are already lit and you would like to ignite the side burner, skip to step 3. If none of the main burners are lit and you are only using the side burner, start with step 1. 1) Check that the side burner control knob is in the off position. Check by pushing in and turning knob clockwise (A). Also check that all main burner control knobs are in the off position.
Operation Integrated WEBER CONNECT Technology Using the WEBER CONNECT Module A WEBER CONNECT App B C First things first. Download the WEBER CONNECT app.
Please follow these steps for setting a notification to alert you when your grill has reached a target internal temperature: 1) Push any button located on the temperature controller to turn ON the WEBER CONNECT module. 2) Push the BELL button to activate grill temperature notification. 3) While the display is blinking, push the + or buttons to set the target grill temperature. Push the CHECKMARK button to confirm your selection. 4) Reapeat steps 2 and 3 to update or set a new target temperature.
Tips and Hints The Flame Direct or Indirect OFF HIGH MEDIUM DIRECT HEAT SETUP INDIRECT HEAT SETUP Use the direct method for small, tender pieces of food that take less than 20 minutes to cook, such as: hamburgers, steaks, chops, kabobs, boneless chicken pieces, fish fillets, shellfish, and sliced vegetables. With direct heat, the fire is right below the food. It sears the surfaces of the food, developing flavors, texture, and delicious caramelization while cooking the food all the way to the center.
WEBER CRAFTED Outdoor Kitchen Collection Ready This feature is only available on select models. Some models are Outdoor Kitchen Collection Ready with the included Grates and Frame. Remove the right-hand cooking grate. Place the Frame on the right-hand side of the cookbox for the widest range of heat control (A). The Spacer included with your grill is used only when cooking with the WEBER CRAFTED Outdoor Kitchen Collection (B).
D Using the Smoker Box This feature is only available on select models. Option 2: Setting up for Direct Cooking The smoker box is positioned where the Weber logo is over the center burner during grilling, with main burners set on low (G). Notes: For best smoking results, burners in use should be on low. Do not place the main body of the smoker box directly over a burner. This could ignite all of the wood chips at once resulting in reduced smoking times.
WEBER CRAFTED Grill Locker Storage Hooks This feature is only available on select models. Use the double-sided hooks on the side of the cabinet (B) for convenient storage of cooking grates on the outside of the grill. Additional hooks on the inside of the cabinet store the WEBER CRAFTED spacer grate, which can be used with WEBER CRAFTED Outdoor Kitchen Collection grillware.. Note: Do not place hot cooking grates on storage hooks. The side storage area (A) is ideal for storing accessories and grillware.
Product Care Cleaning and Maintenance A D B E C F Cleaning the Inside of the Grill Over time, the performance of your grill can diminish if it has not been maintained properly. Low temperatures, uneven heat, and food sticking to cooking grates are all signs that cleaning and maintenance are overdue. When your grill is off and cool, start by cleaning the inside, from the top down. A thorough cleaning is recommended at least twice a year. Consistent use may require quarterly cleanings.
Located under the burners, the heat deflectors distribute heat evenly throughout the cookbox while cooking. Keeping heat deflectors clean will enhance the cooking performance of your grill. 1) Scrape the heat deflectors with a plastic scraper (G). 2) If necessary, brush the heat deflectors with a stainless steel bristle grill brush. 3) Remove heat deflectors and set aside.
Troubleshooting MAIN BURNER(S) or SIDE BURNER WILL NOT IGNITE SYMPTOM • Main burners or side burner do(es) not ignite when following the electronic ignition instructions in the “Operation” section of this owner's manual. CAUSE SOLUTION There is a problem with gas flow. If any burner does not ignite, the first step is to determine if there is gas flowing to the burner(s). To check this, follow the instructions below for “Lighting Your Grill with a Match.
Proper Burner Flame Pattern SYMPTOM • Grill does not reach desired temperature or heats unevenly. • One or more of the burners fail to ignite. • Flame is low when burner is on high position. • Flames do not run the whole length of the burner. • Burner flame pattern is erratic. The burners in your grill were factory set for the correct air and gas mixture. When the burners are performing correctly, you will see a specific flame pattern.
Troubleshooting GREASY GRILL (Peeling Paint & Flare-Ups) SYMPTOM • Inside of lid appears to have the appearance of peeling paint. CAUSE SOLUTION The flakes you see are accumulated cooking vapors that have turned into carbon. This happens over time after repeated use of your grill. This is not a defect. Clean the lid. Refer to the “Product Care” section. SYMPTOM • Experiencing flare-ups when grilling or preheating. C CAUSE SOLUTION There is leftover food from the previous meal.
Troubleshooting LOSS OF POWER SYMPTOM • WEBER CONNECT module and control knobs lights do not turn on. CAUSE SOLUTION Wires are disconnected. Check that all of the wires are connected securely to the terminals on the back of the WEBER CONNECT module and to the control board under the side table. Refer to the "WEBER CONNECT Wire Chart". Power cord is disconnected. Check that the power cord is plugged in to the port beneath the side table and to the wall outlet.
Troubleshooting Fuse Replacement If your WEBER CONNECT module is non-responsive even after securing all electrical connections, it is possible that the grill’s fuse has blown. The grill’s power supply utilizes a cartridge fuse. This simple and inexpensive part can be easily replaced with the following instructions: A CAUTION: Only use the properly sized and rated fuse when replacing. Failure to do so will void your warranty. The correct fuse is: 1.6A 250V 5x20mm Fast blow 1.
D Connecting an External Power Bank 75750_050521 USB-C A 75750_050521 USB-C C USB-C 75750_050521 As an alternative to using an AC wall outlet to power the WEBER CONNECT Module during your cook, you can instead connect an external rechargeable power bank, sold seperately. The power bank should have a minimum capacity of 10,000 mA hours with a 5 volt USB-A connector.
Grilling Guide Grilling Guide Type Thickness/Weight Approximate Total Grill Time ¾ inch (19 mm) thick 4 to 6 minutes direct high heat 1 inch (25 mm) thick 6 to 8 minutes direct high heat 2 inches (5 cm) thick 14 to 18 minutes sear 6 to 8 minutes direct high heat, then 8 to 10 minutes indirect high heat Flank Steak 1½ to 2 pounds (0,68 - 0,91 kg), ¾ inch (19 mm) thick 8 to 10 minutes direct medium heat Ground Beef Patty ¾ inch (19 mm) thick 8 to 10 minutes direct medium heat 3 to 4 pounds (1,
39 38 37 36 24 25 26 27 28 29 30 31 32 33 34 35 23 22 21 20 19 18 14 15 16 17 11 12 13 10 8 9 7 6 5 4 3 1 2 Replacement Parts GENESIS EX-335 • SX-335 GENESIS - EX/SX-335 NG - US 063021 40 41 42 43 44 45 46 47 48 49 50 51 52 53 54 55 56 57 58 59 60 61 62 63 64 65 66 67 68 69 70 71 72 73 74 GENESIS SE-SX-335 1 2 3 4 5 6 7 8 9 10 11 12 13 14 15 16 17 18 19 20 21 22 23 24 25 26 27 28 29 30 31 32 33 34 35 36 37 38 39 40 weber.
43 79 78 77 76 43 42 73 38 39 40 41 75 38 39 40 41 42 78 77 76 75 74 72 37 74 37 71 70 69 61 62 63 64 65 66 67 68 60 59 35 36 25 26 27 28 29 30 31 32 33 34 24 23 22 73 72 71 70 62 63 64 65 66 67 68 69 61 60 58 57 56 50 51 52 53 54 55 48 49 35 36 25 26 27 28 29 30 31 32 33 34 24 23 22 21 59 21 19 20 58 57 15 16 17 18 12 13 14 11 20 19 15 16 17 18 12 13 14 51 52 53 54 55 56 9 10 11 8 9 10 49 50 47 7 46 45 44 48 6 3 4 5 1 2 GENESIS - EPX-3
43 38 39 40 41 42 36 37 35 33 34 30 31 32 27 28 29 24 25 26 23 22 21 20 19 16 17 18 15 11 12 13 14 10 8 9 7 6 3 4 5 1 2 Replacement Parts GENESIS SPX-435 GENESIS - SPX-435 NG - US 063021 44 45 46 47 48 49 50 51 52 53 54 55 56 57 58 59 60 61 62 63 64 65 66 67 68 69 70 71 72 73 74 75 76 77 78 GENESIS SE-SPX-435 1 2 3 4 5 6 7 8 9 10 11 12 13 14 15 16 17 18 19 20 21 22 23 24 25 26 27 28 29 30 31 32 33 34 35 36 37 38 39 40 41 42 43 weber.
weber.com U.S.: 1-800-446-1071 Canada: 1-800-446-1071 Mexico: 01 800 0093237 Model: GEN1 Apple and the Apple logo are trademarks of Apple Inc., registered in the U.S. and other countries. App Store is a service mark of Apple Inc. Android is a trademark of Google LLC. Google Play and the Google Play logo are trademarks of Google LLC. The Bluetooth® word mark and logos are registered trademarks owned by Bluetooth SIG, Inc. and any use of such marks by Weber-Stephen Products LLC is under license.