GRILL OWNER’S GUIDE Thank you for purchasing a Weber® grill. Take a few minutes and protect it by registering your product online at www.weber.com. m DANGER If you smell gas: • Shut off gas to the appliance. • Extinguish any open flames. • Open lid. • If odour continues, keep away from the appliance and immediately call your gas supplier or your fire department. Leaking gas may cause a fire or explosion which can cause serious bodily injury, death, or damage to property.
WARNINGS m DANGER Failure to follow the DANGERS, WARNINGS and CAUTIONS contained in this Owner’s Guide may result in serious bodily injury or death, or may result in a fire or an explosion causing damage to property. 2 WWW.WEBER.COM WARNINGS: m Keep this Owner’s Guide for future reference. m Follow all warnings and instructions when using the appliance. m Improper assembly of grill may be dangerous. Please follow the assembly instructions carefully. m Do not use this grill unless all parts are in place.
WARRANTY Thank you for purchasing a WEBER® product. Weber-Stephen Products LLC, 1415 S. Roselle Road, Palatine, Illinois 60067. (“Weber”) prides itself on delivering a safe, durable, and reliable product. This is Weber’s Voluntary Warranty provided to you at no extra charge. It contains the information you will need to have your WEBER® product repaired in the unlikely event of a failure or defect. Pursuant to applicable laws, the customer has several rights in case the product is defective.
PARTS LIST .......................................................................1 ......................................1 .....................................................................................1 ...........................1 .......................................................................1 .............................1 ......................................................................1 ......................................................................................1 ...
ASSEMBLY 1 2 3 1 2 4 5 WWW.WEBER.
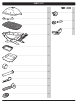
WEBER® Q® 1000 EXPLODED VIEW 1. Lid 2. Handle Spacer 3. Handle 4. Cooking Grate 2 5. Burner Tube 3 6. Igniter Electrode Assembly 7. Cookbox 8. Carrying Handle Q1000_EURO_LP_022515 1 4 5 6 7 8 9 10 11 11 12 12 13 14 13 15 16 17 6 WWW.WEBER.COM 9. Rear Cradle 10. Front Cradle 11. Push Button Igniter / Electronic Igniter Button & Module 12. Gas Cartridge Support Basket / Hose Bracket 13.
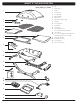
WEBER® Q® 1200 EXPLODED VIEW 1 Q1200_EURO_LP_022515 2 3 4 5 6 7 1. Lid 2. Thermometer 3. Handle Spacer 4. Handle 5. Cooking Grate 6. Left Side Table 7. Right Side Table 8. Burner Tube 9. Igniter Electrode Assembly 10. Cookbox 11. Carrying Handle 12. Rear Cradle 13. Front Cradle 14. Electronic Igniter Button & Module 15. Gas Cartridge Support Basket / Hose Bracket 16.
WEBER® Q® 2000 EXPLODED VIEW Q2000_EURO_LP_022515 1 2 3 4 5 6 7 8 9 10 11 12 13 13 14 15 16 17 18 19 8 WWW.WEBER.COM 1. Lid 2. Handle Spacer 3. Handle 4. Cooking Grate 5. Left Side Table 6. Right Side Table 7. Burner Tube 8. Igniter Electrode Assembly 9. Cookbox 10. Carrying Handle 11. Rear Cradle 12. Front Cradle 13. Push Button Igniter / Electronic Igniter Button & Module 14. Hose Bracket 15.
WEBER® Q® 2200 EXPLODED VIEW Q2200_EURO_LP_022515 1 2 3 4 5 6 7 8 9 10 1. Lid 2. Thermometer 3. Handle Spacer 4. Handle 5. Cooking Grate 6. Left Side Table 7. Right Side Table 8. Burner Tube 9. Igniter Electrode Assembly 10. Cookbox 11. Carrying Handle 12. Rear Cradle 13. Front Cradle 14. Electronic Igniter Button & Module 15. Hose Bracket 16. Valve, Hose and Regulator Assembly (Hose and Regulator may not be included) 17. Disposable Drip Pan 18.
IMPORTANT INFORMATION ABOUT LP GAS & LP GAS CONNECTIONS WHAT IS LP GAS? Liquefied petroleum gas, also called LPG, LP gas, liquid propane, or simply propane or butane, is the flammable, petroleum-based product used to fuel your grill. It is a gas at moderate temperatures and pressure when it is not contained. But at moderate pressure inside a container, such as a cartridge or cylinder, LPG is a liquid. As pressure is released from the cartridge or cylinder, the liquid readily vaporizes and becomes LP gas.
IMPORTANT INFORMATION ABOUT LP GAS & LP GAS CONNECTIONS COUNTRY GAS TYPE & PRESSURE Bulgaria, China, Cyprus, Czech Republic, Denmark, Estonia, Finland, Hungary, Iceland, India, Japan, Korea, Latvia, Lithuania, Malta, Netherlands, Norway, Romania, Singapore, Slovak Republic, Slovenia, Sweden, Turkey I3B/P - 30 mbar / 2.
WHAT IS A REGULATOR? Your Weber gas grill is equipped with a pressure regulator, which is a device to control and maintain uniform gas pressure as gas is released from the cartridge or cylinder. ® m DANGER Do not store an extra (spare) or disconnected gas supply cartridge or cylinder under or near this grill. CONNECTING THE REGULATOR TO THE CARTRIDGE CONNECTING THE REGULATOR TO THE CARTRIDGE Use only butane/propane disposable cartridges with a minimum capacity of 430g and a maximum capacity of 460g.
CONNECTING THE REGULATOR TO THE CYLINDER CONNECTING THE REGULATOR TO THE CYLINDER 1 Only use cylinders with a minimum capacity of 2,5 kg and a maximum capacity of 13 kg. A) Connect regulator to cylinder. m WARNING: Make sure that the cylinder or regulator valve is closed. 2 Some regulators push ON to connect and pull OFF to disconnect; others have a nut with a left-hand thread that connects to the cylinder valve.
WHAT IS A LEAK CHECK? The fuel system in your grill features connections and fittings. A leak check is a reliable way to make sure that no gas is escaping from any of the connections or fittings. Although all factory-made connections have been thoroughly checked for gas leaks, it’s important to perform a leak check before using your grill for the first time, as well as anytime you disconnect and reconnect a fitting and each time you perform routine maintenance.
PREPARING TO USE YOUR GRILL WHEN CONNECTED TO A CYLINDER CHECKING FOR GAS LEAKS AFTER CONNECTING A CYLINDER You will need: A spray bottle or brush or rag and a soapand-water solution. (You can make your own soap-andwater solution by mixing 20% liquid soap with 80% water; or, you can purchase solution in the plumbing section of any hardware store.) A) Make sure the burner control knob is turned off by pushing it in and turning it clockwise to the off ( ) position. B) Turn gas supply on at source.
DISCONNECTING THE REGULATOR DISCONNECTING THE REGULATOR FROM THE CARTRIDGE 1 When your cartridge needs to be replaced, follow these instructions to remove it. A) Make sure the burner control knob is turned off by pushing it in and turning it clockwise to the off ( ) position. B) Make sure the regulator gas control valve is turned off by turning it clockwise until tight (1). C) Unscrew disposable cartridge from regulator by turning it anti-clockwise (2).
SAFETY CHECKS BEFORE USING YOUR GRILL SAFETY FIRST It’s a good idea to get in the habit of performing a few safety checks before grilling. Safety must be considered when you are deciding where to place and operate your grill. Be sure to read the following warnings before installing or using your grill. WARNINGS: m Only use this grill outdoors in a wellventilated area. Do not use in a garage, building, breezeway, shed, hut or any other enclosed area.
BURNER IGNITION & USAGE METHODS OF BURNER IGNITION There are two ways to ignite the burner. The first is by using the ignition system built into your grill. The second is with a match. Next are the steps for igniting your grill using the ignition system. On the following page are steps for igniting your grill with a match. BURNER IGNITION A) Open the grill lid (1).
BURNER IGNITION & USAGE BURNER IGNITION Lighting with a Match A) Open the grill lid (1). m DANGER Failure to open the lid before igniting the grill’s burner, or not waiting five minutes to allow the gas to clear if the grill does not light, may result in an explosive flareup which can cause serious bodily injury or death. B) Unfold the side tables (2) (Q® 1200, Q® 2000, Q® 2200). C) Make sure the burner control knob is turned to the off ( ) position (3).
BARBECUING TIPS & HELPFUL HINTS TIPS & HINTS • Always preheat the grill before cooking. Set burner(s) on high heat and close lid; preheat for 10 to 15 minutes. • The temperature of your gas grill may run hotter than normal for the first few uses. • Recipe barbecuing times are based on outside temperatures of 70°F (21°C) and little or no wind. Allow for more cooking time on cold or windy days, or at higher altitudes. Allow for less cooking time in extremely hot weather.
BARBECUING TIPS & HELPFUL HINTS RED MEAT Thickness / Weight Approximate Total Barbecuing Time Steak: New York strip, rib-eye, and filet mignon (tenderloin) ¾ inch thick 3 to 5 minutes high heat 1 inch thick 6 to 8 minutes high heat Steak: Porterhouse and T-bone ¾ inch thick 4 to 6 minutes high heat 1 inch thick 8 to 10 minutes high heat Flank Steak 1½ to 2 pounds, ¾ inch thick 12 to 14 minutes high heat Ground Beef Patty ¾ inch thick 8 to 10 minutes medium heat Tenderloin 3 to 4 pounds
TROUBLESHOOTING PROBLEMS SOLUTIONS Burner does not ignite when you push the igniter button. Be sure that there is gas flow to the burner by attempting to match light your burner. Refer to “BURNER IGNITION— Lighting with a Match.” If match lighting is successful, the problem lies in the ignition system. Refer to “MAINTAINING THE PUSH BUTTON IGNITION SYSTEM” or “MAINTAINING THE ELECTRONIC IGNITION SYSTEM.” Be sure that wires are correctly inserted into terminals on igniter electrode assembly.
ANNUAL MAINTENANCE KEEPING YOUR WEBER™ GAS GRILL IN TIP-TOP SHAPE m DANGER Failure to correct any problems described on this page may result in a fire, which can cause serious bodily injury or death, and cause damage to property. To keep your gas grill performing as safely and efficiently as on day one, we strongly recommend that you inspect and clean the spider/insect screen(s) and burner tube(s) at least once a year.
ANNUAL MAINTENANCE BURNER TUBE CLEANING OR REPLACEMENT 1 Confirm that Grill Is Off and Cool 5 A) Check that the burner control knob is in the off ( ) position. Check by pushing burner control knob in and turning it clockwise until it stops. B) Disconnect the cylinder. C) Remove the lid. D) Remove cooking grates. Remove Burner Tube You will need: A 3/8" nut driver. A) Remove the screw that holds the burner tube to the cookbox (1). B) Carefully slide the burner tube out from the cookbox (2).
ROUTINE MAINTENANCE BEAUTIFUL— INSIDE AND OUT Weber™ grill owners take a lot of pride in their grills. Flaunt your pride and joy. Keep your grill clean and beautiful— inside and out—by following these routine maintenance steps. CLEANING THE OUTSIDE OF THE GRILL To keep the outside of your grill looking its best, use the following guidelines for safe cleaning. m WARNING: Turn your Weber® gas grill off and wait for it to cool before cleaning it.
ROUTINE MAINTENANCE IGNITION SYSTEM OPERATIONS The igniter supplies a spark to the igniter electrode assembly. Whether you are performing routine maintenance or a troubleshooting check on the ignition system, read the following to keep your ignition system working properly. m WARNING: All gas controls and supply valves should be in the OFF position. If the igniter fails to ignite your Q™ grill, you will need to pinpoint where the problem is occurring: with the gas flow or with the ignition system.
MEMO WWW.WEBER.
m ATTENTION: This product has been safety-tested and is only certified for use in a specific country. Refer to country designation located on outside of box. These parts may be gas-carrying or gas-burning components. Please contact Weber-Stephen Products LLC Customer Service Department for genuine Weber-Stephen Products LLC replacement part(s) information.