SUMMIT ® # 42374 PLATINUM D4 & D6 BUILT-IN NG GAS GRILL OWNER'S GUIDE YOU MUST READ THIS OWNERS GUIDE BEFORE OPERATING YOUR GAS GRILL DANGER If you smell gas: 1. Shut off gas to the appliance. 2. Extinguish any open flames. 3. Open lid. 4. If odor continues, keep away from the appliance and immediately call your gas supplier or your fire department. Leaking gas may cause a fire or explosion which can cause serious bodily injury or death, or damage to property. WARNING 1.
DANGERS & WARNINGS DANGER Failure to follow the Dangers, Warnings and Cautions contained in this Owner’s Manual may result in serious bodily injury or death, or in a fire or an explosion causing damage to property. WARNINGS Do not store a spare or disconnected liquid propane cylinder under or near this barbecue. Improper assembly may be dangerous. Please follow the assembly instructions carefully.
WARRANTY WARRANTY Weber-Stephen Products Co.
GENERAL INSTRUCTIONS OPERATING WARNING: Only use this barbecue outdoors in a well-ventilated area. Do not use in a garage, building, breezeway or any other enclosed area. WARNING: Your Weber® gas barbecue shall not be used under an unprotected combustible roof or overhang. WARNING: Your Weber® gas barbecue is not intended to be installed in or on recreational vehicles and/or boats.
GENERAL INSTRUCTIONS 5 If burners go out during cooking, open lid, turn off all burners and wait five minutes before relighting. Preheating - Your Weber® gas barbecue is an energy-efficient appliance. It operates at an economical low BTU rate. To preheat: after lighting, close lid and turn all burners to high (HH). Preheating to between 500° and 550° F (260° and 290° C) will take 10 to 15 minutes depending on conditions such as air temperature and wind.
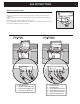
GAS INSTRUCTIONS 6 CHECK FOR GAS LEAKS REMOVE CONTROL PANEL DANGER Do not use an open flame to check for gas leaks. Be sure there are no sparks or open flames in the area while you check for leaks. Sparks or open flames will result in a fire or explosion which can cause serious bodily injury or death and damage to property. WARNING: You should check for gas leaks every time you disconnect and reconnect a gas fitting. Part required: Phillips Screwdriver. Remove the burner control knobs (1).
GAS INSTRUCTIONS Put your fingers under the front edge of the control panel and lift off. Completely remove the control panel (4) from the cooking box assembly exposing the valves, burners, igniter, and manifold. Remove the Front Panel by sliding the panel up and out of the slots.
GAS INSTRUCTIONS 8 Check: 1) Gas line-to-manifold connections. WARNING: If there is a leak at connection (1), retighten the fitting with a wrench and recheck for leaks with soap and water solution. If a leak persists after re-tightening the fitting, turn OFF the gas. DO NOT OPERATE THE GRILL. Contact the Customer Service Representative in your area using the contact information on our web site. Log onto www.weber.com®. 2) Valves to manifold connections.
GAS INSTRUCTIONS 9 REINSTALL CONTROL PANEL Parts required: control panel, screws, and burner control knobs. Place the control panel back onto the control panel brackets on either side of the front of the cooking box. Line up screws with screw holes on both the control panel and control panel brackets. Tighten screws. Reinstall burner control knobs & igniter wires (if necessary). Place corresponding control knobs down onto the valve stems.
OPERATING INSTRUCTIONS GRILLING METHODS NOTE: If grill looses heat while cooking refer to the troubleshooting section of this manual. You can adjust the Left and Right burners in each burner set as desired. The control settings are High (H), Medium (M), Low (L), or Off (O). If burners go out during cooking, turn off all burners and wait 5 minutes before relighting. WARNING: Check the bottom tray and catch pan for grease build-up before each use.
OPERATING INSTRUCTIONS 11 INDIRECT COOKING GRILLING TIPS & HELPFUL HINTS The Indirect Method is similar to roasting, but with the added benefits of that grilled texture, flavor, and appearance you can’t get from an oven. To set up for Indirect cooking, gas burners are lit on either side of the food but not directly beneath it.
OPERATING INSTRUCTIONS 12 LIGHTING D6 1 Summary lighting instructions are on the control panel. DANGER Failure to open the lid while igniting the barbecue’s burners, or not waiting 5 minutes to allow the gas to clear if the barbecue does not light, may result in an explosive flame-up which can cause serious bodily injury or death.
OPERATING INSTRUCTIONS MANUAL LIGHTING 1) 2) 3) 4) D6 1 DANGER Failure to open lid while igniting the barbecue’s burners, or not waiting 5 minutes to allow the gas to clear if the barbecue does not light, may result in an explosive flame-up which can cause serious bodily injury or death. Open the lid. Make sure all burner control knobs are turned OFF. (Push each burner control knob down and turn clockwise to ensure they are in the OFF position.) Turn the gas supply valve on.
OPERATING INSTRUCTIONS USING THE SMOKER The smoker uses presoaked wood chips. For best results with faster cooking foods like steaks, burgers and chops, etc., we recommend using finer wood chips because they ignite and create smoke faster. For longer cooking foods such as roasts, chicken and turkeys, etc., we recommend using larger wood chunks because they ignite slowly and provide smoke for a longer period of time.
OPERATING INSTRUCTIONS LIGHTING THE SMOKER BURNER 15 D6 1 WARNING: Check hose before each use of grill for nicks, cracking, abrasions or cuts. If the hose is found to be damaged in any way, do not use the grill. Replace using only Weber® authorized replacement hose. Contact the Customer Service Representative in your area using the contact information on our website. Log onto www.weber.com®. 2,3,9 8 6 1) Open the grill lid.
OPERATING INSTRUCTIONS 16 MANUALLY LIGHTING THE SMOKER BURNER WARNING: Check hose before each use of grill for nicks, cracking, abrasions or cuts. If the hose is found to be damaged in any way, do not use the grill. Replace using only Weber® authorized replacement hose. Contact the Customer Service Representative in your area using the contact information on our website. Log onto www.weber.com®. 1) D6 1 9 2,3,10 6,7 8 Open the lid.
OPERATING INSTRUCTIONS ROTISSERIE ASSEMBLY 3) Parts required: rotisserie motor bracket(1), rotisserie motor(1), rotisserie shaft(1), spit forks(4) and fork screws (4). 1) Install the motor bracket Attach the stainless steel motor bracket to the left side of the cooking box, using the 1/4-20 fasteners and the 1/4-20 Keps nuts. 17 Put the spit forks on the rotisserie shaft. Slide a spit fork from each side onto the shaft so that the tines are facing each other.
OPERATING INSTRUCTIONS USING THE ROTISSERIE Note - Before using your rotisserie, measure your food at the widest point. If it exceeds 9 1/2” (241.8mm), it is too large to fit the rotisserie. If it is too large, food can be prepared using a roast holder and the Indirect Cooking Method. • • IMPORTANT SAFEGUARDS WARNINGS • • • • • • • • • • • • • • • • • • • Read all instructions before using your rotisserie. This rotisserie is for outdoor use only.
OPERATING INSTRUCTIONS 19 D4 LIGHTING THE ROTISSERIE BURNER 1 ATTENTION: READ BEFORE LIGHTING ROTISSERIE BURNER After a period of non-use, before lighting the Rotisserie Burner, a few seconds must pass for the gas supply line to fill. When holding the ignition button you will see a flash of flames moving from right to left across the Rotisserie Burner surface, the Rotisserie Burner is not lit until the entire ceramic surface is aflame.
OPERATING INSTRUCTIONS MANUALLY LIGHTING THE ROTISSERIE BURNER D4 1 ATTENTION: READ BEFORE LIGHTING ROTISSERIE BURNER After a period of non-use, before lighting the Rotisserie Burner, a few seconds must pass for the gas supply line to fill. When holding a match to the Rotisserie Burner you will see a flash of flames moving from right to left across the Rotisserie Burner surface, the Rotisserie Burner is not lit until the entire ceramic surface is aflame.
MAIN & SMOKER BURNER TROUBLESHOOTING PROBLEM CHECK CURE Burners burn with a yellow or orange flame, in conjunction with the smell of gas. Inspect Spider / Insect Screens for possible obstructions. (Blockage of holes.) Clean Spider / Insect Screens. (See Section “Annual Maintenance”) Burner does not light, or flame is low in HIGH position. Is fuel hose bent or kinked? Straighten fuel hose.
ROTISSERIE TROUBLESHOOTING 22 PROBLEM Burner does not light. CHECK Did you hold the burner control knob down and hold down for 20 seconds until after burner ignited? CURE Try to relight burner by holding burner control knob down and continue holding down until 20 seconds after burner has ignited.
MAINTENANCE WEBER® SPIDER /INSECT SCREENS Your Weber® gas barbecue, as well as any outdoor gas appliance, is a target for spiders and other insects. They can nest in the venturi section(1) of the burner tubes. This blocks the normal gas flow, and can cause the gas to flow back out of the combustion air opening. This could result in a fire in and around the combustion air openings, under the control panel, causing serious damage to your barbecue.
MAINTENANCE 24 REPLACE MAIN BURNERS 1. 2. 3. 4. 5. 6. 7. 8. Your Summit® gas grill must be OFF and cool. Turn gas OFF at source. Disconnect regulator. Remove cooking grates. Remove Smoker box. Remove Flavorizer® bars. To remove control panel refer to “Remove the control panel” under “Check for Gas Leaks.” Disconnect all ignition wires from the Ignition Module.
MAINTENANCE 9. Disconnect the Thermocouple from the IR Burner valve. 10. 25 Remove screws from the manifold assembly: (a) Locate the screws on both sides of the manifold frame. (b) Remove the screws from manifold frame.
MAINTENANCE 26 11. Pull manifold assembly out from the manifold frame. 12. Lift and twist the burner assembly slightly, to separate the Crossover® tube (a) from the burners (b). D4 B B A D6 13. 14. Remove the Crossover® tube. Pull the selected burner(s) tube(s) from manifold frame and replace with a new burner tube.
MAINTENANCE 15. To reinstall the manifold assembly, reverse steps 7 through 14. CAUTION: The burner openings (1) must be positioned properly over the valve orifices (2). (2) 27 CROSSOVER® IGNITION SYSTEM OPERATIONS If the Crossover ignition system fails to ignite the LEFT burner in a burner set, light the LEFT burner with a match. If the LEFT burner lights with a match, then check the Crossover® ignition system. • Check that both ignition wires(1,2) are attached properly.
WEBER-STEPHEN PRODUCTS CO. www.weber.com® ©2005- The following trademarks are registered in the name of Weber-Stephen Products Co., an Illinois corporation, located at 200 East Daniels Road, Palatine, Illinois 60067 U.S.A.