LP GAS GRILL OWNER’S GUIDE GUÍA DEL PROPIETARIO DE LA BARBACOA DE GAS PROPANO LICUADO - PG. 31 MODE D’EMPLOI DU GRILL À GAZ PL - PG. 55 E210 · E310 · SP310 Thank you for purchasing a Weber® grill. You’ve made a wise investment. Now take a few minutes and protect it by registering your product online at www.weber.com.® YOU MUST READ THIS OWNER’S GUIDE BEFORE OPERATING YOUR GAS GRILL. m DANGER If you smell gas: 1) Shut off gas to the appliance. 2) Extinguish any open flames. 3) Open lid.
WARNINGS m DANGER Failure to follow the DANGERS, WARNINGS and CAUTIONS contained in this Owner’s Guide may result in serious bodily injury or death, or may result in a fire or an explosion causing damage to property. 2 WWW.WEBER.COM® WARNINGS: m Improper assembly of grill may be dangerous. Please follow the assembly instructions carefully. m Do not use this grill unless all parts are in place. The grill must be properly assembled according to the assembly instructions.
WARRANTY Weber-Stephen Products LLC (Weber) hereby warrants to the ORIGINAL PURCHASER of this Weber® gas grill that it will be free of defects in material and workmanship from the date of purchase as follows: Aluminum castings: 25 years (2 years on paint; excludes fading) Stainless steel shroud: 25 years Porcelain-enameled shroud: 25 years Stainless steel burner tubes: 10 years Stainless steel cooking grates: 5 years no rust through or burn through Stainless steel Flavorizer® bars: 5 years no rust throug
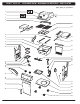
SPIRIT® E210 LP EXPLODED VIEW · DIAGRAMA DE DESPIECE · VUE ECLATEE Spirit_E210_LP_US_042512 1 2 21 3 4 22 23 5 6 24 7 8 25 9 10 26 27 11 12 13 14 15 28 29 30 31 32 16 17 18 33 19 34 35 20 36 37 38 4 WWW.WEBER.
SPIRIT® E210 LP EXPLODED VIEW · DIAGRAMA DE DESPIECE · VUE ECLATEE SPIRIT® E210 LP EXPLODED VIEW LIST SPIRIT® E210 LP LISTA DEL DIAGRAMA DE DESPIECE SPIRIT® E210 LP LISTE DE LA VUE ÉCLATÉE 1. Thermometer and Bezel 1. Termómetro y bisel 1. Thermomètre et bec 2. Logo Plate 2. Placa del logotipo 2. Plaque du logo 3. Shroud Assembly 3. Ensamblaje de la cubierta 3. Assemblage du châssis 4. Warming Rack 4. Rejilla para calentar 4. Grille de maintien au chaud 5.
IMPORTANT INFORMATION ABOUT LP GAS WHAT IS LIQUID PROPANE GAS? Liquid propane (LP) is the flammable, petroleum-based product used to fuel your grill. It is a gas at moderate temperatures and pressure when it is not contained. But at moderate pressure inside a container, such as a cylinder, LP is a liquid. As pressure is released from the cylinder, the liquid readily vaporizes and becomes LP gas. • LP has an odor similar to natural gas. You should be aware of this odor. • LP is heavier than air.
IMPORTANT INFORMATION ABOUT LP GAS CONNECTIONS WHAT IS A REGULATOR? Your Weber® gas grill is equipped with a pressure regulator, which is a device to control and maintain uniform gas pressure as gas is released from the LP cylinder. REGULATOR CONNECTIONS Each Weber® LP regulator is designed for vapor withdrawal and is equipped with a UL-listed Type 1 cylinder connection as described in the latest edition of ANSI Z21.58.
LP CYLINDER INSTALLATION AND REMOVAL FUELING YOUR GRILL Before using your grill for the first time, you need to obtain an LP cylinder. New cylinders can be purchased full; empty cylinders can be refilled or exchanged. You may choose to purchase a spare LP cylinder so that you don't run out of fuel in the middle of cooking a meal. m WARNING: Never store an extra (spare) LP cylinder under or near the Weber® gas grill.
LP CYLINDER INSTALLATION AND REMOVAL FUEL LEVEL The cylinder scale, a feature on some of our grills, will indicate the propane supply so you can refill the cylinder before running out of fuel. Check the fuel level by viewing the orange level indicator line, located on the side of the cylinder scale. When the indicator line is at the bottom, the cylinder is empty (1). When it is in the middle, the cylinder is half full (2). When it is at the top, the cylinder is full (3).
PREPARING TO USE YOUR GRILL WHAT IS A LEAK CHECK? The fuel system in your grill features many connections and fittings. A leak check is a reliable way to make sure that no gas is escaping from any of the connections or fittings. Although all factory-made connections have been thoroughly checked for gas leaks, it’s important to perform a leak check before using your grill for the first time, as well as anytime you disconnect and reconnect a fitting and each time you perform routine maintenance.
PREPARING TO USE YOUR GRILL m DANGER Do not use an open flame to check for gas leaks. Be sure there are no sparks or open flames in the area while you check for leaks. Sparks or open flames will result in a fire or explosion, which can cause serious bodily injury or death and damage to property. m WARNING: The gas connections of your gas grill have been factory tested. We do, however, recommend that you leak check all gas connections before operating your gas grill.
GRILLING TIPS & HELPFUL HINTS PREHEATING TIPS & HINTS • Always preheat the grill before • Some foods, such as a casserole or thin fish fillets, cooking. Set all burners will require a container for on high heat and close lid; grilling. Disposable foil pans preheat for 10 minutes, or are very convenient, but any until thermometer registers metal pan with ovenproof 500° – 550°F (260° – 290°C). handles can also be used.
SAFETY CHECKS BEFORE USING YOUR GRILL SAFETY FIRST It’s sensible and smart to get in the habit of performing a few safety checks before grilling. When you are getting ready to grill, your first thought should always be safety. Following are a few safety checks that you should perform each time you grill. SLIDE-OUT GREASE TRAY Your grill was built with a grease collection system, which funnels grease away from food and into removable containers.
MAIN BURNER IGNITION & USAGE METHODS OF BURNER IGNITION There are two ways to ignite burner 1. The first is by using the electronic Crossover® ignition system built into your grill. The second is with a match. Next are the steps for igniting your grill using the electronic Crossover® ignition system. On the following page are steps for igniting your grill with a match. Summary lighting instructions are inside the cabinet door.
MAIN BURNER IGNITION & USAGE MAIN BURNER IGNITION Lighting with a Match A) Open the grill lid (1). 1 m DANGER Failure to open the lid before igniting the grill’s burners, or not waiting five minutes to allow the gas to clear if the grill does not light, may result in an explosive flare-up which can cause serious bodily injury or death. B) Make sure ALL burner control knobs are turned off (2). Check by pushing control knobs in and turning them clockwise until they stop.
TROUBLESHOOTING GENERAL TROUBLESHOOTING PROBLEMS SOLUTIONS Burner does not ignite when you push the igniter button. Be sure that there is gas flow to the burners by attempting to match light your burners. Refer to “MAIN BURNER IGNITION—Lighting with a Match.” If match lighting is successful, the problem lies in the ignition system. Refer to “MAINTAINING THE ELECTRONIC CROSSOVER® IGNITION SYSTEM.” Be sure that wires are correctly inserted into terminals on igniter module.
ANNUAL MAINTENANCE KEEPING YOUR WEBER® GAS GRILL IN TIP-TOP SHAPE m DANGER Failure to correct any problems described on this page may result in a fire, which can cause serious bodily injury or death, and cause damage to property. To keep your Weber® gas grill performing as safely and efficiently as on day one, we strongly recommend that you inspect and clean the spider/insect screens and burner tubes at least once a year.
ANNUAL MAINTENANCE BURNER TUBE CLEANING OR REPLACEMENT 2 Confirm that Grill Is Off 1 A) Turn gas supply off at source and disconnect gas fitting. B) Check that all burner control knobs are in the off ( ) position. Check by pushing control knobs in and turning them clockwise until they stop. If they do not turn, they are already off. If they do turn, continue turning them clockwise until they stop; then they are off. If your grill has a side burner, make sure the side burner control knob is turned off.
ANNUAL MAINTENANCE BURNER TUBE CLEANING OR REPLACEMENT (continued) Remove Burner Tubes For Spirit® grills with 2 burners (210 and 220 models): 1 1 2 2 A) Slide burner tube 1 out from under the guide screw and washer. Move burner tube 1 slightly to the left to detach it from Crossover® tube (1). B) Remove Crossover® tube (2). C) Lift burner tube 1 up and out of cookbox while guiding the wires through the hole in the cookbox (3). D) Slide burner tube 2 out from under the guide screw and washer.
ANNUAL MAINTENANCE BURNER TUBE CLEANING OR REPLACEMENT (continued) 1 Clean Burner Tubes You will need: A flashlight, a wire (a straightened-out coat hanger), a suitable stainless steel bristle brush, and a soft bristle brush (toothbrush). A) Look inside each burner tube and Crossover® tube with a flashlight (1). B) Clean any debris or blockage from the inside of the tubes with the wire (2). C) Check spider/insect screens at the ends of the burner tubes and clean them using the soft bristle brush (3).
ANNUAL MAINTENANCE BURNER TUBE CLEANING OR REPLACEMENT (continued) Reinstall Burner Tubes For Spirit® grills with 2 burners (210 and 220 models): 1 1 A) Put burner tube 2 inside cookbox and pass the front end of tube out through burner tube 2 opening. Note: Single row of burner ports should be facing up. Slide burner tube 2 under the guide screw and washer (1). B) Put burner tube 1 inside cookbox and pass igniter wires and the front end of tube out through burner tube 1 opening (2).
ANNUAL MAINTENANCE BURNER TUBE CLEANING OR REPLACEMENT (continued) 3 Reinstall Manifold You will need: A Phillips screwdriver, two 7/16" wrenches. A) Align valves with burner tubes. Using two 7/16" wrenches, install bolts and nuts that secure manifold to cookbox (1). B) With a Phillips screwdriver, install screws and washers that secure manifold to front cross brace (2). If manifold was properly reinstalled, valves will now be fully seated inside burner tubes.
ROUTINE MAINTENANCE BEAUTIFUL— INSIDE AND OUT Weber® grill owners take a lot of pride in their grills, and with good reason: our grills are marvels of engineering and design. Flaunt your pride and joy. Keep your grill clean and beautiful—inside and out—by following these routine maintenance steps. CLEANING THE OUTSIDE OF THE GRILL To keep the outside of your grill looking its best, use the following guidelines for safe cleaning.
ROUTINE MAINTENANCE MAINTAINING THE ELECTRONIC CROSSOVER® IGNITION SYSTEM The igniter module supplies power to the electronic Crossover® ignition system and the side burner with one igniter button. Whether you are performing routine maintenance or a troubleshooting check on the ignition system, read the following to keep your ignition system working properly.
m ATTENTION: This product has been safety tested and is only certified for use in a specific country. Refer to country designation located on outer carton. These parts may be gas carrying or gas burning components. Please contact Weber-Stephen Products LLC, Customer Service Department for genuine Weber-Stephen Products LLC replacement part(s) information.