GAS GRILL Built-In NG Gas Grill Owner’s Guide S-640 - NG #43157 #00000 YOU MUST READ THIS OWNER’S GUIDE BEFORE OPERATING YOUR GAS GRILL DANGER If you smell gas: 1. Shut off gas to the appliance. 2. Extinguish any open flames. 3. Open lid. 4. If odor continues, keep away from the appliance and immediately call your gas supplier or your fire department. Leaking gas may cause a fire or explosion which can cause serious bodily injury or death, or damage to property. WARNING: 1.
WARNINGS 2 DANGERS AND WARNINGS DANGER Failure to follow the Dangers, Warnings and Cautions contained in this Owner’s Manual may result in serious bodily injury or death, or in a fire or an explosion causing damage to property. WARNINGS Do not store a spare or disconnected liquid propane cylinder under or near this barbecue. Improper assembly may be dangerous. Please follow the assembly instructions carefully.
WARRANTY Weber-Stephen Products Co.
EXPLODED VIEW S-640 4 $ S640_NG_US % & ' ( ) * + , $# $$ $% $& &$ &% && &' &( &) &* &+ &, '# '$ $' $( $) $* $+ '% '& '' $, %# %$ %% '( ') %& '* %' '+ %( %) %* %+ ', (# %, &# ($ (% WWW.WEBER.
EXPLODED VIEW LIST S-640 5 1. Shroud Hardware 20. Disposable Drip Pan 39. Smoker Box 2. Shroud 21. Drip Tray 40. Smoker Bar 3. Thermometer 22. Catch Pan 41. Smoker Burner 4. Thermometer Bezel 23. Catch Pan Holder 42. Cookbox 5. Handle 24. Left Rear Panel 43. Bulkhead 6. Qrill OutTM Handle Light 25. Left Panel 44. Manifold Hose 7. Rotisserie Motor 26. Left Door 45. Rear Frame Support 8. Rotisserie Bracket 27. Door Handles 46. Vent Cover 9. Warming Rack 28.
GENERAL INSTRUCTIONS OPERATING The natural gas supply is easy to use and gives you more cooking control than charcoal fuel. • These instructions will give you the minimum requirements for assembling your Weber® gas barbecue. Please read the instructions carefully before using your Weber® gas barbecue. Improper assembly can be dangerous. • Not for use by children. • If there are local codes that apply to portable gas grills, you will have to conform to them.
GAS INSTRUCTIONS 7 7 Slide out Bottom tray - Remove excess grease, then wash with warm soapy water, then rinse. Do not use cleaners that contain acid, mineral spirits or xylene. Rinse well after cleaning. Flavorizer® bars and Cooking grates - Clean with a suitable brass bristle brush. As needed, remove from grill and wash with warm soapy water, then rinse with water. Preserve Your Stainless Steel Your grill or its cabinet, lid, control panel and shelves may be made from stainless steel.
GAS INSTRUCTIONS TYPE OF GAS Your natural gas grill is factory built to operate using natural gas only. Never attempt to operate your grill on gases other than the type specified on the grill rating plates. Your grill operates at 4.5” of water column pressure. If replacement of the hose becomes necessary, factory specified parts are required. See your local dealer.
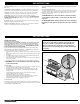
GAS INSTRUCTIONS 9 9 2) Remove the two screws that secure the control panel to the frame. 3) Remove the control panel. Tilt panel forward and lift up and away from grill. Completely remove the control panel (3) from the cooking box assembly exposing the valves, burners, igniter, and manifold. 2 1 CHECK FOR GAS LEAKS DANGER Do not use an open flame to check for gas leaks. Be sure there are no sparks or open flames in the area while you check for leaks.
GAS INSTRUCTIONS Check: 1) 2) 3) 4) 5) Main gas line to manifold connection. Rotisserie (I.R. Burner) gas line connection. Bulkhead and gas supply hose connection. Bulkhead to regulator connection. Regulator to hose connection. WARNING: If there is a leak at connection (1, 2, 3, 4, or 5), retighten the fitting with a wrench and recheck for leaks with soap and water solution. If a leak persists after re-tightening the fitting, turn off the gas. DO NOT OPERATE THE GRILL.
OPERATING INSTRUCTIONS GRILLING METHODS Note: If grill looses heat while cooking refer to the troubleshooting section of this manual. You can adjust the individual burners as desired. The control settings are START/HI, MEDIUM, LOW, or OFF. If burners go out during cooking, turn off all burners and wait 5 minutes before relighting. 11 11 ARRÊTÉ OFF APAGADO WARNING: Check the bottom tray and catch pan for grease build-up before each use. Remove excess grease to avoid a grease fire in the bottom tray.
OPERATING INSTRUCTIONS GRILLING TIPS & HELPFUL HINTS • Always preheat the grill before cooking. Set all burners on “HI” heat and close lid; heat for 10 minutes, or until thermometer registers 500˚-550˚F (260˚-288˚C). • Sear meats and cook with the lid down for perfectly grilled food every time. • Grilling times in recipes are based on 70˚F (20˚C) weather and little or no wind. Allow more cooking time on cold or windy days, or at higher altitudes. Allow less cooking time in extremely hot weather.
OPERATING INSTRUCTIONS 13 13 LIGHTING Summary lighting instructions are inside the left hand cabinet door. DANGER Failure to open the lid while igniting the barbecue’s burners, or not waiting 5 minutes to allow the gas to clear if the barbecue does not light, may result in an explosive flame-up which can cause serious bodily injury or death. 1 5 MAIN BURNER SNAP IGNITION Note: Each control knob snap igniter creates a spark from the igniter electrode to the burner lighting tube.
OPERATING INSTRUCTIONS USING THE SMOKER The smoker uses presoaked wood chips. For best results with faster cooking foods like steaks, burgers and chops, etc., we recommend using finer wood chips because they ignite and create smoke faster. For longer cooking foods such as roasts, chicken and turkeys, etc., we recommend using larger wood chunks because they ignite slowly and provide smoke for a longer period of time.
OPERATING INSTRUCTIONS 15 15 MANUALLY LIGHTING THE SMOKER BURNER 1) Open the lid. DANGER Failure to open the lid while igniting the grill, or not waiting 5 minutes to allow the gas to clear if the grill does not light, may result in an explosive flare-up which can cause serious bodily injury or death. 1 7 9 2 3 10 2) 3) 4) 5) 6) 7) Open smoker box lid Fill smoker with water soaked wood chunks or chips. Make sure all burner control knobs are turned to “OFF”.
OPERATING INSTRUCTIONS WARNING: Setup up the rotisserie with food before lighting rotisserie burner. COOKING • OPERATING 1) 2) 3) 4) 5) 6) 7) Remove rotisserie shaft from grill. Remove one spit fork. Push the rotisserie shaft through the center of the food. Slide the spit fork onto the shaft. Insert the tines of both spit forks into the food. The food should be centered on the shaft. Tighten the spit fork screws Place the motor in the bracket, slide to lock.
OPERATING INSTRUCTIONS 17 17 MANUALLY LIGHTING THE ROTISSERIE BURNER ATTENTION: READ BEFORE LIGHTING ROTISSERIE BURNER After a period of non-use, before lighting the Rotisserie Burner, a few seconds must pass for the gas supply line to fill. When holding a match to the rotisserie burner you will see a flash of flames moving from left to right across the Rotisserie Burner surface, the Rotisserie Burner is not lit until the entire ceramic surface is aflame.
TROUBLESHOOTING 18 PROBLEM CHECK CURE Burners burn with a yellow or orange flame, in conjunction with the smell of gas (This is normal for the burner lighting tube). Inspect Spider/Insect Screens for possible obstructions. (Blockage of holes.) Clean Spider/Insect Screens. (See Section “Annual Maintenance”) Symptoms: Burner does not light, or flame is low in “HI” position. Is fuel hose bent or kinked? Straighten fuel hose.
ROTISSERIE TROUBLESHOOTING PROBLEM Rotisserie burner does not light. CHECK 19 19 CURE Did you hold the burner control knob in and hold in for 20 seconds until after burner ignited? Try to relight burner by holding burner control knob in and continue holding in until 20 seconds after burner has ignited.
MAINTENANCE MAIN BURNER CLEANING PROCEDURE Turn off the gas supply. Remove the manifold (See “Replace Main Burners”). Look inside each burner with a flashlight. Clean the inside of the burners with a wire (a straightened-out coat hanger will work). Check and clean the air shutter opening at the ends of the burners. Check and clean the valve orifices at the base of the valves. Use a Steel bristle brush to clean outside of burners. This is to make sure all the burner ports are fully open.
MAINTENANCE 21 21 8) Remove the two screws that secure the manifold to the cookbox. Pull manifold assembly out from the manifold frame. 9) Pull the selected burner(s) tube(s) from manifold frame and replace with a new burner tube. 10) To reinstall the manifold assembly, reverse steps 7 through 9. CAUTION: The burner openings (A) must be positioned properly over the valve orifices (B). Make sure the opposite end of the burner tubes (C) properly align into the slots on the backside of the cookbox.
ATTENTION: This product has been safety tested and is only certified for use in a specific country. Refer to country designation located on outer carton. These parts may be gas carrying or gas burning components. Please contact Weber-Stephen Products Co., Customer Service Department for genuine Weber-Stephen Products Co. replacement part(s) information. WARNING: Do not attempt to make any repair to gas carrying or gas burning components without contacting Weber-Stephen Products Co.
▲ FOUR GOOD REASONS TO REGISTER YOUR WEBER® GRILL RIGHT NOW CUATRO BUENAS RAZONES PARA REGISTRAR SU ASADOR WEBER® AHORA MISMO QUATRE BONNES RAISONS D’ENREGISTRER VOTRE GRILL WEBER® DES MAINTENANT Register your grill online at www.weber.com® (If you register online, you do not need to send in this registration card.) Registre su asador en línea en www.weber.com® (Si usted se registra en línea, no necesita enviar esta tarjeta de registro.) Enregistrez votre grill en ligne sur www.weber.
Thanks for sharing your contact information with us. Again, it all stays strictly between us — Weber does not share customers’ names with anyone else. If you need replacement parts or have questions about the assembly, use or maintenance of your grill, please call Weber Customer Service. Gracias por compartir su información de contacto con nosotros. De nuevo, todo quedará estrictamente entre nosotros — Weber no comparte los nombres de sus clientes con nadie.