
User's Manual


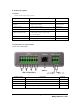

WebEye WebEye B101B101
User’s Guide
10
V. Assigning IP Address and Configuring Administrator’s Condition.
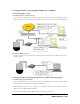
1. Connecting WebEye to a PC
1) Connecting WebEye on Internet or LAN.
You may use direct cable (white colored one) to connect WebEye on Internet or LAN. Though you connect
WebEye as follows, a remote user may not access WebEye before you configure its network setting properly.
2) Connecting WebEye to a PC.
You may use crossover cable (red colored one) to directly connect WebEye to a PC. This connection is just to
configure WebEye.
2. Assigning IP address and Configuring administrator’s condition with Setup program
1) Starting Setup Program for WebEye
Click the “WebEyeSetup.exe ” file on your PC. When the Setup Program is executed, the setup program
detects and shows every WebEye connected on the local network.
From the WebEyes listed, select one to assign a new IP address. (Default is 211.53.133.92). To choose a
WebEye, click on its MAC Address or IP addres
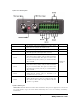
The “Reboot” button will reboot the WebEye. This process takes 10-20 seconds.