Induction Cooktop Instruction Manual / Installation Manual MODEL:WEID-A212
Safety Warnings Your safety is important to us. Please read this information before using your cooktop. Installation Electrical Shock Hazard • Disconnect the appliance from the mains electricity supply before carrying out any work or maintenance on it. • Connection to a good earth wiring system is essential and mandatory. • Alterations to the domestic wiring system must only be made by a qualified electrician. • Failure to follow this advice may result in electrical shock or death.
be installed according to these instructions for installation. • This appliance is to be properly installed and earthed only by a suitably qualified person. • This appliance should be connected to a circuit which incorporates an isolating switch providing full disconnection from the power supply. • Failure to install the appliance correctly could invalidate any warranty or liability claims. Operation and Maintenance Electrical Shock Hazard • Do not cook on a broken or cracked cooktop.
implant manufacturer before using this appliance to make sure that their implants will not be affected by the electromagnetic field. • Failure to follow this advice may result in death. Hot Surface Hazard • During use, accessible parts of this appliance will become hot enough to cause burns. • Do not let your body, clothing or any item other than suitable cookware contact the Induction glass until the surface is cool.
spillovers that may ignite. • Never use your appliance as a work or storage surface. • Never leave any objects or utensils on the appliance. • Do not place or leave any magnetisable objects (e.g. credit cards, memory cards)or electronic devices (e.g. computers, MP3 players) near the appliance, as they may be affected by its electromagnetic field. • Never use your appliance for warming or heating the room. • After use, always turn off the cooking zones and the cooktop as described in this manual (i.e.
satisfied that they can use the appliance without danger to themselves or their surroundings. • Do not repair or replace any part of the appliance unless specifically recommended in the manual. All other servicing should be done by a qualified technician. • Do not use a steam cleaner to clean your cooktop. • Do not place or drop heavy objects on your cooktop. • Do not stand on your cooktop. • Do not use pans with jagged edges or drag pans across the Induction glass surface as this can scratch the glass.
Care should be taken to avoid touching heating elements. Children less than 8 years of age shall be kept away unless continuously supervised. •This appliance can be used by children aged from 8 years and above and persons with reduced physical,sensory or mental capabilities or lack of experience and knowledge if they have been given supervision or instruction concerning use of the appliance in a safe way and understand the hazards involved. •Children shall not play with the appliance.
•The appliance is not intended to be operated by means of an external timer or separate remote-control system. CAUTION:The cooking process has to be supervised.A short term cooking process has to be supervised continuously. WARNING:In order to prevent tipping of the appliance,this stabilizing means must be installed.Refer to the instructions for installation.
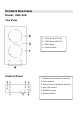
Product Overview Model:IND-230 Top View 1. 2000 Boost 2300 W 2. 1500 Boost 1800 W 3. Glass plate 4. Control panel Control Panel 1. Heating zone selection controls 2.Timer control 3. Power/Timer regulating controls 4. key lock control 5. ON/OFF control 6.
A Word on Induction Cooking Induction cooking is a safe, advanced, efficient, and economical cooking technology. It works by electromagnetic vibrations generating heat directly in the pan, rather than indirectly through heating the glass surface. The glass becomes hot only because the pan eventually warms it up. iron pot magnetic circuit ceramic glass plate induction coil induced currents Before Using Your New Induction Cooktop • Read this guide, taking special note of the ‘Safety Warnings’ section.
Choosing the Right Cookware • Only use cookware with a base suitable for induction cooking. Look for the induction symbol on the packaging or on the bottom of the pan. • You can check whether your cookware is suitable by carrying out a magnet test. Move a magnet towards the base of the pan. If it is attracted, the pan is suitable for induction. • If you do not have a magnet: 1. Put some water in the pan you want to check. 2. If does not flash in the display and the water is heating, the pan is suitable.
Using Your Induction Cooktop To start cooking 1. Touch the ON/OFF control. After power on, the buzzer beeps once, all displays show “ – “ or “ – – “, indicating that the induction hob has entered the state of standby mode. 2. Place a suitable pan on the cooking zone that you wish to use. • Make sure the bottom of the pan and the surface Of the cooking zone are clean and dry. 3. Touching the heating zone selection control, and a indicator next to the key will flash 4.
If the display flashes setting alternately with the heat This means that: • you have not placed a pan on the correct cooking zone or, • the pan you’re using is not suitable for induction cooking or, • the pan is too small or not properly centred on the cooking zone. No heating takes place unless there is a suitable pan on the cooking zone. The display will automatically turn off after 1 minutes if no suitable pan is placed on it. When you have finished cooking 1.
4. Beware of hot surfaces “H” will show which cooking zone is hot to touch. It will disappear when the surface has cooled down to a safe temperature. It can also be used as an energy saving function if you want to heat further pans, use the hotplate that is still hot. Using the Boost Function Boost function is the function that one zone rising to a larger power in one second and lasting for 5 minutes. Then you can get a more powerful and faster cooking. Using the Boost to get larger power 1.
4.If you want to cancel the boost during this 5 minutes, touch the heating zone selection button, an indicator next to the key will flash. And then touch the boost button. The heating zone will go back to the power stage which was set before boost. Power management In this hob every zone can work with Boost function. If you need to use boost, first make sure that the other zone is at the maximum power level of 5.
Locking the Controls • You can lock the controls to prevent unintended use (for example children accidentally turning the cooking zones on). • When the controls are locked, all the controls except the ON/OFF control are disabled. To lock the controls Touch the keylock control. The timer indicator will show “Lo“. To unlock the controls 1. Make sure the ceramic hob is turned on. 2. Touch and hold the keylock control for a while. 3. You can now start using your ceramic hob.
Power level Default working timer (hour) 1 8 2 8 3 8 4 4 5 4 6 4 7 2 8 2 9 2 When the pot is removed, the induction hob can stop heating immediately and the hob automatically switch off after 2 minutes. People with a heart pace maker should consult with their doctor before using this unit. Using the Timer You can use the timer in two different ways: • You can use it as a minute minder. In this case, the timer will not turn any cooking zone off when the set time is up.
If the setting time exceeds 99 minutes, the timer will automatically return to 0 minute. 4. Touch the ‘Timer’, the timer is canceled, and the “00” will show in the minute display. 5. When the time is set, it will begin to count down immediately. The display will show the remaining time and the timer indicator will flash for 5 seconds. 6. Buzzer will beep for 30 seconds and the timer indicator shows “- - “ when the set time finished. Setting the timer to turn one cooking zone off 1.
Hint: Touch the “-“or “+” control of the timer once will decrease or increase by 1 minute. Touch and hold the “-“or “+” control of the timer will decrease or increase by 10 minutes. If the setting time exceeds 99 minutes, the timer will automatically return to 0 minute. 4. Touching the heating zone selection control, and then touch the ‘Timer’, the timer is canceled, “00” will show in the minute display, then and then “--”. 5. When the time is set, it will begin to count down immediately.
(set to 6 minutes) (set to 3 minutes) 2. When cooking timer expires, the corresponding cooking zone will be switch off automatically and show “H” . NOTE: If you want to change the time after the timer is set, you have to start from step 1 Cooking Guidelines Take care when frying as the oil and fat heat up very quickly, particularly if you’re using Power Boost. At extremely high temperature, oil and fat will ignite spontaneously and there will be a serious fire risk.
• Some tasks, including cooking rice by the absorption method, may require a higher power setting than the lowest setting to ensure the food is cooked properly in the time recommended. Searing steak To 1. 2. 3. cook juicy flavoursome steaks: Stand the meat at room temperature for about 20 minutes before cooking. Heat up a heavy-based frying pan. Brush both sides of the steak with oil. Drizzle a small amount of oil into the hot pan and then lower the meat onto the hot pan. 4.
Heat setting Suitability 1-2 • • • • delicate warming for small amounts of food melting chocolate, butter, and foods that burn quickly gentle simmering slow warming 3-4 • reheating • rapid simmering • cooking rice 5-6 • pancakes 7-8 • sautéing • cooking pasta 9 • • • • stir-frying searing bringing soup to the boil boiling water Care and Cleaning What? How? Important! Everyday soiling on glass (fingerprints, marks, stains left by food or non-sugary spillovers on the glass) 1.
Boilovers, melts, and hot sugary spills on the glass Spillovers on the touch controls Remove these immediately with a fish slice, palette knife or razor blade scraper suitable for Induction glass cooktops, but beware of hot cooking zone surfaces: 1. Switch the power to the cooktop off at the wall. 2. Hold the blade or utensil at a 30° angle and scrape the soiling or spill to a cool area of the cooktop. 3. Clean the soiling or spill up with a dish cloth or paper towel. 4.
The touch controls are unresponsive. The controls are locked. The touch controls are difficult to operate. There may be a slight film of water over the controls or you may be using the tip of your finger when touching the controls. Rough-edged cookware. The glass is being scratched. Some pans make crackling or clicking noises. The induction hob makes a low humming noise when used on a high heat setting. Fan noise coming from the induction hob. Pans do not become hot and appears in the display.
Failure Display and Inspection If an abnormality comes up, the induction hob will enter the protective state automatically and display corresponding protective codes: Problem F3/F4 Possible causes Temperature sensor of the induction coil failure What to do Please contact the supplier. F9/FA Temperature sensor of the IGBT Please contact the supplier. failure. E1/E2 Abnormal supply voltage Please inspect whether power supply is normal. Power on after the power supply is normal.
The weight and dimensions are approximate. We are continually improving our products, and we may modify the specifications, designs and models without notice. Installation Selection of installation equipment Cut out the work surface according to the sizes shown in the drawing. For the purpose of installation and use, a minimum of 5 cm space shall be preserved around the hole. Be sure the thickness of the work surface is at least 30mm.
A(mm) B(mm) C(mm) D E 760 50 mini 30 mini Air intake Air exit 10mm Before locating the fixing brackets The unit should be placed on a stable, smooth surface (use the packaging). Do not apply force onto the controls protruding from the hob. Fix the hob on the work surface by screw four brackets on the bottom of hob (see picture) after installation.
Cautions 1. The induction hotplate must be installed by qualified personnel or technicians. We have professionals at your service. Please never conduct the operation by yourself. 2. The hob will not be installed directly above a dishwasher, fridge, freezer, washing machine or clothes dryer, as the humidity may damage the hob electronics 3. The induction hotplate shall be installed such that better heat radiation can be ensured to enhance its reliability. 4.
1. If the cable is damaged or needs replacing, this should be done by an after-sales technician using the proper tools, so as to avoid any accidents. 2. If the appliance is being connected directly to the mains supply, an omnipolar circuit breaker must be installed with a minimum gap of 3mm between the contacts. 3. The installer must ensure that the correct electrical connection has been made and that it complies with safety regulations. 4. The cable must not be bent or compressed. 5.