ENGLISH R Trademark Please do not return unit to retailer. Por favor, no devuelva el aparato al lugar de compra. Veuillez ne pas retourner l’outil au détaillant. 1-800-554-6723 www.weedeater.com BC2400 ESPAÑOL Instruction Manual Manual de Instrucciones Manuel d’Instructions For Occasional Use Only DANGER: Read and follow all Safety Rules and Operating Instructions before using this product. Failure to do so can result in serious injury.
SAFETY RULES WARNING: When using gardening appliances, basic safety precautions must always be followed to reduce the risk of fire and serious injury. Hazard Zone DANGER: This power tool can be dangerous! This unit can cause serious injury including amputation or blindness to the operator and others. The warnings and safety instructions in this manual must be followed to provide reasonable safety and efficiency in using the unit.
. S Keep handles free of oil and fuel S Always use the handlebar and a properly adjusted shoulder strap with a blade (see ASSEMBLY). S Always store gasoline in a container approved for flammable liquids. CUTTING SAFETY WARNING: Inspect the area to be cut before each use. Remove objects (rocks, broken glass, nails, wire, string, etc.) which can be thrown or become entangled in the blade or trimmer head. S Keep others including children, animals, bystanders, and helpers at least 50 feet (15 meters) away.
operate in a locale where such regulations exist, you are legally responsible for maintaining the operating condition of these parts. Failure to do so is a violation of the law. For normal homeowner use, the muffler and spark arrest- ing screen will not require any service. After 50 hours of use, we recommend that your muffler be serviced or replaced by your authorized service dealer.
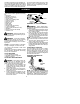
ATTACHING THE PLASTIC SHIELD AND TRIMMER HEAD ASSEMBLY INFORMATION -- WEED BLADE WARNING: The shield must be properly installed. The shield provides partial protection to the operator and others from the risk of thrown objects, and is equipped with a line limiter blade which cuts excess line to the proper length. The line limiter blade (on underside of shield) is sharp and can cut you. 1. Remove wing nut from shield. 2. Insert bracket into slot on shield. 3.
NOTE: Make sure all parts are in place as il- WARNING: Do not use any blades, or lustrated, and the blade is sandwiched between the dust cup and the retaining washer. There should be no space between the blade and the dust cup or the retaining washer. 7. Align hole in dust cup with hole in side of gearbox by rotating the blade. 8. Insert a small screwdriver into aligned holes. This will keep the shaft from turning while tightening the blade nut.
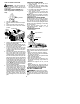
OPERATION KNOW YOUR BRUSHCUTTER READ THIS INSTRUCTION MANUAL AND SAFETY RULES BEFORE OPERATING YOUR UNIT. Compare the illustrations with your unit to familiarize yourself with the location of the various controls and adjustments. Save this manual for future reference. Trigger Handle Starter Handle Handlebar Trimmer head Choke Lever Shield Muffler Primer Bulb Blade ON/STOP SWITCH CHOKE The ON/STOP switch is used to stop the engine. To stop the engine, push and release the engine ON/STOP switch.
HOW TO START YOUR UNIT STARTING A WARM ENGINE 1. Move the choke lever to the HALF CHOKE position. 2. Squeeze and hold the throttle trigger. Keep throttle trigger fully squeezed until the engine runs smoothly. 3. Pull starter rope sharply until engine runs, but no more than 5 pulls. 4. Allow engine to run 15 seconds, then move the choke lever to the OFF CHOKE position. NOTE: If engine has not started, pull starter rope 5 more pulls. If engine still does not run, it is probably flooded.
Before trimming, bring engine to a speed sufficient to cut material to be trimmed. Do not run the engine at a higher speed than necessary. The cutting line will cut efficiently when the engine is run at less than full throttle. At lower speeds, there is less engine noise and vibration. The cutting line will last longer and will be less likely to “weld” onto the spool. Always release the throttle trigger and allow the engine to return to idle speed when not cutting.
SWEEPING -- The fanning action of the rotating line can be used to blow away loose debris from an area. Keep the line parallel to and above the area surface and swing the tool from side to side. OPERATING INSTRUCTIONS FOR USE WITH WEED BLADE S Blade Thrust is a reaction that only occurs when using a bladed unit. This reaction can cause serious injury such as amputation. Carefully study this section.
MAINTENANCE WARNING: Disconnect the spark plug before performing maintenance except for carburetor adjustments. CHECK FOR LOOSE FASTENERS AND PARTS S S S S S Spark Plug Boot Air Filter Housing Screws Assist Handle Screw Debris Shield CHECK FOR DAMAGED OR WORN PARTS Contact an authorized service dealer for replacement of damaged or worn parts. S ON/OFF Switch -- Ensure ON/OFF switch functions properly by moving the switch to the OFF position. Make sure engine stops; then restart engine and continue.
SERVICE AND ADJUSTMENTS REPLACING THE LINE 1. Remove spool by firmly pulling on tap button. 2. Clean entire surface of hub and spool. 3. Replace with a pre-wound spool, or cut two lengths of 12-1/2 feet of 0.080! (2 mm) diameter Weed Eaterr brand line. WARNING: Never use wire, rope, string, etc., which can break off and become a dangerous missile. 4. Insert ends of the lines about 1/2 inch (1 cm) into the small holes on the inside of spool. Spool Small Holes Line exit holes Hub Line in Notch 5.
TROUBLESHOOTING TABLE WARNING: Always stop unit and disconnect spark plug before performing all of the recommended remedies below except remedies that require operation of the unit. TROUBLE CAUSE REMEDY Engine will not start. 1. Engine flooded. 1. See “Starting a Flooded Engine” in Operation Section. 2. Fill tank with correct fuel mixture. 3. Install new spark plug. 4. Check for dirty fuel filter; replace. Check for kinked or split fuel line; repair or replace. 5.
LIMITED WARRANTY ELECTROLUX HOME PRODUCTS, INC., warrants to the original purchaser that each new Weed Eater" " brand gasoline tool or attachment is free from defects in material and workmanship and agrees to repair or replace under this warranty any defective gasoline product or attachment as follows from the original date of purchase. 2 YEARS-- Parts and Labor, when used for household purposes. 90 DAYS -- Parts and Labor, when used for commercial, professional, or income producing purposes.
replace as necessary” shall be warranted for 2 years. Any warranted part which is scheduled for replacement as required maintenance shall be warranted for the period of time up to the first scheduled replacement point for that part. DIAGNOSIS: The owner shall not be charged for diagnostic labor which leads to the determination that a warranted part is defective if the diagnostic work is performed at an approved POULAN/WEED EATER servicing center.