Owner's Manual 30" RIDING MOWER SIDE DISCHARGE ELECTRIC START PARTS AND SERVICE This product has been expertly engineered and carefully manufactured to rigid quality standards. As with all mechanical products, some adjustments or part replacement may be necessary during the life of your unit. For Parts and service, contact our authorized distributor: call 1-800-849-1297 • For replacement parts, have available the following information: a. Model Number/Manufacturer's I.D. Number b. Description of part.
TABLE OF CONTENTS Warranty ................................................. 2 Safety Rules ........................................... 3 Product Specifications ............................ 6 Assembly/Pre-Operation ........................ 7 Operation .............................................. 10 Maintenance Schedule ......................... 17 SERVICE NOTES Maintenance ......................................... 17 Service and Adjustments ...................... 21 Storage .............................
SERVICE NOTES SAFETY RULES DANGER: This cutting machine is capable of amputating hands and feet and throwing objects. Failure to observe the following safety instructions could result in serious injury or death. • Never direct discharged material toward anyone. Avoid discharging material against a wall or obstruction. Material may ricochet back toward the operator. Stop the blade when crossing gravel surfaces.
SAFETY RULES III. CHILDREN 41 FOL D AL ONG TH D I S O IS A TTED 15 D LINE E G REE SLO PE 4 ONLY RIDE UP AND DOWN HILL, NOT ACROSS HILL To avoid personal injury or property damage, use extreme care in handling gasoline. Gasoline is extremely flammable and the vapors are explosive. • Extinguish all cigarettes, cigars, pipes, and other sources of ignition. • Use only approved gasoline container. • Never remove gas cap or add fuel with the engine running. Allow engine to cool before refueling.
RIDING MOWER MODEL NUMBER WELRVBA (96026000100) PRODUCT NUMBER 960 26 00-01 DECALS 1 5 4 2 3 SAFETY RULES • Never fill containers inside a vehicle or on a truck or trailer bed with plastic liner. Always place containers on the ground away from your vehicle when filling. • Remove gas-powered equipment from the truck or trailer and refuel it on the ground. If this is not possible, then refuel such equipment with a portable container, rather than from a gasoline dispenser nozzle.
PRODUCT SPECIFICATIONS MODEL NUMBER WELRVBA (96026000100) PRODUCT NUMBER 960 26 00-01 MOWER DECK CUSTOMER RESPONSIBILITIES PRODUCT SPECIFICATIONS Gasoline Capacity and Type: 1.5 Gallons Unleaded Regular Oil Type (API SG-SL): SAE 30 (Above 32°F) SAE 5W30 (Below 32°F) Oil Capacity: 48 Oz. Spark Plug: Champion RC12YC (Gap: .030") Ground Speed (Mph): Forward: Reverse: Charging System: 3 Amps @ Battery Blade Bolt Torque: 45-55 Ft. Lbs. • Read and observe the safety rules.
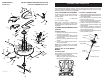
RIDING MOWER MODEL NUMBER WELRVBA (96026000100) PRODUCT NUMBER 960 26 00-01 MOWER DECK 36 6 19 7 10 Your new riding mower has been assembled at the factory with the exception of those parts left unassembled for shipping purposes. To ensure safe and proper operation of your riding mower all parts and hardware you assemble must be tightened securely. Use the correct tools as necessary to ensure proper tightness. TOOLS REQUIRED FOR ASSEMBLY TO INSTALL STEERING WHEEL 1.
INSTALL SEAT 1. Remove bolt and flat washer securing seat to cardboard packing and set aside for assembly of seat to riding mower. Remove the cardboard packing and discard. 2. Place seat on seat pan so all three (3) bottom pads are positioned over large slotted holes in pan. 3. Push down on seat to engage pads in slots and pull seat towards rear of riding mower. 4. Raise seat and tighten bolt and large flat washer securely. 5. Remove tape and discard. 6. Lower seat into operating position and sit on seat.
RIDING MOWER MODEL NUMBER WELRVBA (96026000100) PRODUCT NUMBER 960 26 00-01 STEERING ✓CHECKLIST CHECK TIRE PRESSURE The tires on your riding mower were overinflated at the factory for shipping purposes. Correct tire pressure is important for best cutting performance. Before you operate your new riding mower, we wish to assure that you receive the best performance and satisfaction from this Quality Product. CHECK DECK LEVELNESS 27 For best cutting results, mower housing should be properly leveled.
RIDING MOWER OPERATION DRIVE MODEL NUMBER WELRVBA (96026000100) PRODUCT NUMBER 960 26 00-01 These symbols may appear on your riding mower or in literature supplied with the product. Learn and understand their meaning.
RIDING MOWER MODEL NUMBER WELRVBA (96026000100) PRODUCT NUMBER 960 26 00-01 DRIVE 109 1 3 2 KNOW YOUR RIDING MOWER READ THIS OWNER'S MANUAL AND SAFETY RULES BEFORE OPERATING YOUR RIDING MOWER Compare the illustrations with your riding mower to familiarize yourself with the locations of various controls and adjustments. Save this manual for future reference.
00155 The operation of any riding mower can result in foreign objects thrown into the eyes, which can result in severe eye damage. Always wear safety glasses or eye shields while operating your riding mower or performing any adjustments or repairs. We recommend a wide vision safety mask over spectacles or standard safety glasses. HOW TO USE YOUR RIDING MOWER GROUND DRIVE • To stop ground drive, depress brake pedal all the way down. • Move motion control lever to neutral position.
RIDING MOWER MODEL NUMBER WELRVBA (96026000100) PRODUCT NUMBER 960 26 00-01 CHASSIS 100 35 101 18 10 105 44 103 102 11 40 39 34 41 16 45 2 53 53 65 106 52 97 55 57 60 67 43 42 56 52 59 29 71 54 53 67 64 62 53 68 67 66 84 82 74 63 45 64 83 13 45 7 85 45 69 86 32 45 108 14 45 45 45 45 15 8 25 72 73 LRV-B_Chassis_10 88 Deck Clutch Lever "Engaged" Position 67 19 67 104 45 91 45 95 77 76 79 73 32 Motion Control Lever 22 94 81 82 78 45 Mower Hei
REVERSE OPERATION SYSTEM (ROS) Your riding mower is equipped with a Reverse Operation System (ROS). Any attempt by the operator to travel in the reverse direction with the deck clutch engaged will shut off the engine unless ignition key is placed in the ROS "ON" position. Deflector Shield 4. Rest the mulch cover on the deflector. 5. Attach the 1 bungee from the deflector to the deck. USING THE REVERSE OPERATION SYSTEM Only use if you are certain no children or other bystanders will enter the mowing area.
RIDING MOWER MODEL NUMBER WELRVBA (96026000100) PRODUCT NUMBER 960 26 00-01 ELECTRICAL LRV2 13 25 3 4 12 20 21 22 23 19 9 17 16 24 TO START ENGINE When starting the engine for the first time or if the engine has run out of fuel, it will take extra cranking time to move fuel from the tank to the engine. • Sit on seat in operating position, depress clutch/brake pedal and set parking brake. • Place motion control lever in neutral position. • Move deck clutch lever to “DISENGAGED” position.
RIDING MOWER MOWING TIPS • • • Mower should be properly leveled for best mowing performance. See “TO LEVEL MOWER HOUSING” in the Service and Adjustments section of this manual. The left hand side of mower should be used for trimming. Drive so that clippings are discharged onto the area that has already been cut. Have the cut area to the right of the riding mower. This will result in a more even distribution of clippings and more uniform cutting.
SERVICE NOTES MAINTENANCE MAINTENANCE SCHEDULE 2 ) $ ) .
CHECK REVERSE OPERATION (ROS) SYSTEM • When the engine is running with the ignition switch in the engine "ON" position and the deck clutch lever engaged, any attempt by the operator to shift into reverse should shut off the engine. • When the engine is running with the ignition switch in the ROS "ON" position and the deck clutch lever engaged, any attempt by the operator to shift into reverse should NOT shut off the engine. RIDING MOWER Always observe safety rules when performing any maintenance.
TROUBLESHOOTING CHART: See appropriate section in manual unless directed to service center. PROBLEM Will not start Hard to start Engine will not turn over CAUSE Out of fuel. Bad spark plug. Dirty air filter. Water in fuel. 1 2 3 4 5 6 Loose or damaged wiring. Engine valves out of adjustment. 5 6 1 2 3 4 Dirty air filter. Bad spark plug. Weak or dead battery. Stale or dirty fuel. 1 2 3 4 5 6 Loose or damaged wiring. Engine valves out of adjustment. 5 6 Clean/replace air filter.
AIR FILTER Your engine will not run properly using a dirty air filter. Service air cleaner more often under dusty conditions. See engine manual. MUFFLER Inspect and replace corroded muffler and spark arrester (if equipped) as it could create a fire hazard and/or damage. CLEAN AIR SCREEN Air screen must be kept free of dirt and chaff to prevent engine damage from overheating. Clean with a wire brush or compressed air to remove dirt and stubborn dried gum fibers.
INTERLOCKS AND RELAYS Loose or damaged wiring may cause your riding mower to run poorly, stop running, or prevent it from starting. • Check wiring. Ensure all wiring and connectors are secure. TO START ENGINE WITH A WEAK BATTERY CAUTION: Lead-acid batteries generate explosive gases. Keep sparks, flame and smoking materials away from batteries. Always wear eye protection when around batteries. If your battery is too weak to start the engine, it should be recharged.
FRONT-TO-BACK ADJUSTMENT IMPORTANT: Deck must be level side-to side. To obtain the best cutting results, the mower housing should be adjusted so that the front is approximately 1/8" to 1/2" lower than the rear when the mower is in its highest position. Check adjustment on right side of riding mower. Measure distance “F” directly in front and behind the mandrel at bottom edge of mower housing as shown. TO LEVEL MOWER HOUSING Adjust the mower while riding mower is parked on level ground or driveway.