
User Documentation


Instructions for safe use
2493030000/00/09.166
STEP-BY-STEP FITTING INSTRUCTION
1. Check there is no tension in the threads. It is not
necessary to dismantle the gland.
2. Fit the complete cable gland to the enclosure.
Hand-tighten, then suitably secure with a wrench.
3. Prepare cable as required for the installation. If
required, fit the shroud over the cable.
4. Insert cable through the cable gland. Position the
cable correctly. The seal must grip the outer jacket
of the cable when the cable gland is tightened.
5. Tighten Back Nut/Conduit Nut to the Entry Body.
Ensure the seal makes full contact with cable sheath
and then tighten the Back Nut/Conduit Nut by the
additional turns detailed in Table 1. Support the
cable to prevent it from twisting during tightening.
If fitted, pull shroud over gland assembly.
6. (KCG option only) Fasten mating conduit/equipment
to the Conduit Nut to complete the installation.
Note - Cable Glands featuring Lead Sheath Option
To ensure that continuity is provided for the lead
sheath and the installation is completed correctly
the gland should be installed as follows:
• A section of the cable outer sheath should be stripped
back to expose the lead sheath. It should be stripped
back in a position suitable to terminate the conductors
correctly and for the internal cable gland seal to secure
the cable outer sheath.
• The continuity washer within the gland should make
full contact with the lead sheath of the cable.
• The gland should then be installed as per the above
instructions.
• Contact Weidmuller for further advice if required.
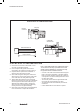
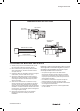
STEP-BY-STEP FITTING INSTRUCTIONS
Entry Body
Back Nut/
Conduit Nut
CABLE PREPARATION
COMPLETED
INSTALLATION
Length as required