
Manual

WI-I/O 9-x Wireless Module User Manual v2.16
WI-I/O-EX-1-S-x Serial Module
Page 64
6.2 Self Test Functions
6.2.1 Input to Output Reflection (WI-I/O 9-1_WI-I/O-EX-1-S-1 only)
The unit will require re-configuration after SELF TEST. Ensure you know the required
operational configuration including system and unit addresses so that the network can be
restored after testing.
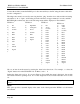
Remove the cover in the front panel, and set the DIP switches as shown below. Hold down the red button
for five seconds, or until the Rx LED glows yellow, release the Red button (the Rx LED now flashes),
then press and release the Red button (the flashing Rx LED extinguishes).
0 0 0 0 0 0 0 0
1 0 0 0 0 0 0 0
Input signals may now be connected to the input terminals of the module. If the module is operating
correctly, then the input signals will be reflected to the corresponding output on the same module. For
example, if DI 1 is connected to common - i.e. the first digital input is turned "ON" - then DO 1 will
activate, if the module is functional. Similarly, if a 12mA signal is connected to AI 2, then a 12mA
signal should be able to be measured from AO 2, if the module is functioning correctly.
If a module does not pass its self test function, then it should be returned to an authorised service agent
for attention
6.2.2 Radio Testing using Tone Reversals (WI-I/O 9-x modules only)
This function allows the unit to be configured to continuously transmit a sequence of alternate zeros
and ones on the radio. This function provides the facility to check VSWR of antennas during
installation, as well as checking the fade margin of the path between two units (see below - received
signal strength indication).
The tone reversals function is initiated by setting all of the DIL switches to ON, and holding down the
red button for approximately 5 seconds( until the RX LED lights continuously). On releasing the
button, the RX LED will flash continuously, and the TX LED will light, indicating that the radio
transmitter is on.
To finish the test, push the red button again or re-power the module.
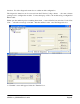
6.2.3 Diagnostics menu
To aid in the checking and set-up of the module, a user friendly menu provides access to diagnostic