
Install Instructions (Venting)


Part number 550-100-103/1110
GAS-FIRED WATER BOILER — Manual addendum — Venting
A–10
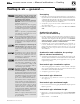
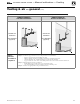
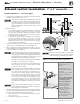
Installing and supporting the concentric Figure 10
sidewall vent assembly
Install terminations — concentric pipes
Assemble the vent termination as described for vertical concentric 1.
terminations, beginning on page A-12.
If necessary, you can shorten the lengths of the inner and
outer pipes for a shorter finished assembly. But you must
ensure the pipes butt correctly at both ends. Failure to
properly assemble the concentric termination can result
in flue gas recirculation, causing possible severe personal
injury or death.
Wall penetration:2.
3” termination: Preferably, use a thimble with a 4½-inch hole. a.
If not using a thimble, carefully use a hole saw to cut a hole
not larger than 4¾ inches in diameter through the wall. The
finished hole must provide a solid stop for the rain cap ribs,
as shown in the inset to Figure 10.
4” termination: Preferably, use a thimble with a 6-inch hole. b.
If not using a thimble, carefully use a hole saw to cut a hole
not larger than 6¼ inches in diameter through the wall. The
finished hole must provide a solid stop for the rain cap ribs,
as shown in the inset to Figure 10.
Secure the termination in place so the rain cap will butt against the 3.
outside wall or outer thimble plate as shown in Figure 10.
Before beginning vent and air piping from the boiler to the con-4.
centric termination, mount and secure the concentric termination
as shown in Figure 10 and Figure 11.
The vent and air piping must be securely supported, and
must not rest its weight on the boiler fittings. Failure to
properly support the vent and air piping could result in
vent piping damage, resulting in possible severe personal
injury, death or substantial property damage.
The supports/bracing used must support the termination
assembly to prevent slippage or movement.
The clamps used on the outside of the termination pipe
must not cut into the pipe or contain sharp edges that
could cause a crack to form.
When inserting the partially-assembled termination
kit through the roof penetration, wrap plastic or other
protection over the end of the exposed assembly to pre-
vent debris from entering the pipes. If the air passages
become blocked, the boiler will not operate. Once the
rain cap has been cemented to the assembly, there is no
way to correct the problem. The assembly would have
to be replaced if it were cut to be removed and cleaned.
Altering the assembly in any way could result in severe
personal injury or death due to toxic flue product emis-
sions.
When using AL294C stainless vent pipe, use the vent
pipe manufacturer’s PVC adapter when connecting to
the concentric vent attachment.
After the assembly has been positioned in the opening and all sup-5.
ports have been attached, install a bird screen (purchased separately
if not included with the kit) and rain cap as follows:
Place the bird screen on the end of the inner pipe as in a. Fig-
ure 17, page A-14.
Cement the rain cap in place as shown.b.
Sidewall vent/air termination: 3” or 4” concentric (cont.)
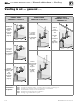
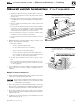
Figure 11
Concentric termination requirements
Concentric termination
(installing termination — see
page A-8)
Install pipe supports every 5 s
feet on both the horizontal and
vertical runs.
Install a hanger support within s
6 inches of any upturn in the
piping.
The concentric termination s
assembly must be installed
before piping from the
boiler to the termination.
Support the termination s
at the wall as shown in the
termination instructions.
Slope horizontal piping s
downward toward the boiler at
least 1/4 inch per foot.
Rotate the concentric s
termination Y-fitting about
30° to result in pipe centers the
same as at the boiler.
Ensure that the wall material is strong enough
to prevent the rain cap from being pushed
inward if struck or pushed from the outside.