
Ultra Boiler Manual


Part number 550-100-440/0122
8
(continued)
DO NOT install a relief valve with a pressure higher
than 30 PSIG
. is is the maximum allowable relief
valve setting for the Ultra boiler.
Pressure test boiler before permanently attaching water or gas piping
or electrical supply.
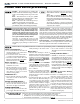
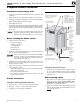
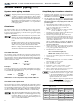
1. See Figure2 for reference in following steps.
2. Remove supply line tees* and 3/4” elbow from accessory bag.
Pipe to boiler supply connection as shown. Use pipe dope spar-
ingly. (* 1”x1”x1/4” and *1”x1”x3/4” tees with Ultra-80 to -230
or * 1-1/4”x1-1/4”x1/4” and *1-1/4”x1-1/4”x3/4” tees with Ultra
299/399.
3. Temporarily plug the ¾” relief valve tapping in the street elbow
with a ¾” NPT pipe plug.
4. Connect a hose to the boiler drain valve, the other end connected
to a fresh water supply. Make sure the hose can also be used to
drain the boiler aer test.
5. Connect a nipple and shuto valve to system supply connection
on the supply tee. is valve will be used to bleed air during the
ll. (Valve and nipple are not included with boiler.)
6. Connect a shuto valve to system return connection. (Valve is not
included with boiler.)
7. To avoid getting water on boiler, you may want to pipe street elbows
on top of shuto valves and attach catch-buckets beneath.
8. If convenient, install the boiler circulator and any other piping
compatible with Figure2 that would still allow bleeding air from
shuto valves.
9. Follow guidelines in this manual for piping components, locations
and sizing.
1. Open the shuto valves you installed on supply and return con-
nections.
2. Slowly open boiler drain valve and fresh water supply to ll boiler
with water. e boiler will ll quickly because of its low water
content.
3. When water reaches shuto valves, close boiler drain valve.
4. Close shuto valves.
5. Slowly reopen boiler drain valve until test pressure on the pres-
sure/temperature gauge reaches at least 45 psig, but no higher
than 55 psig.
6. Hold at test pressure for 10 minutes.
Do not leave boiler unattended. A cold water ll could
expand and cause excessive pressure, resulting in severe
personal injury, death or substantial property damage.
7. Make sure constant gauge pressure has been maintained through-
out test. Check for leaks. Repair if found.
Leaks must be repaired at once. Failure to do so
can damage boiler, resulting in substantial property
damage.
Do not use petroleum-based cleaning or seal-
ing compounds in boiler system. Gaskets and
seals in the system may be damaged. is can
result in substantial property damage.
1. Disconnect ll water hose from water source.
2. Drain boiler through drain valve. Remove hose aer
draining.
3. Remove nipples and valves unless they will remain for
use in the system piping.
4. Remove plug from relief valve street elbow. See page9
to install relief valve.
Figure 2 Hydrostatic test piping connections