
Instruction manual


Part number 550-142-054/0411
GV90+ gas-fired water boiler — Boiler Manual
10
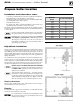
Figure 8 Air pressure switch mounting
1 Interior panel top
2 Jacket left side panel
3 Air pressure switch
4 WHITE hose
5 RED hose
6 Mounting screws
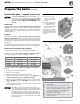
Figure 9 Follow instructions to perform the steps
shown below
Prepare the boiler (continued)
Install high altitude air pressure switch
when required (only above 5,500 feet)
1. For installations at altitude more than 5,500 feet above sea level:
a. A special high altitude air pressure switch is required.
b. The gas valve outlet pressure setting must be checked, and
adjusted if necessary, per the instructions on page 62.
Failure to check gas valve outlet pressure and adjust, if
necessary, could result in severe personal injury, death
or substantial property damage. Carefully follow the
guidelines given in this manual.
2. Obtain the GV90+ high altitude kit from your local Weil-McLain
distributor. The high altitude kit contains the high altitude air
pressure switch.
3. See Figure 8 (switch shown with wires removed).
a. Remove the two (RED) control wires from the air pressure
switch spade terminals.
b. Remove the factory-installed air pressure switch (loosen top
screw and remove bottom screw holding switch to jacket in-
terior panel).
c. Install the high altitude air pressure switch in the same loca-
tion.
d. Carefully replace the hoses on the new switch, with the red hose
on the hose barb closest to the electrical spade connectors, as
shown in Figure 8. The white hose goes on the other hose barb.
e. Replace the two (RED) control wires on the new pressure
switch spade terminals.
Rotate the boiler into position
Boiler is shipped on back side. It must be taken off skid
and rotated into correct position.
After installing condensate line, inspecting (replacing if necessary) the
gas/air orifice and installing the high altitude kit (if required), move
the boiler near its position.
Figure 9 shows the boiler with the front and top panels replaced.
These panels may be left off if desired until the installation has been
completed.
Boiler is heavy and contains some sheet metal parts which
may have sharp edges. Wear gloves when handling and
take proper precautions when moving. Failure to do so
will result in severe personal injury, death or substantial
property damage.
Refer to Figure 9 for placement sequence as follows:
1 Wear heavy gloves — carefully rotate the boiler over onto its
base rail legs.
2 Clip the shipping strap securing the skid to the boiler block as-
sembly. Remove the skid and strap.
3 Attach the jacket rear panel as shown using (4) #10 x ½” screws
provided in the accessory bag.