
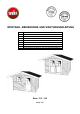
assembly Instructions


Techn. Änderungen vorbehalten! Copyright HRB 3662
4
- en -
Dear customer
Thank you very much for choosing a weka product.
Read these instructions through completely before assembling your product in order to avoid errors in
assembly or damage.
IMPORTANT
Please use the enclosed packing list to check immediately that your weka product has been
delivered complete and intact.
Please do not dispose of the packing list before the guarantee period has expired. This list enables you to
check that all the individual parts are present. It should be retained along with the proof of purchase. Any
complaints which may arise can probably be easily rectified with this list. The item numbers on the packing
list do not correspond to the item numbers in the following assembly instructions.
We recommend that 2 people carry out the assembly.
In order to prevent accidents, we recommend that children are kept out of the direct vicinity during assembly.
We reserve the right to make further technological developments. This means that there many be minor
deviations in the illustrations.
Please do not simply throw away the packaging material. Paper, card and corrugated board as well as
plastic packaging materials should be placed in the correct collection containers.
Recommendations
A prerequisite for successful assembly is an absolutely level and square foundation. We recommend a
continuous foundation. A foundation plan can be obtained from your specialist dealer.
A raft foundation is also possible.
In order to avoid rising damp, we recommend that a barrier layer using the packaging film, roofing paper or
similar be laid between the foundation and the floor beams. Roofing paper for a barrier layer is not included
in the scope of this delivery.
The structure should be anchored to the foundation to protect against wind damage. Concrete anchors or
steel angles obtainable from specialist suppliers are suitable for anchoring the floor beams to the foundation.
The anchors are not included in the scope of this delivery.
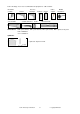
Please drill pilot holes for all screw connections to avoid damaging the wood. The following symbol in the
instructions will indicate when this is necessary:
You will find the wall structure of your special building type on the sheet accompanying these instructions.
You will also find the packing list in the wall packages.
The pallet on which the structure is transported comprises 2 floor beams which are required for the assembly
of the structure and 2 distance timbers which are only packaging material and can be disposed of.
The intermediate spaces between the floor beams guarantee the necessary subfloor ventilation for the
house.
Fit the wall boards together, with the tongue pointing upwards. If necessary, use a rubber mallet, where the
assembly timber will prevent any damage to the tongue. The assembly timber can be found in the front wall
package.
In order to check the right angles, measure the diagonals and make any necessary corrections until you
obtain equal values.
The wall boards are laterally interchangeable. With the relevant building type, you can fit the door in the left
or in the right half of the front wall. The door will always open to the right.
If the roof is asymmetrical, ensure that the door will always open with no trouble by locating it under the
gable peak!
The ceiling battens attached to the door frame (under no circumstances to the wall boards) ensure a clean
transition from door frame to the wall boards.
When laying the roof boarding, care should be taken to ensure that the roof boards are not pressed tight into
each other. Subsequent swelling of the wood as a result of moisture occurring is unavoidable.
The roofing felt provided serves primarily as a temporary protection against the weather. We
recommend that you also apply a further layer of roof paper with bitumen cold bonding agent. (Not
included in the delivery!)
The window/door panes must be sealed all round with transparent silicone for windows immediately after
assembly and painting to ensure full resistance to driving rain.
The threaded rods of the wind safety device are only tightened by hand. Ensure that the helical springs