
Owner`s manual


Page of 14
7
1. Mount the left and right shield rods to the inside of the wheel guards using hex bolts.
2. Once shield rods are firmly in place, slide the shield bracket onto the shield rod.
3. Tighten the carriage bolt, leaving it loose enough to allow the safety shield to be raised and
lowered easily.
NOTE: The eye shield should move freely when being adjusted, but stay in place when the
locking knob is tightened.
WARNING! Turn the power off and remove the plug from the outlet before changing
the grinding wheels. When turning the grinder on with a newly installed wheel, DO NOT
STAND IN FRONT OF THE GRINDER. Stand to the side and allow the grinder to run for at
least one minute before proceeding to use it.
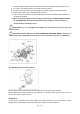
Installing or Changing the Wheel
1. Loosen the tool rest hex nuts and slide the tool rest away from the wheel.
2. Use a screwdriver to remove the wheel-cover screws and remove the wheel cover.
3. Fit an appropriately sized wrench on the spindle hex nut.
4. Loosen the wheel nut in a clockwise direction for the left side and a counter-clockwise
direction for the right side.
5. Remove the outer flange and grinding wheel. To remove the hex nut, turn the wrench and
nut until the wrench is resting on the workbench behind the tool.
6. Inspect the new wheel carefully to ensure there are no cracks, chips or other damage.