
Product Manual
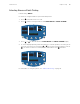


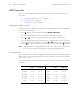
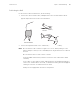
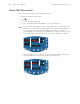
Table Of Contents
- Top
- General Information
- Setup
- Patient Monitoring
- Alarms and Alerts
- Reviewing Patient Data
- Operator Maintenance
- Reference
- Limited Warranty
- Index

32 Chapter 3 Patient Monitoring Welch Allyn Vital Signs Monitor 300 Series
NIBP Preparation
Before you start any NIBP measurement, always follow the steps described in these
procedures:
• “Changing the Target Pressure” on page 32
• “Selecting a Cuff” on page 32
• “Positioning the Cuff” on page 33
Changing the Target Pressure
Follow these steps to change the target pressure (default initial pressure for cuff inflation)
for the current patient type:
1. Press until the message window displays TARGET PRESSURE.
The SYS window displays the current setting for initial inflation pressure.
2. Press or to raise or lower the preset pressure value to the target level.
To set the displayed pressure level and return to normal operation, either do nothing
for 10 seconds or press any button other than or . If you press a function button
(such as ), the monitor returns to normal operation with that function ( ) activated.
Selecting a Cuff
You can tell whether the cuff size is appropriate by putting the cuff on the patient and then
inspecting the fit. If the edge marking lies somewhere between the two range markings,
then the fit is correct.
You can also find the correct cuff by measuring the circumference of the patient’s arm at
the biceps:
Note
Target pressure is a nominal starting point. If it is too low to take a measurement,
the monitor takes another measurement using a higher initial pressure.
Cuff Size Circumference
(inches)
Circumference
(centimeters)
Cuff Size Circumference
(inches)
Circumference
(centimeters)
Neonate #1 1.3 - 2.2 3.3 - 5.6 Small Child 4.9 - 6.6 12.4 - 16.8
Neonate #2 1.6 - 2.8 4.2 - 7.1 Child 6.2 - 8.4 15.8 - 21.3
Neonate #3 2.1 - 3.6 5.4 - 9.1 Small Adult 7.9 - 10.6 20.0 - 27.0
Neonate #4 2.4 - 4.6 6.9 - 11.7 Adult 10.0 - 13.5 25.3 - 34.4
Neonate #5 3.5 - 5.9 8.9 - 15.0 Large Adult 12.6 - 17.1 32.1 - 43.4
Infant 3.9 - 5.2 9.8 - 13.3 Thigh 16.0 - 21.7 40.7 - 55.0