SureTemp Thermometer Model 679 Operating Instruction Manual 0050
Thank you for purchasing the Welch Allyn Model 679 SureTemp® thermometer. The operating and maintenance instructions found in this manual should be followed to ensure years of accurate and reliable service. Please read these instructions thoroughly before using your 679 SureTemp® thermometer. Technical service manuals may be ordered by contacting Welch Allyn Customer Service at (800) 854-2904.
CONTENTS INTRODUCTION .................................................................. 2 SAFETY & WARNINGS ......................................................... 2 PARTS ................................................................................ 3 MOUNTING INSTRUCTIONS ................................................. 4 SETUP ............................................................................... 4 CHANGING PROBES ..................................................................
INTRODUCTION The Welch Allyn 679 SureTemp is a portable thermistor thermometer to be used for measuring patient temperatures ranging from 84°F to 108°F (28.9°C to 42.2°C). Oral/axillary and rectal probes utilize single-use disposable probe covers which limit cross-contamination. Oral, axillary and rectal temperatures can be taken using Normal or Monitor operating modes. Axillary temperatures taken using the Normal operating mode will display temperatures in about 10 seconds for patients 3 years and under.
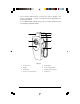
• Do not use the thermometer if you notice any signs of damage to the probe or instrument. Contact our Customer Service Department for immediate assistance. • Do not ETO sterilize without using proper procedures described in the 679 SureTemp technical manual. Figure 1 1. Probe cover box 5. 2. Display 6. Probe handle Probe storage channel 3. Mode button 7. Latching probe connector 4. Probe cover ejection button 8.
WALL MOUNTING INSTRUCTIONS The optional wall mount bracket should be mounted approximately 48 inches from the floor. This allows the end user of average height relatively easy access to the probe and probe covers. It should have at least 12 inches of clearance on the top of the unit so that the end user can easily remove the thermometer probe and load a probe cover without hindrance.
CHANGING PROBES • Depress the latch and unplug the probe connector from the thermometer. • Remove the probe from the storage channel. • Repeat steps 1 through 6 in the SETUP section. FEATURES • Normal Mode: The thermometer takes oral temperatures in about 4 seconds and rectal temperatures in about 15 seconds. Axillary temperatures taken using the Normal operating mode will display temperatures in about 10 seconds for patients under 4 years.
Mode Table DISPLAY INDICATORS Instrument Malfunction: This icon is displayed if the unit is not functioning properly. Contact the Welch Allyn Customer Service Department. Broken Probe: If displayed, probe may be damaged. Remove and reinstall probe. If error persists, then install a new probe. Probe Position: Probe has broken contact with the tissue. Once proper contact has been achieved, the icon will be turned off but will reappear at the end of the temperature measurement.
or Rectal Probe: This icon is displayed to show that the rectal mode has been selected. Walking Segments: This will be displayed when the thermometer is in process of taking a temperature in the Normal mode. Monitor Mode: Monitor mode is generally used for long term temperature monitoring, taking axillary temperatures, or when difficult situations prevent accurate temperatures from being taken in the Normal mode. High Temperature: This icon is displayed if the patient’s temperature is greater than 108.
OPERATION 1. Withdraw the probe from the storage channel and observe a thermometer display test followed by an audible tone and a display of the probe type OrL = Oral, ALy=Axillary, or rEC = Rectal. 2. Load a probe cover onto the probe. Hold probe handle collar with thumb and forefinger, being careful not to hold or press the “ejection” button. Press the collar down firmly to secure the cover.
3. During the temperature measurement cycle, “walking” segments will appear on the display indicating measurement is in process. 4. When the final temperature has been reached, a tone will sound and the patient’s temperature will be displayed. 5. After the temperature measurement is complete, remove the probe from the patient, then eject the probe cover by firmly pressing the ejection button on the probe. (Figure 1) 6.
TAKING AXILLARY TEMPERATURES (PATIENTS UNDER 4 YEARS) BLUE CAPPED PROBE Axillary temperature in children ages’ birth through three years can be taken with the SureTemp in the Axillary Mode, with an oral probe. 1. Withdraw the oral probe from its storage channel and observe a quick thermometer self-test on the display. 2. With OrL probe type displayed, depress and hold the Mode button for two seconds.
rate readings. 7. Place the arm snugly at the patient’s side. Hold the arm in this position without movement of the arm or probe during the measurement cycle. Movement of the arm or probe during this time will activate the probe position icon and may cause inaccurate readings. 9. An audible tone and display of a temperature reading indicates the final temperature has been reached. 10.
the storage channel to clear the display and reset the thermometer to Normal mode in preparation for another temperature. TAKING RECTAL TEMPERATURES - RED CAPPED PROBE 1. Exchange the oral probe (blue ejection button) for the rectal probe (red ejection button) by removing the probe from the storage channel, unplugging the probe connector from the thermometer, and repeating steps 1 through 6 in the SETUP section. 2. Attach a probe cover in the same manner as in the oral procedure.
maintenance. Refer to the 679 SureTemp Technical Service Manual for detailed information on security settings, sterilization, and calibration verification. Battery Replacement 1. With thumb and forefinger, firmly press-in on indentations located on the sides of the rear housing. This will release two snaps. 2. Remove the battery door. 3. Remove batteries by lifting the battery strap. IMPORTANT: After removing the old batteries press and hold the MODE button for 5 seconds before inserting the new batteries.
LIMITED WARRANTY 1-YEAR LIMITED WARRANTY ON NEW INSTRUMENTS: Instrumentation purchased new from Welch Allyn, Inc. (Welch Allyn) is warranted to be free from original defects in material and workmanship under normal use and service for a period of one year from the date of first shipment from Welch Allyn. This warranty shall be fulfilled by Welch Allyn or its authorized representative repairing or replacing at Welch Allyn's discretion, any such defect, free of charge for parts and labor.